Mini Creme Brulee Cheese Recipe Easy and Delicious Treat

WANT TO SAVE THIS RECIPE?

Looking for a dessert that is both easy to make and bursting with flavor? This Mini Crème Brûlée Cheese Recipe may be just what you need! With a creamy texture and a crunchy caramel top, it’s a treat that impresses every time. I’ll show you how to mix, bake, and caramelize like a pro, ensuring your mini desserts will dazzle friends and family. Let’s dive into this delicious journey together!

Ingredients

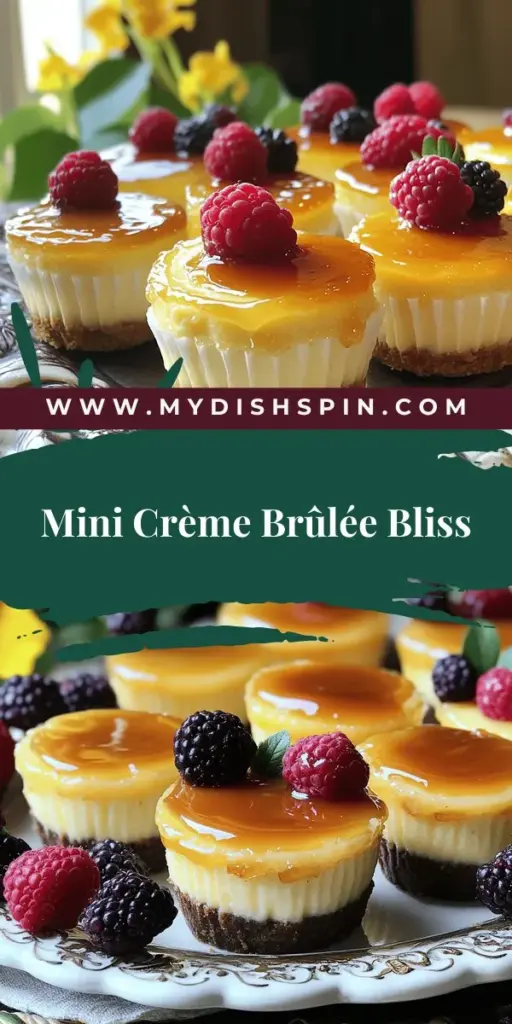
Ingredient List for Mini Crème Brûlée Cheese Recipe

Cream Cheese: This is the star of the dish. It gives our cheesecake its rich and creamy texture. Make sure it’s softened to mix easily with the sugar.

Granulated Sugar: This sugar sweetens the cheesecake filling. It blends well with the cream cheese, making it smooth and fluffy.

Brown Sugar: We use this sugar for the crunchy topping. It adds a deep flavor and helps create that beautiful caramel layer.

Heavy Cream: This ingredient brings richness. It makes our cheesecake light and airy.

Egg Yolks: They act as a binder. They give the cheesecake a nice, creamy structure.

Cornstarch: This helps stabilize the mixture. It ensures our mini cheesecakes hold their shape.

Lemon Juice: A little acidity brightens the flavor. It balances the sweetness of the cream and sugar.

Salt: This enhances all the flavors. Just a pinch makes a big difference.

Fresh Berries: These are optional but recommended. They add color and a fresh taste, making each bite even better.

Using these ingredients will help you create a delightful dessert. Check out the Full Recipe for more details on how to make this treat.

Step-by-Step Instructions

Prepping Your Ingredients

1. First, preheat your oven to 325°F (163°C). This step is vital.

2. Next, prepare your baking dish. Fill it with a shallow layer of hot water. This water bath helps cook the cheesecake gently and evenly.

3. In a mixing bowl, take 1 cup of softened cream cheese and 1/2 cup of granulated sugar. Beat them together until the mix is smooth and creamy. This creates a great base for our cheesecake.

Baking Process

1. After mixing, add 1 teaspoon of vanilla extract, 1/2 cup of heavy cream, 2 egg yolks, 1 tablespoon of cornstarch, 1 tablespoon of lemon juice, and 1/4 teaspoon of salt.

2. Mix everything well. You want a smooth and fluffy texture.

3. Now it’s time to fill the ramekins. Spoon the mixture into each ramekin, filling them about 3/4 full.

4. Carefully place the ramekins in the baking dish with hot water. Make sure the water reaches halfway up the sides. This helps keep the cheesecake from cracking.

5. Bake for about 25-30 minutes. The edges should be set, but the center can still jiggle slightly.

Caramelizing the Topping

1. Once baked, remove the ramekins from the water bath. Let them cool at room temperature before putting them in the fridge for at least 2 hours.

2. After chilling, sprinkle a thin layer of brown sugar on top of each cheesecake cup.

3. If you have a kitchen torch, you can caramelize the sugar. Hold the torch about 2 inches above the sugar. Move it in circles until the sugar bubbles and turns golden brown.

4. If you don’t have a torch, you can place the ramekins under a broiler for a few minutes. Keep an eye on them to avoid burning.

5. Allow the topping to cool for a minute. This makes it crunchy.

Now, you have a delightful treat that is easy to make and sure to impress! For the complete recipe, check the Full Recipe.

Tips & Tricks

Achieving the Perfect Texture

Mixing your ingredients until smooth is key for a great result. Any lumps can ruin your cheesecake. Use a handheld mixer or a whisk to blend well. This makes the texture creamy and light. After mixing, cooling is important. Let the ramekins cool at room temperature first. Then, chill them in the fridge for at least two hours. This helps the cheesecake set properly.

Common Mistakes to Avoid

Overbaking can lead to dry cheesecake. Watch the time closely. Bake until the edges are set, but the center should still jiggle a bit. This ensures a creamy texture. Cracks can be a big problem too. To prevent them, use a water bath. The steam helps keep the cheesecake moist. Also, do not open the oven door while baking. This can cause sudden temperature changes, leading to cracks.

- <strong>Cream Cheese</strong>: This is the star of the dish. It gives our cheesecake its rich and creamy texture. Make sure it’s softened to mix easily with the sugar.” /></p>
</p>
<h2>Variations</h2>
</p>
<h3>Flavor Additions</h3>
<p>You can make your mini crème brûlée cheese more fun by adding flavors. Try cocoa powder for a rich chocolate taste. Use about 1 to 2 tablespoons, depending on how strong you want it. You can also add citrus zest like lemon or orange for a fresh kick. Just a teaspoon of zest will brighten up your dish.</p>
</p>
<p>Adding extracts like almond or coconut can change the flavor too. Just a few drops will do the trick. Cinnamon or nutmeg can add warmth. Sprinkle in a pinch for a cozy touch. These flavors can really make this dessert your own!</p>
</p>
<h3>Alternative Serving Suggestions</h3>
<p>Serving your mini crème brûlée cheese with sauces can enhance the experience. A berry coulis made from pureed berries adds sweetness and tartness. Drizzle it on the plate before placing the cheese cups. This adds color and flavor.</p>
</p>
<p>You can also change how you present these treats. Instead of ramekins, try using small glasses or jars. This gives a fun twist to the look. Layering the cheese with fruit or crumbled cookies in the glass is a great idea too. This makes each bite exciting and adds texture.</p>
</p>
</p>
<h2>Storage Info</h2>
</p>
<h3>How to Store Leftovers</h3>
</p>
<p>To keep your mini crème brûlée cheese fresh, store it in the fridge. Place the ramekins in an airtight container. This helps prevent the tops from getting soggy. You can keep them in the fridge for up to three days. If you want to freeze them, let the cheesecakes cool completely first. Wrap each ramekin tightly in plastic wrap, then in foil. They can last in the freezer for up to a month. Just remember to label them for easy identification.</p>
</p>
<h3>Reheating Instructions</h3>
</p>
<p>If you want to enjoy your cheesecake warm, you can reheat it safely. Remove the ramekin from the fridge and let it sit at room temperature for about 15 minutes. Preheat your oven to 300°F (150°C). Place the ramekin on a baking sheet and warm it for about 10-15 minutes. Keep an eye on it to avoid overheating. You want it just warm, not hot. Enjoy the creamy texture and rich flavor of your cheesecake again!</p>
</p>
<h2>FAQs</h2>
</p>
<h3>Can I make Mini Crème Brûlée Cheese in advance?</h3>
<p>Yes, you can prepare Mini Crème Brûlée Cheese ahead of time. Make the cheesecake and chill it for at least two hours. This helps the flavors blend and the texture set nicely. You can store them in the fridge for up to three days. Just wait to caramelize the sugar until right before serving. This keeps the top crunchy and fresh.</p>
</p>
<h3>What can I use instead of a kitchen torch?</h3>
<p>If you don’t have a kitchen torch, you can use your oven’s broiler. Place the ramekins on a baking sheet. Sprinkle the brown sugar on top, then put them under the broiler. Watch closely, as this can burn quickly. You want the sugar to melt and turn golden brown. This gives you a nice brulee effect without a torch.</p>
</p>
<h3>Can I modify the ingredients for dietary needs?</h3>
<p>Absolutely! To make this recipe gluten-free, ensure your cornstarch is certified gluten-free. For a dairy-free option, use vegan cream cheese and a non-dairy heavy cream. You may have to adjust the sweetness because some dairy-free products can taste less sweet. Always check the labels for allergens. Enjoy this treat while meeting your dietary needs!</p>
</p>
<p>You now have a complete guide to making Mini Crème Brûlée Cheese. We discussed key ingredients, from cream cheese to sugars. The step-by-step instructions made baking clear and fun. Tips helped you avoid common mistakes and achieve the right texture. We also explored variations and storage options to keep your dessert fresh.</p>
</p>
<p>By following these steps, you can impress friends and family. Enjoy experimenting with flavors and presentation. Baking this treat should bring joy and creativity to your kitchen. Now it’s time for you to make the perfect Mini Crème Brûlée Cheese!</p>
</div>

- Cream Cheese: This is the star of the dish. It gives our cheesecake its rich and creamy texture. Make sure it’s softened to mix easily with the sugar.

Mini Creme Brulee Cheese Recipe

Indulge in this Mini Crème Brûlée Cheese Recipe that combines creamy goodness with a perfectly crunchy caramel topping. This easy and delicious dessert will wow your guests, and it's simple enough for any home chef. Learn to mix, bake, and caramelize your way to a stunning treat that’s perfect for any occasion. Click through to explore the full recipe and start impressing your family and friends today!

Ingredients
  

1 cup cream cheese, softened

1/2 cup granulated sugar

1 teaspoon vanilla extract

1/2 cup heavy cream

2 large egg yolks

1 tablespoon cornstarch

1 tablespoon lemon juice

1/4 teaspoon salt

1/4 cup brown sugar (for topping)

Fresh berries (optional, for garnish)

Instructions
 

Preheat your oven to 325°F (163°C) and prepare a baking dish with a shallow layer of water (for a water bath). This helps to gently cook the cheesecake.

    In a mixing bowl, beat the softened cream cheese with granulated sugar until smooth and creamy.

      Add the vanilla extract, heavy cream, egg yolks, cornstarch, lemon juice, and salt to the bowl. Mix until all ingredients are well incorporated and the mixture is smooth and fluffy.

        Spoon the mixture into mini ramekins or silicone muffin cups, filling them about 3/4 full.

          Carefully place the ramekins in the baking dish with hot water, ensuring the water reaches halfway up the sides of the ramekins. This prevents the cheesecake from cracking during baking.

            Bake in the preheated oven for approximately 25-30 minutes, or until the edges are set but the center still has a slight jiggle.

              Remove the ramekins from the water bath and allow them to cool to room temperature before refrigerating for at least 2 hours to fully set.

                Once chilled, sprinkle a thin layer of brown sugar evenly over each cheesecake cup.

                  Using a kitchen torch, gently caramelize the brown sugar until it bubbles and turns golden brown. Allow to cool for a minute to harden the top.

                    Optionally, garnish each mini crème brûlée cheesecake with fresh berries for an added touch of color and flavor.

                      Prep Time: 20 minutes | Total Time: 3 hours | Servings: 6

                        - Presentation Tips: Serve the mini cheesecake cups on a decorative platter, topped with a few fresh berries for a pop of color. Enjoy the combination of creamy cheese and crunchy caramel in each delightful bite!

                          WANT TO SAVE THIS RECIPE?

                          Leave a Comment

                          Recipe Rating