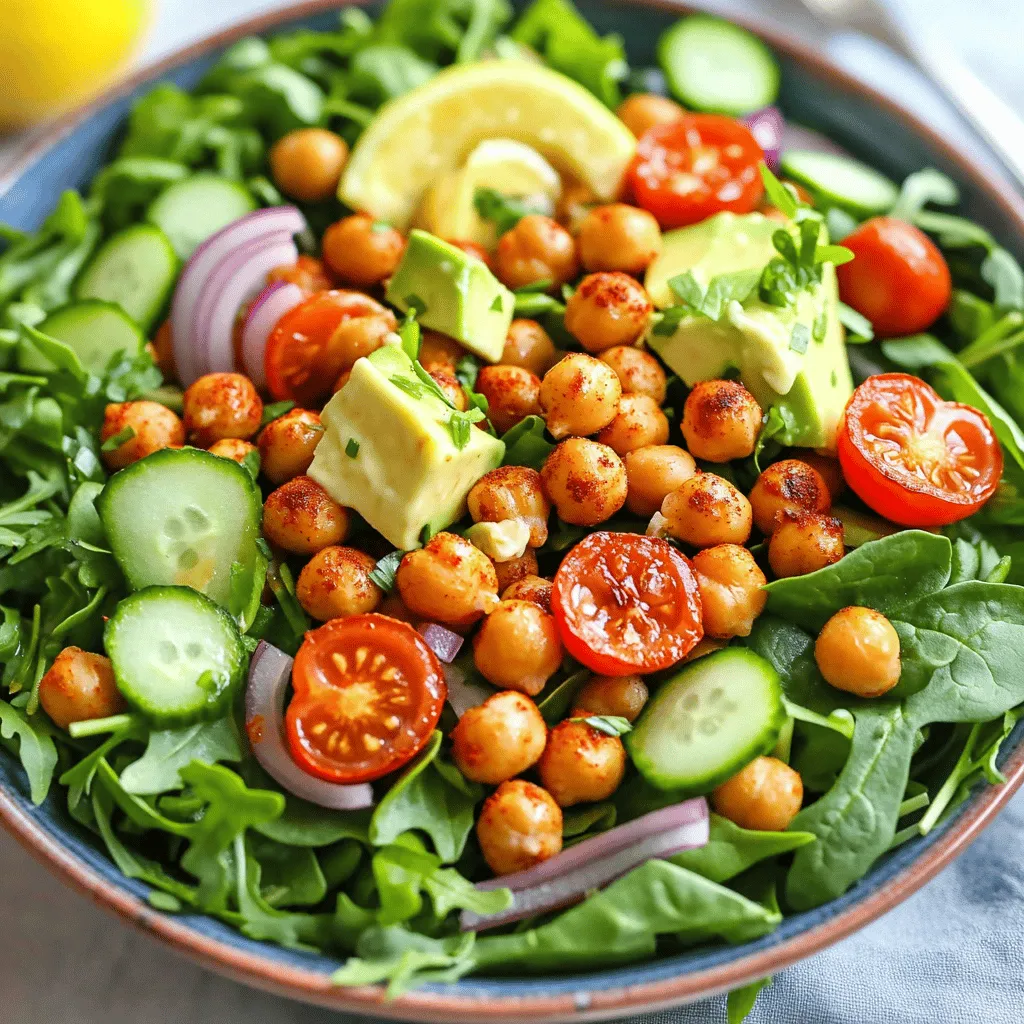
Looking for a tasty and healthy dish? This Crispy Chickpea Salad has you covered! It’s packed with flavor and crunch, making it perfect for lunch or dinner. I’ll guide you through each step, from picking the freshest ingredients to baking chickpeas for that perfect crispy finish. Whether you’re vegan, gluten-free, or just want a nutritious meal, this salad is for you. Let’s dive in and get cooking!
Ingredients
Key Ingredients for Crispy Chickpea Salad
The key ingredients for a crispy chickpea salad are simple yet vibrant. Here’s what you need:
– 1 can (15 oz) chickpeas, rinsed and drained
– 2 tablespoons olive oil
– 1 teaspoon smoked paprika
– 1 teaspoon garlic powder
– Salt and pepper, to taste
– 2 cups mixed greens (spinach, arugula, and romaine)
– 1/2 cup cherry tomatoes, halved
– 1/2 cucumber, diced
– 1/4 red onion, finely sliced
– 1 avocado, diced
– 2 tablespoons tahini
– 2 tablespoons lemon juice
– 1 tablespoon honey or agave syrup (optional)
– Fresh parsley, chopped (for garnish)
These ingredients work together to create a salad that bursts with flavors and textures. The chickpeas give a nice crunch, while the greens add freshness.
Importance of Freshness in Ingredients
Using fresh ingredients is crucial for a salad like this. Fresh greens keep the salad crisp and vibrant. The tomatoes and cucumber add juiciness and crunch. Fresh herbs, like parsley, enhance the taste and aroma. Always choose ripe avocados, as they add creaminess. Fresh ingredients make your dish not just tasty but also nutritious.
Optional Ingredients and Substitutions
Feel free to customize your salad. You can add ingredients like:
– Roasted bell peppers for sweetness
– Feta cheese for a salty kick
– Nuts or seeds for added crunch
– Quinoa or farro for more substance
If you have a nut allergy, you can skip nuts. For a dairy-free option, leave out cheese or use a vegan alternative.
For the dressing, if tahini is hard to find, you can use yogurt or a simple olive oil vinaigrette.
Step-by-Step Instructions
Prepping the Chickpeas
First, grab a can of chickpeas. Rinse and drain them well. This step helps remove extra salt and improves taste. Next, take a bowl and add the chickpeas. Pour in olive oil, smoked paprika, garlic powder, salt, and pepper. Toss it all together until the chickpeas are well coated. This mix gives them great flavor.
Baking for Optimal Crispiness
Now, preheat your oven to 400°F (200°C). Line a baking sheet with parchment paper. Spread the seasoned chickpeas on the sheet in a single layer. This helps them bake evenly. Bake for 25-30 minutes. Halfway through, give them a toss. This will ensure they get crispy all around. You want them golden brown and crunchy.
Assembling the Salad Components
While the chickpeas bake, prepare the salad. In a large bowl, mix the greens, cherry tomatoes, cucumber, red onion, and avocado. Toss them gently to combine. For the dressing, whisk tahini, lemon juice, and honey or agave in a small bowl. If it feels thick, add a bit of water until it’s smooth. Once the chickpeas are crispy, let them cool a little. Then, add them to the salad. Drizzle with the dressing and toss everything together. Finish with fresh parsley on top for a nice touch. Enjoy your delicious and healthy crispy chickpea salad!
Tips & Tricks
How to Achieve the Perfect Crisp
Start with dried chickpeas if you can. Soaking and cooking them will give a better crunch. If using canned chickpeas, rinse them well. Pat them dry with a towel. This step is key for crispiness. Toss them with olive oil and spices before baking. Spread them out in a single layer on the baking sheet. Bake at 400°F (200°C) for 25-30 minutes. Toss them halfway to get even crispness. Watch them closely near the end to avoid burning.
Best Practices for Dressing Application
Make your dressing while the chickpeas bake. This way, it’s fresh and ready. Mix tahini, lemon juice, and a pinch of salt in a bowl. If it’s too thick, add a little water to thin it out. Drizzle the dressing over the salad just before serving. This keeps the greens crisp. Toss gently to coat all ingredients without bruising them. Taste the salad before serving. Adjust the seasoning if needed.
Serving Suggestions for Maximum Flavor
Serve the salad in a large bowl to show off its color. Garnish with fresh parsley for a pop of green. You can add more toppings, like nuts or seeds, for crunch. This adds more flavor and texture. Pair this salad with a light protein like grilled chicken or fish. It makes for a balanced meal. Enjoy it as a side dish or a main course. The crispy chickpeas add a fun twist that everyone will love.

Variations
Vegetarian and Vegan Options
You can easily make this salad fit a vegetarian or vegan diet. The main ingredients are all plant-based. The crispy chickpeas add protein and crunch. You can swap honey for agave syrup to keep it vegan. This salad is tasty, fresh, and very filling.
Gluten-Free Modifications
Good news! This crispy chickpea salad is already gluten-free. All the ingredients are safe for those with gluten issues. Make sure to check any packaged items you use. This way, you can enjoy it without worry.
Adding Protein or Grains for a Heartier Meal
Want a heartier meal? Add some cooked quinoa or brown rice. These grains boost fiber and protein. You can also add grilled chicken or tofu for extra protein. This will keep you full longer. Mix and match to find your favorite combo.
Storage Info
How to Store Leftovers Properly
Store leftover crispy chickpea salad in an airtight container. Make sure the salad cools down first. This keeps it fresh and tasty for later. If you want to keep the chickpeas crispy, store them separately. Add them right before eating.
Best Containers for Storage and Reheating
I recommend glass or BPA-free plastic containers. These containers seal well and keep flavors in. When reheating, use a microwave-safe dish. For best results, reheat chickpeas in the oven to retain their crunch.
Shelf Life of Ingredients
The salad is best when fresh. However, you can store it in the fridge for up to three days. Chickpeas can last about a week if stored well. Mixed greens should be eaten within a couple of days. Diced veggies are also best within three days for maximum flavor.
FAQs
Can I use dried chickpeas instead of canned?
Yes, you can use dried chickpeas. First, soak them overnight. Then, cook them until soft. This takes more time but offers great flavor.
What other toppings can I add to my salad?
You can add many toppings. Try sliced bell peppers, shredded carrots, or radishes. Nuts like almonds or walnuts add crunch. Feta cheese or olives can add saltiness. Get creative with your favorites!
How do I make this salad in advance?
To make this salad early, prep the chickpeas and veggies separately. Store each in airtight containers. Combine them right before serving to keep everything fresh. This keeps the salad crisp and tasty.It has all the steps and tips you need to make this delicious dish. Enjoy cooking!
This blog post covered how to make a tasty crispy chickpea salad. We discussed key ingredients, their freshness, and optional swaps. Step-by-step, I shared how to prep, bake, and assemble your salad. You learned tips for a perfect crisp and great dressing. We explored variations for different diets and how to store leftovers properly.
To wrap up, enjoy making this salad your own. Fresh ingredients and smart prep make all the difference. Now, you’re ready to create a delicious dish everyone will love!