No-Bake Cheesecake Jars Simple Dessert Delight

WANT TO SAVE THIS RECIPE?

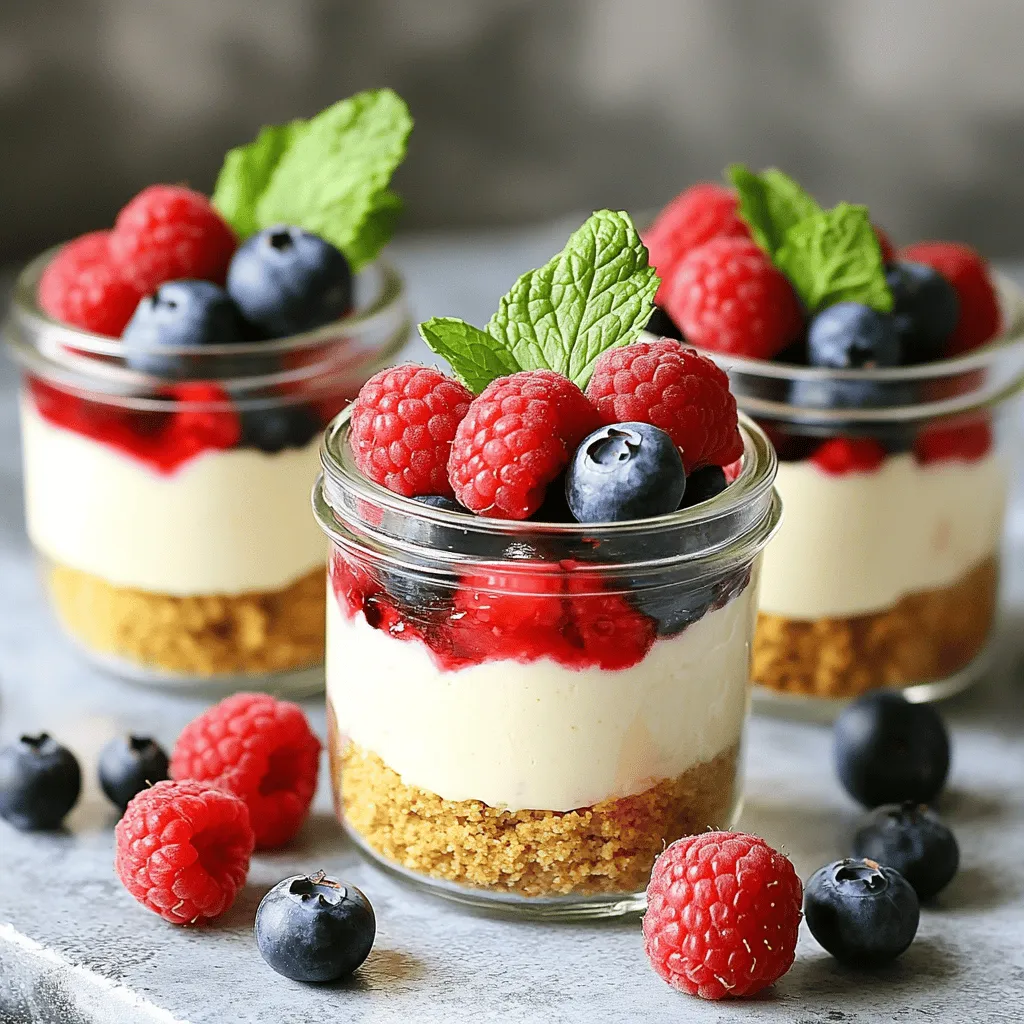
Are you ready to impress your friends with a fun and easy treat? No-bake cheesecake jars are a game-changer! They mix creamy cheese and crunchy crust together in a cute jar. You can customize these desserts to match your taste. Whether you like classic flavors or something unique, I’ve got you covered. Stick around to learn how to create these simple dessert delights that everyone will love!

Ingredients

Main Ingredients for No-Bake Cheesecake Jars

To make these tasty no-bake cheesecake jars, you need a few key items. Here’s what you will need:

– 8 oz cream cheese, softened

– 1 cup powdered sugar

– 1 teaspoon vanilla extract

– 1 cup heavy whipping cream

– 1 cup graham cracker crumbs

– 1/4 cup unsalted butter, melted

– 1 cup mixed berries (strawberries, blueberries, raspberries)

– Fresh mint leaves for garnish

These ingredients come together to create a creamy and delicious dessert that everyone will love.

Optional Ingredients for Flavor Variations

You can change the flavors of your cheesecake jars with some fun options. Here are a few ideas:

– Lemon juice and zest for a zesty twist

– Cocoa powder for a chocolate flavor

– Nutmeg or cinnamon for a warm touch

– Different fruits like peaches, mangoes, or cherries

Feel free to mix and match these flavors to suit your taste.

Tools and Equipment Needed

To prepare your no-bake cheesecake jars, gather the following tools:

– Mixing bowls

– Electric mixer or whisk

– Measuring cups and spoons

– Jars or cups for serving

– Spatula for folding

– Refrigerator for chilling

Having the right tools will make your cooking process easier and more fun! You can find the full recipe for no-bake cheesecake jars to guide you through each step.

Step-by-Step Instructions

Preparation of Cream Cheese Mixture

To start, grab a mixing bowl. Add 8 ounces of softened cream cheese. Then, add 1 cup of powdered sugar and 1 teaspoon of vanilla extract. Use an electric mixer to blend everything until it’s smooth and creamy. This is the base of your cheesecake. The cream cheese gives it a rich flavor.

How to Prepare the Graham Cracker Base

In another bowl, mix 1 cup of graham cracker crumbs with 1/4 cup of melted unsalted butter. Stir until the crumbs are well coated. This mixture will form a crunchy base for your cheesecake. It adds texture and a nice crunch to each bite.

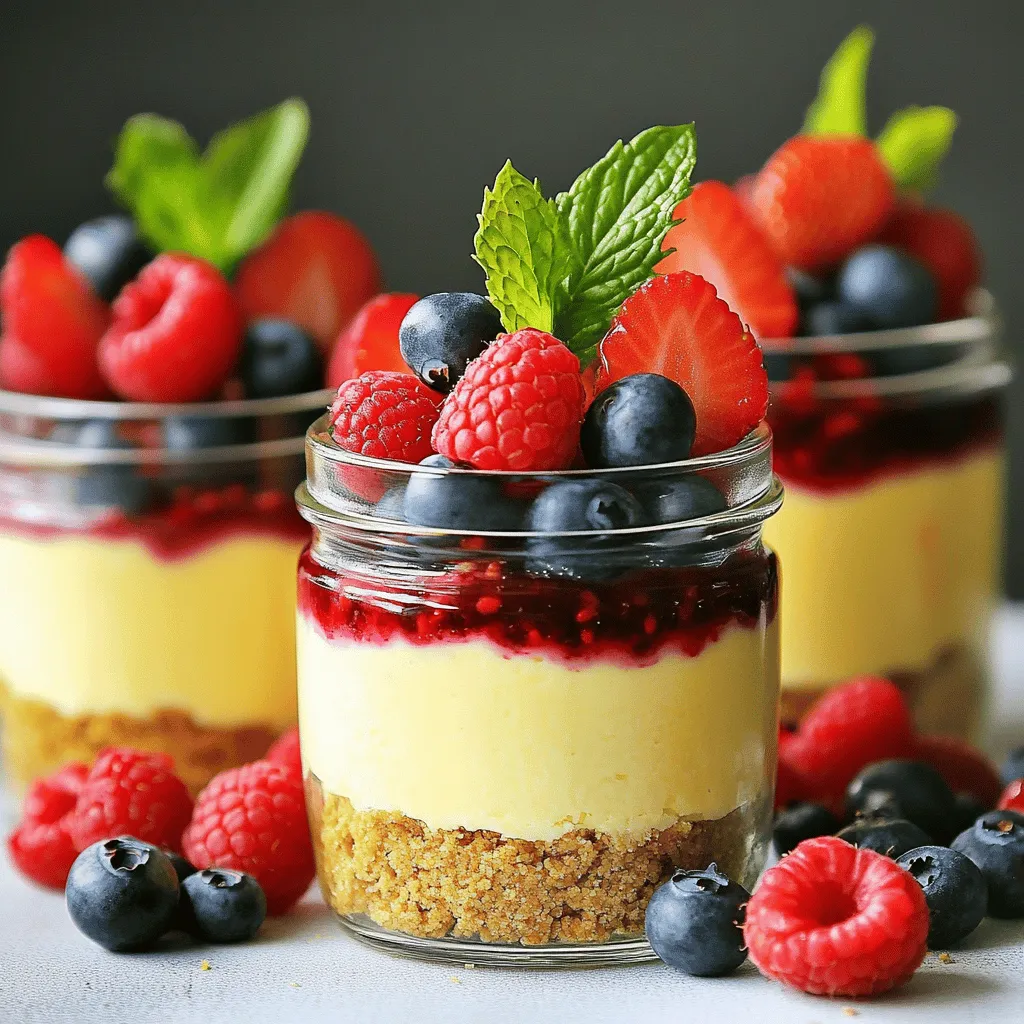
Layering the Cheesecake Jars

Now, it’s time to layer your jars. Start with a spoonful of the graham cracker base at the bottom of each jar. Press it down gently. Next, add a layer of the cream cheese mixture on top. Use a spoon to smooth it out. Then, add a layer of mixed berries. You can use strawberries, blueberries, or raspberries. Repeat the layers until the jars are full. Finish with a layer of cream cheese on top.

Chilling and Setting the Cheesecake

Place your layered jars in the refrigerator. Chill them for at least 4 hours. This helps the cheesecake set properly. The longer they chill, the better the flavors blend. Before serving, garnish each jar with fresh mint leaves and a few extra berries. Enjoy your delightful no-bake cheesecake jars! For the full recipe, check out the instructions above.

Tips & Tricks

How to Achieve the Perfect Creamy Texture

To get that creamy texture, start with softened cream cheese. Cold cream cheese makes mixing hard. Use an electric mixer to blend it well with powdered sugar and vanilla extract. This step ensures a smooth base. Next, whip the heavy cream until it forms stiff peaks. Fold this whipped cream gently into the cream cheese mixture. This keeps air in the mix and adds lightness.

Common Mistakes to Avoid

One common mistake is overmixing the cream cheese. This can make your cheesecake too dense. Another mistake is not letting the jars chill long enough. They need at least four hours in the fridge. This time helps the flavors blend and the texture set. Also, be careful when folding in the whipped cream. If you stir too hard, you might lose that nice fluffy texture.

Best Serving Techniques

When serving, use clear jars so everyone can see those lovely layers. Add fresh mint leaves and extra berries on top for a pop of color. If you want, you can drizzle some honey or chocolate sauce over the top for extra sweetness. Serve these jars cold for a refreshing treat. You can find the full recipe to make these delightful jars and enjoy a simple dessert delight.

Variations

Different Flavor Profiles (Chocolate, Lemon, etc.)

You can easily change the flavor of your no-bake cheesecake jars. For a chocolate twist, add cocoa powder to the cream cheese mix. Use about 1/4 cup for a rich taste. For a lemon flavor, mix in lemon juice and zest. Start with 2 tablespoons of juice and 1 tablespoon of zest. Taste and adjust to your liking. You can also try flavors like peanut butter or matcha for fun surprises.

Alternatives for Dietary Needs (Gluten-Free, Vegan, etc.)

To make these jars gluten-free, use gluten-free graham crackers. You can also swap the butter for coconut oil or a dairy-free substitute. For a vegan version, replace cream cheese with dairy-free cream cheese. Use coconut cream instead of heavy cream. Sweeten with maple syrup or agave nectar. These swaps keep the dessert delicious while catering to different diets.

Creative Toppings and Decorations

Toppings can make your cheesecake jars really special. Fresh fruit is a great choice. Use berries, sliced bananas, or mango chunks. You can also sprinkle crushed nuts for a nice crunch. For extra sweetness, drizzle chocolate or caramel sauce on top. Whipped cream adds a nice touch too. Use a piping bag for a fancy look. You can even add edible flowers for a beautiful finish.

These variations let you enjoy no-bake cheesecake jars in many ways. You can find the Full Recipe [here].

Storage Info

How to Store No-Bake Cheesecake Jars

To keep your no-bake cheesecake jars fresh, store them in the fridge. Use an airtight container or cover each jar with plastic wrap. This will prevent odors from other foods from affecting your dessert. Make sure to keep the jars upright to avoid any spills.

Shelf Life and Freezing Options

These cheesecake jars can last for up to five days in the fridge. If you want to keep them longer, you can freeze them. Just remember to leave out any fresh toppings like berries or mint before freezing. Wrap each jar tightly with plastic wrap and then foil to protect against freezer burn. They can last for up to three months in the freezer.

Reheating and Serving After Storage

No need to reheat these jars! They taste best cold. If you’ve frozen them, let them thaw in the fridge overnight. Before serving, add fresh berries and mint leaves on top for a nice touch. Enjoy your delicious, easy dessert! For the full recipe, check out the details above.

FAQs

Can I use low-fat cream cheese for the recipe?

Yes, you can use low-fat cream cheese. It will change the texture slightly. Your cheesecake may be less rich, but it will still taste good. This option can help cut calories if that’s a concern for you.

How long do the cheesecake jars last in the fridge?

The cheesecake jars last about 3 to 5 days in the fridge. Make sure to cover them well. The longer they sit, the softer the layers may become. Still, they taste great for a few days.

Is it possible to make these jars in advance?

Yes, you can make these jars ahead of time. They are perfect for parties or family gatherings. Just prepare them a day or two before. This way, you save time and stress on the day of your event.

Can I substitute other fruits besides berries?

Absolutely! You can use other fruits like diced mango or peaches. You might also try bananas or even chocolate chips for a fun twist. Just make sure the fruit is fresh and ripe for the best flavor.

No-bake cheesecake jars are easy and fun to make. You learned about the key ingredients, tools needed, and how to layer them for tasty results. I shared tips to get the texture right and avoid mistakes. You can also explore different flavors and dietary options. Remember, storing your jars properly extends their life.

Enjoy making these treats. They’re perfect for any occasion and sure to impress.

To make these tasty no-bake cheesecake jars, you need a few key items. Here’s what you will need: - 8 oz cream cheese, softened - 1 cup powdered sugar - 1 teaspoon vanilla extract - 1 cup heavy whipping cream - 1 cup graham cracker crumbs - 1/4 cup unsalted butter, melted - 1 cup mixed berries (strawberries, blueberries, raspberries) - Fresh mint leaves for garnish These ingredients come together to create a creamy and delicious dessert that everyone will love. You can change the flavors of your cheesecake jars with some fun options. Here are a few ideas: - Lemon juice and zest for a zesty twist - Cocoa powder for a chocolate flavor - Nutmeg or cinnamon for a warm touch - Different fruits like peaches, mangoes, or cherries Feel free to mix and match these flavors to suit your taste. To prepare your no-bake cheesecake jars, gather the following tools: - Mixing bowls - Electric mixer or whisk - Measuring cups and spoons - Jars or cups for serving - Spatula for folding - Refrigerator for chilling Having the right tools will make your cooking process easier and more fun! You can find the full recipe for no-bake cheesecake jars to guide you through each step. To start, grab a mixing bowl. Add 8 ounces of softened cream cheese. Then, add 1 cup of powdered sugar and 1 teaspoon of vanilla extract. Use an electric mixer to blend everything until it's smooth and creamy. This is the base of your cheesecake. The cream cheese gives it a rich flavor. In another bowl, mix 1 cup of graham cracker crumbs with 1/4 cup of melted unsalted butter. Stir until the crumbs are well coated. This mixture will form a crunchy base for your cheesecake. It adds texture and a nice crunch to each bite. Now, it’s time to layer your jars. Start with a spoonful of the graham cracker base at the bottom of each jar. Press it down gently. Next, add a layer of the cream cheese mixture on top. Use a spoon to smooth it out. Then, add a layer of mixed berries. You can use strawberries, blueberries, or raspberries. Repeat the layers until the jars are full. Finish with a layer of cream cheese on top. Place your layered jars in the refrigerator. Chill them for at least 4 hours. This helps the cheesecake set properly. The longer they chill, the better the flavors blend. Before serving, garnish each jar with fresh mint leaves and a few extra berries. Enjoy your delightful no-bake cheesecake jars! For the full recipe, check out the instructions above. To get that creamy texture, start with softened cream cheese. Cold cream cheese makes mixing hard. Use an electric mixer to blend it well with powdered sugar and vanilla extract. This step ensures a smooth base. Next, whip the heavy cream until it forms stiff peaks. Fold this whipped cream gently into the cream cheese mixture. This keeps air in the mix and adds lightness. One common mistake is overmixing the cream cheese. This can make your cheesecake too dense. Another mistake is not letting the jars chill long enough. They need at least four hours in the fridge. This time helps the flavors blend and the texture set. Also, be careful when folding in the whipped cream. If you stir too hard, you might lose that nice fluffy texture. When serving, use clear jars so everyone can see those lovely layers. Add fresh mint leaves and extra berries on top for a pop of color. If you want, you can drizzle some honey or chocolate sauce over the top for extra sweetness. Serve these jars cold for a refreshing treat. You can find the full recipe to make these delightful jars and enjoy a simple dessert delight. {{image_2}} You can easily change the flavor of your no-bake cheesecake jars. For a chocolate twist, add cocoa powder to the cream cheese mix. Use about 1/4 cup for a rich taste. For a lemon flavor, mix in lemon juice and zest. Start with 2 tablespoons of juice and 1 tablespoon of zest. Taste and adjust to your liking. You can also try flavors like peanut butter or matcha for fun surprises. To make these jars gluten-free, use gluten-free graham crackers. You can also swap the butter for coconut oil or a dairy-free substitute. For a vegan version, replace cream cheese with dairy-free cream cheese. Use coconut cream instead of heavy cream. Sweeten with maple syrup or agave nectar. These swaps keep the dessert delicious while catering to different diets. Toppings can make your cheesecake jars really special. Fresh fruit is a great choice. Use berries, sliced bananas, or mango chunks. You can also sprinkle crushed nuts for a nice crunch. For extra sweetness, drizzle chocolate or caramel sauce on top. Whipped cream adds a nice touch too. Use a piping bag for a fancy look. You can even add edible flowers for a beautiful finish. These variations let you enjoy no-bake cheesecake jars in many ways. You can find the Full Recipe [here]. To keep your no-bake cheesecake jars fresh, store them in the fridge. Use an airtight container or cover each jar with plastic wrap. This will prevent odors from other foods from affecting your dessert. Make sure to keep the jars upright to avoid any spills. These cheesecake jars can last for up to five days in the fridge. If you want to keep them longer, you can freeze them. Just remember to leave out any fresh toppings like berries or mint before freezing. Wrap each jar tightly with plastic wrap and then foil to protect against freezer burn. They can last for up to three months in the freezer. No need to reheat these jars! They taste best cold. If you’ve frozen them, let them thaw in the fridge overnight. Before serving, add fresh berries and mint leaves on top for a nice touch. Enjoy your delicious, easy dessert! For the full recipe, check out the details above. Yes, you can use low-fat cream cheese. It will change the texture slightly. Your cheesecake may be less rich, but it will still taste good. This option can help cut calories if that’s a concern for you. The cheesecake jars last about 3 to 5 days in the fridge. Make sure to cover them well. The longer they sit, the softer the layers may become. Still, they taste great for a few days. Yes, you can make these jars ahead of time. They are perfect for parties or family gatherings. Just prepare them a day or two before. This way, you save time and stress on the day of your event. Absolutely! You can use other fruits like diced mango or peaches. You might also try bananas or even chocolate chips for a fun twist. Just make sure the fruit is fresh and ripe for the best flavor. No-bake cheesecake jars are easy and fun to make. You learned about the key ingredients, tools needed, and how to layer them for tasty results. I shared tips to get the texture right and avoid mistakes. You can also explore different flavors and dietary options. Remember, storing your jars properly extends their life. Enjoy making these treats. They’re perfect for any occasion and sure to impress.

- No-Bake Cheesecake Jars

Get ready to wow your guests with delightful no-bake cheesecake jars! These simple dessert delights combine creamy cheese with a crunchy graham cracker base, all layered beautifully in individual jars. Customize them with your favorite flavors like chocolate or lemon, and add fresh fruits for a touch of color. Perfect for any gathering, these easy desserts can be made ahead of time. Click through to explore the full recipe and impress everyone with this luscious treat!

Ingredients
  

8 oz cream cheese, softened

1 cup powdered sugar

1 teaspoon vanilla extract

1 cup heavy whipping cream

1 cup graham cracker crumbs

1/4 cup unsalted butter, melted

1 cup mixed berries (strawberries, blueberries, raspberries)

Fresh mint leaves for garnish

Instructions
 

In a mixing bowl, combine the softened cream cheese, powdered sugar, and vanilla extract. Use an electric mixer to blend until smooth and creamy.

    In a separate bowl, whip the heavy cream until stiff peaks form. Gently fold the whipped cream into the cream cheese mixture until fully combined, being careful not to deflate the whipped cream.

      In another bowl, mix the graham cracker crumbs and melted butter until the crumbs are evenly coated.

        Begin layering your cheesecake jars: Start with a layer of the graham cracker mixture at the bottom of each jar, pressing it down gently to form a base.

          Add a layer of the cream cheese mixture on top of the graham cracker layer, smoothing it out with a spoon.

            Follow this with a layer of mixed berries. Repeat the layers (graham cracker, cream cheese, mixed berries) until the jars are filled, finishing with a layer of the cream cheese mixture on top.

              Chill the jars in the refrigerator for at least 4 hours to set.

                Before serving, garnish each jar with fresh mint leaves and a few extra berries on top.

                  Prep Time: 20 minutes | Total Time: 4 hours 20 minutes | Servings: 4-6 jars

                    WANT TO SAVE THIS RECIPE?

                    Leave a Comment

                    Recipe Rating