WANT TO SAVE THIS RECIPE?
Looking for a sweet treat that’s simple and delicious? Chocolate Covered Banana Pops are the perfect solution! You only need a few ingredients, and they’re fun to make. Whether you’re planning a snack for the kids or a dessert for a party, you cannot go wrong with these pops. Let’s dive into this easy recipe and discover how to create these tasty treats that everyone will love!
Why I Love This Recipe
- Simple Ingredients: This recipe requires just a few common ingredients that you probably already have at home, making it easy to whip up on a whim.
- Healthy Twist: Made with bananas, this treat offers natural sweetness and nutrition, making it a guilt-free dessert option.
- Customizable: You can easily customize the toppings with your favorite nuts or sprinkles, allowing for endless variations.
- Fun for Everyone: These banana pops are a hit with both kids and adults, making them a perfect treat for parties or family gatherings.
Ingredients
List of Ingredients
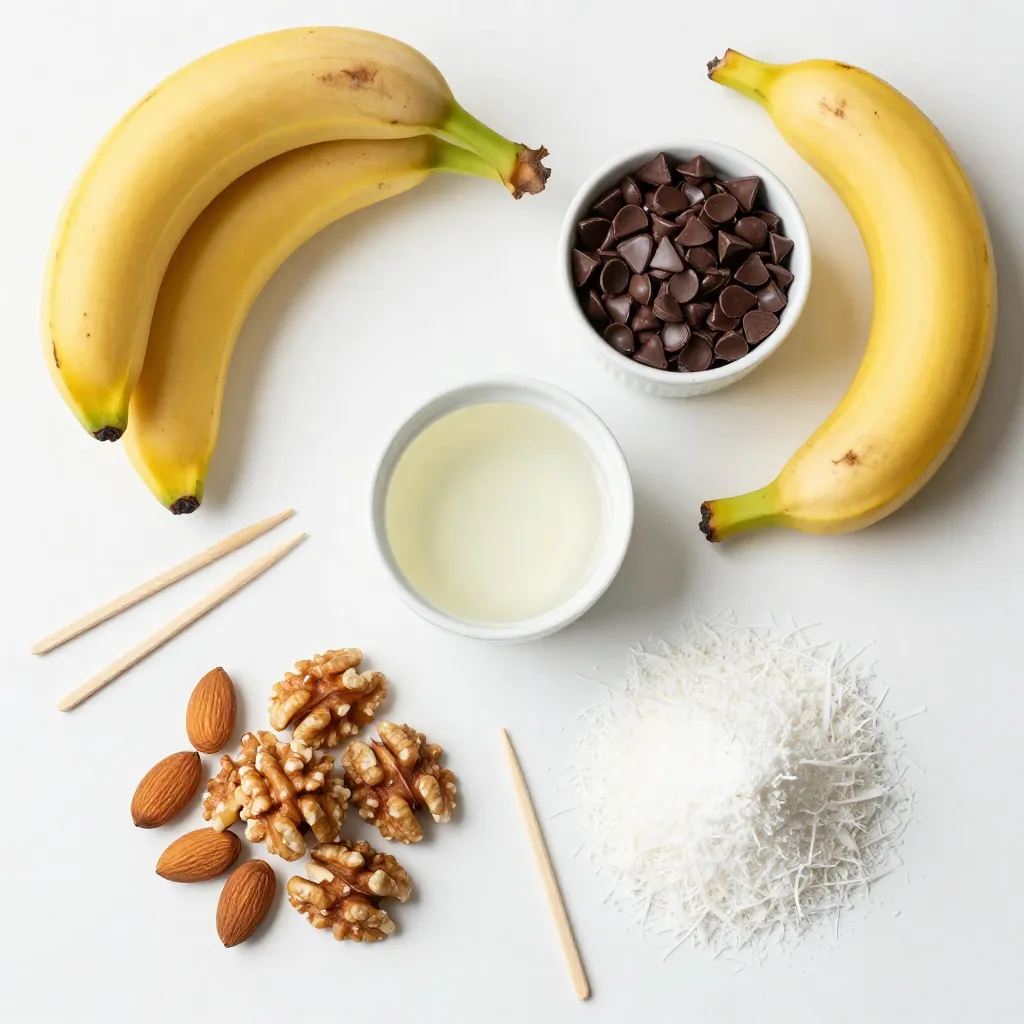
– 2 ripe bananas
– 1 cup semi-sweet chocolate chips
– 1 tablespoon coconut oil
– 1/2 cup crushed nuts (e.g., almonds, walnuts, or pecans)
– 1/4 cup shredded coconut (unsweetened)
– Popsicle sticks
Best Ingredients for Optimal Taste
Using ripe bananas makes a big difference. They are sweet and creamy. Semi-sweet chocolate chips melt well and balance the flavor. I like to add coconut oil. It helps the chocolate coat smoothly. For toppings, crushed nuts add crunch. Unsweetened shredded coconut brings a tropical twist. Each topping adds its special flavor.
Tips for Selecting Ripe Bananas
Pick bananas that are yellow with a few brown spots. This shows they are ripe and sweet. Avoid green bananas; they are not sweet yet. If you want to use them later, buy them a bit green. Let them ripen at room temperature. When they reach the right color, you can start making your banana pops!

Step-by-Step Instructions
Preparation of Banana Pops
Start by peeling the bananas. Select ripe bananas for the best flavor. Cut each banana in half. Insert a popsicle stick into the cut end of each banana half. This step creates your banana pops. Place these banana pops on a baking sheet lined with parchment paper. Make sure they have some space between them. Freeze the banana pops for about one hour. This will help them become firm and easier to dip.
Melting the Chocolate Combination
Next, you need to melt the chocolate. In a microwave-safe bowl, add the chocolate chips and coconut oil. The coconut oil helps the chocolate become smooth. Microwave the bowl in 30-second intervals. Stir between each interval until the mixture is smooth and fully melted. This should take about one to two minutes. Be careful not to overheat the chocolate, as it can burn.
Coating Techniques and Freezing Instructions
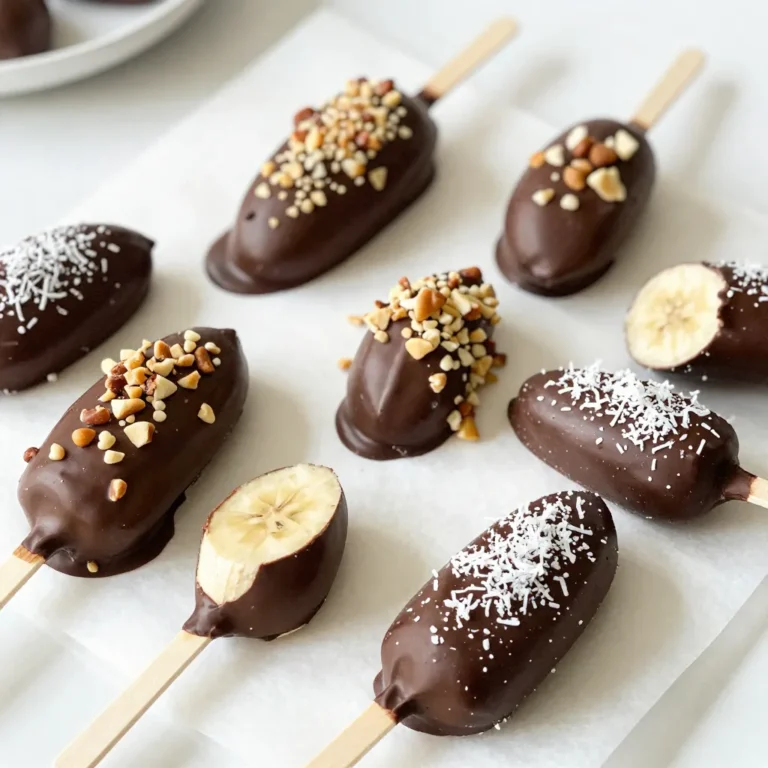
Once the chocolate is ready, take the banana pops from the freezer. Dip each banana pop into the melted chocolate. Make sure to coat each pop fully. After coating, roll the chocolate-covered bananas in crushed nuts or shredded coconut. This adds great texture and flavor. Place the coated banana pops back on the lined baking sheet. Repeat this process for all banana pops. Finally, put the tray back into the freezer for another 30 minutes. This sets the chocolate. Enjoy your tasty treat!
Tips & Tricks
How to Achieve Smooth Chocolate Coating
To get a smooth chocolate coating, use semi-sweet chocolate chips mixed with coconut oil. The oil helps the chocolate melt better. Microwave the mixture in short bursts. Stir between each burst until it’s fully melted. This process keeps the chocolate from burning and helps it stay smooth.
Best Freezing Techniques
Freezing is key for a great treat. After you coat your banana pops, place them back on the parchment-lined baking sheet. Make sure they are spaced apart. This will help them freeze evenly. I like to freeze them for at least 30 minutes. This gives the chocolate time to set and makes them easy to eat.
Suggestions for Making Ahead of Time
You can make these banana pops ahead of time. Just freeze them for up to a month. Wrap each pop in plastic wrap or store them in an airtight container. When you’re ready to serve, let them sit at room temperature for a few minutes. This makes them easier to bite into without the chocolate breaking. Enjoy your tasty treat anytime!
Pro Tips
- Choose the Right Bananas: Make sure your bananas are ripe but not overripe; they should be slightly soft to the touch for the best flavor and texture.
- Use Quality Chocolate: Opt for high-quality semi-sweet chocolate chips for a richer taste. You can also experiment with dark or milk chocolate for different flavors.
- Chill Your Coating: After dipping the banana pops in chocolate, work quickly to coat them with nuts or coconut before the chocolate starts to set.
- Storage Tips: Store leftover banana pops in an airtight container in the freezer to maintain their texture and prevent freezer burn.
Variations
Different Chocolate Options (Dark, Milk, White)
You can change up your chocolate for these pops. Each type gives a new taste. Dark chocolate offers a rich, bittersweet flavor. Milk chocolate is creamy and sweet, perfect for kids. White chocolate adds a sweet and smooth touch. You can try any of these. The choice is yours!
Alternative Toppings and Coatings
The fun doesn’t stop with chocolate. You can coat your banana pops in many ways. Crushed nuts like almonds, walnuts, or pecans add crunch. Shredded coconut brings a tropical vibe. You could even use sprinkles for a pop of color. Try crushed cookies for a fun twist. Get creative with your toppings!
Vegan and Dairy-Free Adjustments
If you want a vegan option, swap regular chocolate for dairy-free chocolate chips. Use coconut oil as before. This keeps everything rich and smooth. You can also skip the nuts if you have allergies. Enjoy these tasty treats while sticking to your diet!
Storage Info
How to Store Chocolate Covered Banana Pops
To store chocolate covered banana pops, first, let them freeze completely. Once frozen, wrap each pop in plastic wrap. This keeps them fresh and prevents freezer burn. You can also place them in a sealed container. Just make sure to leave space between each pop to avoid sticking.
Best Practices for Freezing
When freezing your banana pops, use parchment paper on the tray. This helps to avoid sticking. Freeze them for at least 30 minutes after coating. This time allows the chocolate to set well. If you want to store them long-term, consider using a vacuum sealer. This removes air and maintains freshness.
Shelf Life and Quality Tips
Chocolate covered banana pops can last about two months in the freezer. However, for the best taste, enjoy them within a month. Over time, the bananas may lose some texture. If you notice ice crystals, they might not taste as good. Always check for any off smells before eating.
FAQs
Can I use other fruits?
Yes, you can use other fruits! Strawberries, apples, and pineapple work well too. Just cut them into pieces, like the bananas. Make sure the fruits are firm so they hold their shape when dipped in chocolate. Frozen fruits, like berries, can also add a fun twist. Each fruit gives a different taste and texture, making your treats unique!
What type of chocolate works best?
Semi-sweet chocolate chips are my go-to choice. They melt well and have the right balance of sweetness. You can also try dark chocolate for a richer flavor or milk chocolate for a sweeter taste. If you want to be adventurous, try white chocolate! Just remember to adjust the sweetness of your toppings if you switch up the chocolate.
How do I make them healthier?
To make these banana pops healthier, consider a few changes! Use dark chocolate for less sugar. You can also skip the nuts or coconut if you prefer a lighter treat. Instead, roll them in crushed oats or seeds for extra fiber. If you’re feeling creative, drizzle some yogurt on top instead of chocolate for a fresh twist.
In this post, we explored making delicious chocolate-covered banana pops. We discussed the best ingredients, like ripe bananas and quality chocolate. I shared helpful tips for preparation, freezing, and achieving a smooth coat. We also looked at tasty variations and storage methods to keep your treats fresh.
Remember, you can mix up the chocolate or try different toppings. With these simple steps, you can enjoy this sweet treat anytime. Happy experimenting with your banana pop
Chocolate Covered Banana Pops
Delicious frozen banana pops coated in chocolate and rolled in nuts or coconut.
Prep Time 15 minutes mins
Cook Time 30 minutes mins
Total Time 1 hour hr 45 minutes mins
Course Dessert
Cuisine American
Servings 4
Calories 150 kcal
- 2 whole ripe bananas
- 1 cup semi-sweet chocolate chips
- 1 tablespoon coconut oil
- 1/2 cup crushed nuts (e.g., almonds, walnuts, or pecans)
- 1/4 cup shredded coconut (unsweetened)
- as needed pieces popsicle sticks
Start by peeling the bananas and cutting them in half. Insert a popsicle stick into the cut end of each banana half, creating a banana pop.
Place the prepared banana pops on a parchment-lined baking sheet and freeze for about 1 hour until they are firm.
In a microwave-safe bowl, combine the chocolate chips and coconut oil. Microwave in 30-second intervals, stirring in between, until the mixture is smooth and fully melted.
Once the banana pops are firm, remove them from the freezer. Dip each banana pop into the melted chocolate, ensuring it's completely covered.
Immediately roll the chocolate-covered bananas in crushed nuts or shredded coconut for added texture and flavor.
Place the coated banana pops back on the parchment-lined baking sheet. Repeat until all banana pops are covered.
Put the tray back in the freezer for another 30 minutes to set the chocolate.
Serve the banana pops frozen, or let them thaw for a couple of minutes for easier biting. Enjoy your delicious treat!
Feel free to customize the toppings with your favorite nuts or sprinkles.
Keyword banana, chocolate, dessert, frozen treat
WANT TO SAVE THIS RECIPE?