
If you’re looking for a dessert that impresses without the stress, you’ve landed in the right place! My Heavenly Cream Puffs Recipe is not just simple to make, but also deliciously satisfying. With just a few ingredients and some easy steps, you can whip up these light and fluffy treats that wow friends and family. Ready to take your baking skills to the next level? Let’s dive into this heavenly goodness!
Ingredients
List of Ingredients
To make heavenly cream puffs, gather these ingredients:
– 1 cup water
– 1/2 cup unsalted butter
– 1 cup all-purpose flour
– 1/4 teaspoon salt
– 4 large eggs
– 1 cup heavy cream
– 1/3 cup powdered sugar
– 1 teaspoon vanilla extract
– Optional: chocolate sauce or caramel drizzle for topping
Measurements and Substitutions
Each ingredient plays a key role. For a dairy-free option, use coconut butter instead of unsalted butter. You can swap heavy cream for a non-dairy whipped topping if needed. If you want a gluten-free version, choose a gluten-free flour blend. Just remember that the texture may change slightly.
Recommended Brands
I often trust these brands for my cream puffs:
– Butter: Kerrygold Unsalted Butter
– Flour: King Arthur All-Purpose Flour
– Cream: Organic Valley Heavy Whipping Cream
– Sugar: Domino Powdered Sugar
Using quality ingredients ensures that your cream puffs taste amazing. Check your pantry and grab these items before you start.
Feel free to experiment with brands you love!
Step-by-Step Instructions
Preparing the Oven and Baking Sheet
Start by preheating your oven to 400°F (200°C). This temperature helps the cream puffs rise nicely. Line a baking sheet with parchment paper. This will prevent sticking and make cleanup easy.
Making the Choux Pastry
In a medium saucepan, add 1 cup of water and 1/2 cup of unsalted butter. Heat this mixture over medium heat until the butter fully melts. Stir it gently, and keep an eye on it. Once it starts to boil, you are ready for the next step.
Incorporating Eggs and Creating the Dough
Remove the pan from heat after boiling. Now, add 1 cup of all-purpose flour and 1/4 teaspoon of salt all at once. Stir quickly with a wooden spoon until it forms a ball. It should pull away from the sides of the pan in about 1-2 minutes. Let it cool for a bit, then add 4 large eggs one at a time. Mix well after each egg until the dough is smooth and glossy.
Piping and Baking the Cream Puffs
Next, transfer your dough to a piping bag fitted with a large round tip. Pipe small mounds onto the prepared baking sheet, spacing them about 1 inch apart. You can shape them however you like, but keep them uniform for even baking. Bake for 20-25 minutes. Do not open the oven door while they bake; this can cause them to deflate.
Cooling and Preparing the Filling
Once they are golden brown and puffed up, turn off the oven. Leave the puffs inside for another 10-15 minutes to dry out. This step helps them hold their shape. After that, move them to a wire rack to cool completely. In a large bowl, whip 1 cup of heavy cream, 1/3 cup of powdered sugar, and 1 teaspoon of vanilla extract until soft peaks form. Once the puffs are cool, make a small hole in the bottom of each one. Use a piping bag to fill each puff with the whipped cream. Enjoy your heavenly cream puffs!
Tips & Tricks
Tips for Perfect Puffs
To make perfect cream puffs, follow these tips:
– Use Fresh Ingredients: Fresh eggs and butter give the best rise and flavor.
– Don’t Open the Oven: This keeps the heat inside. Opening can deflate your puffs.
– Pipe Evenly: Keep the size consistent for even baking. Aim for 1-inch mounds.
– Cool Slowly: Let puffs cool in the oven to prevent collapsing.
Common Mistakes to Avoid
Here are some common pitfalls to watch out for:
– Adding Eggs Too Quickly: Add one egg at a time. This helps achieve the right texture.
– Skipping the Cooling Step: Letting the dough cool before adding eggs is key. It helps prevent cooking the eggs.
– Not Using Parchment Paper: This prevents sticking and helps with easy removal.
– Underbaking: Ensure they are golden brown and firm. This ensures they hold their shape.
Whipping the Cream for Filling
Whipping cream is simple, but here are some tips:
– Chill Your Bowl: Cold bowls and beaters help the cream whip faster and achieve stiff peaks.
– Add Sugar Gradually: Slowly add powdered sugar while whipping for even sweetness.
– Watch for Peaks: Stop whipping when soft peaks form. Over-whipping makes butter, which isn’t ideal for filling.
– Flavor It Up: Add vanilla for extra flavor or experiment with other extracts to personalize your cream.

Variations
Different Fillings: Custard, Pastry Cream, and More
You can change up the filling for your cream puffs. The classic choice is whipped cream, but custard or pastry cream works great too. You can make a rich vanilla custard by cooking milk, sugar, and egg yolks. Stir until thick and chill before using. Pastry cream gives a smooth texture and adds flavor. Try adding some chocolate or fruit puree to your custard for a fun twist.
Flavor Enhancements: Extracts and Zests
Want to boost flavor? Add extracts or zests to your filling. Vanilla extract is a must, but you can also try almond or lemon extract for a different taste. If you love citrus, add some lemon or orange zest to the whipped cream. This little touch can change the flavor profile and make your cream puffs unique and delightful.
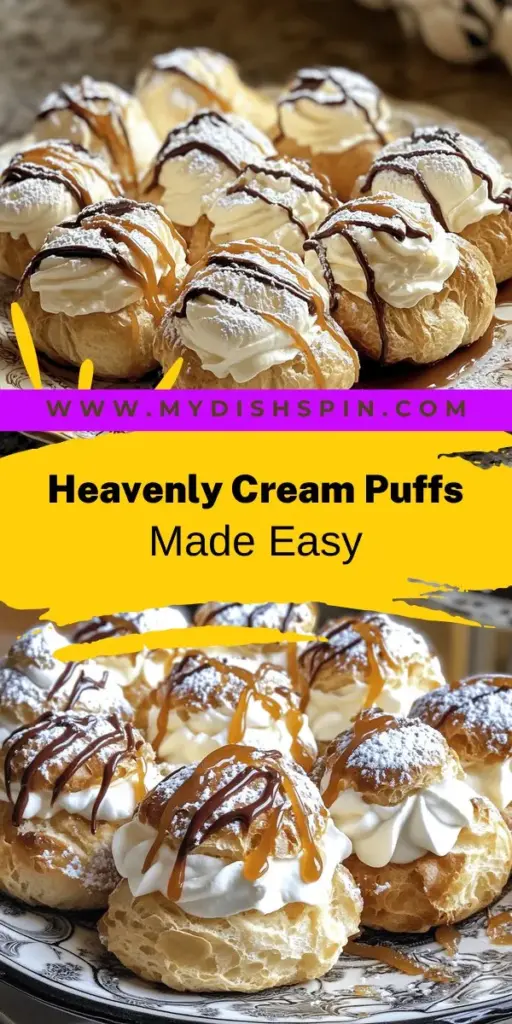
Toppings: Sauces and Sprinkles
Toppings can elevate your cream puffs. Drizzle chocolate sauce or caramel over the top for a sweet finish. You can also sprinkle powdered sugar for a classic look. Want a crunchy texture? Add crushed nuts or sprinkles on top. These additions make your treats not only tasty but also pretty.
Storage Info
How to Store Cream Puffs
To keep your cream puffs fresh, store them in an airtight container. Place a piece of wax paper between layers to prevent sticking. Keep the container in the fridge for up to two days. This will help maintain their softness and flavor. If stored too long, they may become soggy.
Freezing Tips for Future Use
You can freeze cream puffs for later. First, let them cool completely. Then, place them on a baking sheet and freeze until firm. Once frozen, transfer them to a freezer bag. They can last up to three months in the freezer. When ready to eat, thaw in the fridge. Fill them just before serving for the best taste.
Best Serving Suggestions
Serve your cream puffs chilled for a refreshing treat. For a special touch, dust them with powdered sugar before serving. You can also add a drizzle of chocolate sauce or caramel. For a fun twist, experiment by adding fruit or nuts on top. This will elevate their flavor and make them even more delightful!
FAQs
How do I make sure my cream puffs don’t deflate?
To keep your cream puffs from deflating, you must bake them correctly. First, do not open the oven door while they bake. This helps maintain the heat inside. After baking, leave them in the oven for a bit to dry out. This step is key. It helps them hold their shape and stay puffy.
Can I make the dough ahead of time?
Yes, you can make the dough ahead of time, but it’s best to bake it right away. If you must store it, place the dough in an airtight container. Keep it in the fridge for up to 24 hours. When ready to bake, let it come to room temp before piping. This helps ensure good puffing.
What is the best way to fill cream puffs?
For the best filling, use a piping bag with a small tip. First, make a small hole in the bottom of each puff. Then, gently fill them with whipped cream. Fill until you feel resistance, but avoid overfilling. This method gives you even distribution and keeps them neat.
What can I do if my puffs don’t rise?
If your puffs don’t rise, check a few things. First, make sure you used enough eggs. They provide the moisture and structure. Also, ensure your oven is hot enough. If the dough is too wet, it can also cause them to flatten. Next time, try adjusting the flour or egg ratio.
This post covered how to make perfect cream puffs. We explored ingredients, measurements, and brands to use. You learned step-by-step instructions to create those tasty puffs. I shared tips for success and common mistakes to avoid. Plus, we talked about fun filling flavors and storage ideas.
In your cooking journey, practice makes perfect. Enjoy creating delicious cream puffs that impress your family and friends!

