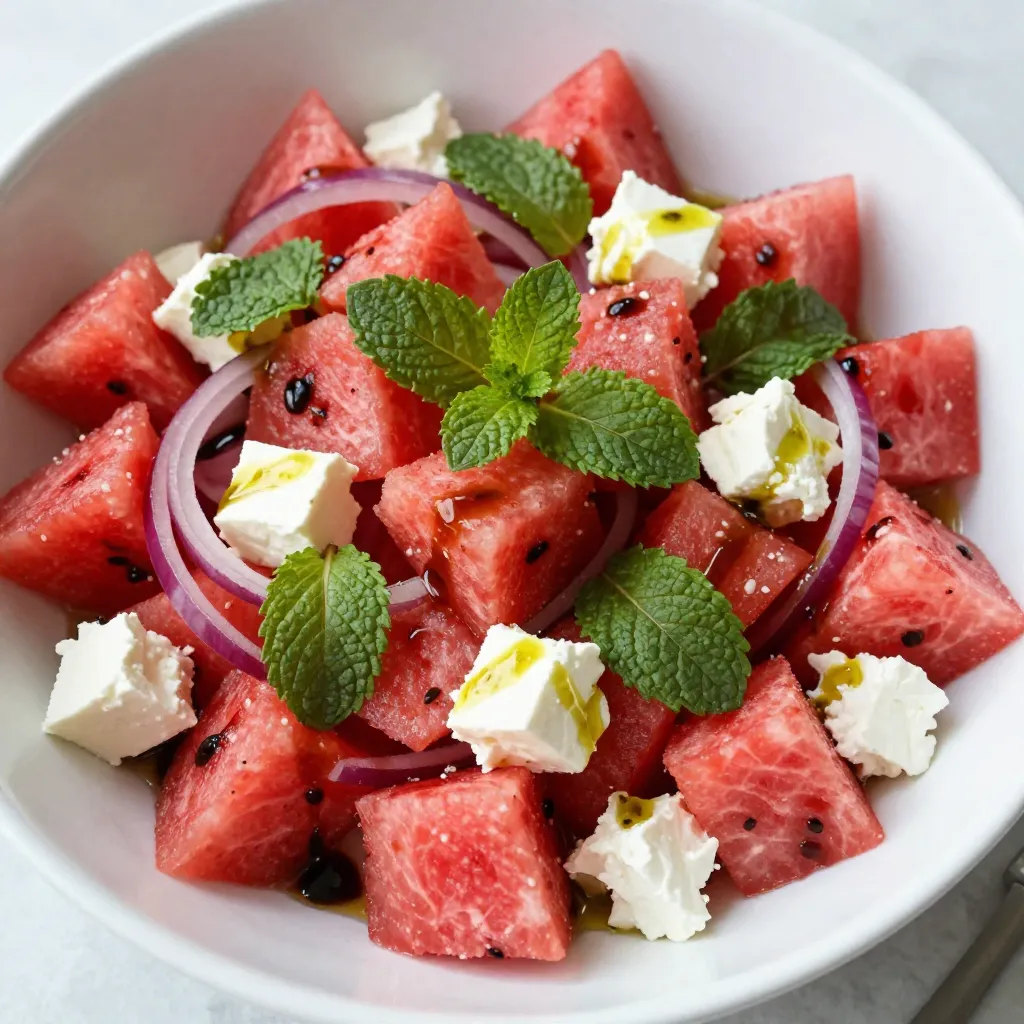
Skip to content
DisclaimerTerms Of UseGDPR PolicyCookie Policy

My Dish Spin

  • Home
  • Drinks
  • Appetizers
  • Dinner
  • Dessert
  • About
  • Contact
  • Privacy Policy
DisclaimerTerms Of UseGDPR PolicyCookie Policy

Stella

- 1 pound baby carrots (or regular carrots cut into sticks) - 3 tablespoons olive oil - 4 cloves garlic, minced - 1 tablespoon fresh thyme leaves (or 1 teaspoon dried thyme) - 1 tablespoon fresh rosemary, chopped (or 1 teaspoon dried rosemary) - Salt and pepper to taste - Zest of 1 lemon - Juice of 1 lemon - You can use any fresh herbs like parsley or dill. - For a sweet note, consider using honey-glazed carrots instead of plain ones. Carrots are packed with vitamins A, K, and fiber. They help improve your vision and boost your immune system. Olive oil is rich in healthy fats. It can reduce inflammation and help your heart. Fresh herbs add flavor and nutrients. Thyme is known for its antibacterial properties, while rosemary may aid digestion. To start, preheat your oven to 425°F (220°C). This high heat helps the carrots roast quickly and evenly. Next, create the marinade. In a large mixing bowl, combine: - 3 tablespoons olive oil - 4 cloves garlic, minced - 1 tablespoon fresh thyme leaves (or 1 teaspoon dried thyme) - 1 tablespoon fresh rosemary, chopped (or 1 teaspoon dried rosemary) - Salt and pepper to taste - Zest of 1 lemon - Juice of 1 lemon Mix these ingredients well to form a flavorful blend. This marinade will coat your carrots and give them a great taste. Now, it’s time to coat the carrots. Add 1 pound of baby carrots to the bowl with the marinade. Toss them gently until they are all coated. This step is key for flavor. Next, spread the carrots in a single layer on a baking sheet lined with parchment paper. This makes cleanup easy! For even cooking, stir the carrots halfway through roasting. This way, they brown nicely on all sides. Roast them for 25-30 minutes, until they are tender and slightly caramelized. Once your carrots are done, remove them from the oven and let them cool for a few minutes. This resting period allows the flavors to settle. You can adjust the seasoning with salt and pepper at this point if needed. For serving, transfer the roasted carrots to a dish. Drizzle a bit more olive oil on top and sprinkle fresh herbs for color. Serve them warm as a beautiful side dish. For the full recipe, check out the recipe section. To get the best roasted carrots, time and temperature matter. Adjust the cooking time based on your carrot size. Smaller baby carrots need 25 to 30 minutes. Larger carrots may take longer. Check their tenderness by piercing them with a fork. Caramelization adds flavor. To achieve this, space the carrots evenly on the baking sheet. This allows hot air to circulate. Don't crowd the pan. This helps them brown nicely. Stir halfway through cooking for even browning. Want to boost the taste? Add spices like cumin or paprika. Fresh herbs like parsley or dill can also work well. Mix these into the marinade for a fun twist. Incorporating nuts or seeds can add crunch. Toasted pine nuts or sunflower seeds make a tasty addition. Sprinkle them on right before serving for added texture. Roasted carrots pair nicely with many dishes. They complement grilled chicken or fish well. You can also serve them alongside a hearty grain dish like quinoa or farro. For a creative presentation, use a serving dish with bright colors. Drizzle more olive oil on top. Sprinkle fresh herbs for a beautiful finish. This makes your dish pop on the table! Try the full recipe to create this delicious side dish. {{image_2}} You can change the taste of garlic herb roasted carrots easily. For a sweet twist, add honey or maple syrup. These sweeteners bring out the natural flavor of the carrots. Just mix them into your marinade. You will enjoy a lovely caramelized taste. If you want some heat, try adding chili flakes. This adds a spicy kick that balances the sweetness. Start with a small pinch and adjust to your liking. You can make these carrots exciting with just a few simple tweaks. Carrots are great year-round, but you can switch things up with seasonal vegetables. In spring, use fresh peas or baby potatoes. They add color and flavor. You can mix them with the carrots for a vibrant dish. Incorporate seasonal herbs for an extra flavor boost. Try basil in summer or parsley in fall. These fresh herbs enhance the dish and bring new tastes to your table. You can’t go wrong with fresh ingredients that match the season. This recipe is naturally vegan. You can enjoy garlic herb roasted carrots without any animal products. Just follow the recipe, and you’re all set! For those who need gluten-free options, this dish is safe for you too. All the ingredients are gluten-free, so you can serve it confidently. Enjoy these tasty carrots with any meal, knowing they fit your diet. For the full recipe, check out the Garlic Herb Roasted Carrots section. To store leftovers, let the carrots cool completely. Place them in an airtight container. This helps keep them fresh and tasty. You can store them in the fridge for up to 4 days. For the best results, use glass or BPA-free plastic containers. They help maintain flavor and texture. To reheat roasted carrots, you can use an oven or a microwave. For the oven, preheat it to 350°F (175°C). Spread the carrots on a baking sheet and heat for about 10-15 minutes. This method keeps them crispy. In the microwave, heat them in short bursts. Use 30 seconds at a time, stirring in between. This method is quicker, but may soften them a bit. To freeze roasted carrots, let them cool first. Spread them on a baking sheet in a single layer. Freeze for about 1-2 hours until solid. Then transfer them to a freezer bag. Remove as much air as possible to avoid freezer burn. When you want to use them, thaw in the fridge overnight. Reheat them using the oven or microwave for best results. Roasted carrots can last for about 3 to 5 days in the fridge. Store them in an airtight container. Make sure they cool down before sealing. This helps keep them fresh and tasty. Yes, you can make garlic herb roasted carrots ahead of time. Roast them, let them cool, and store them in the fridge. When ready to serve, reheat in the oven. This keeps their flavor and texture. Garlic herb roasted carrots pair well with many main dishes. Here are some great options: - Grilled chicken - Baked salmon - Pork chops - Quinoa salad These dishes balance well with the sweet and savory flavors of the carrots. You can use frozen carrots, but adjust the cooking time. Thaw the carrots first and pat them dry. This helps the marinade stick better. Roast them at the same temperature, but check for doneness a few minutes earlier. Frozen carrots may cook faster than fresh ones. Roasting carrots brings out their sweet flavor and boosts their nutrition. We explored the best ingredients and how to prepare them. We also covered tips to enhance flavors and creative variations. You can enjoy this dish any season and adapt it to fit dietary needs. With proper storage, your roasted carrots stay fresh and tasty. This dish is easy to make and pairs well with many meals. Try it out and enjoy the benefits of your work!

Garlic Herb Roasted Carrots Flavorful and Easy Recipe

Looking for a side dish that bursts with flavor and is easy to make? Garlic Herb Roasted Carrots are your

- 1 ½ cups gluten-free all-purpose flour - ½ cup almond flour - ½ cup coconut sugar - 1 ½ cups fresh or frozen blueberries The gluten-free all-purpose flour gives structure to the muffins. It helps them rise and stay fluffy. Almond flour adds a nice nutty flavor and moisture. Coconut sugar provides a subtle sweetness and is less processed than regular sugar. You can use either fresh or frozen blueberries. If you choose frozen, there’s no need to thaw them. They will bake perfectly. - Raw sugar for topping - Lemon zest Adding raw sugar on top creates a sweet, crunchy crust. It makes the muffins look fancy too! Lemon zest brightens the flavor. It adds a fresh, citrus note that pairs well with blueberries. You can use both optional ingredients or skip them if you prefer. - Preheat the Oven: Set your oven to 375°F (190°C). This step is key for even baking. - Prepare Muffin Tin: Line your muffin tin with paper liners or spray it with cooking spray. This helps the muffins release easily after baking. - Combine Dry Ingredients: In a large bowl, mix 1 ½ cups gluten-free all-purpose flour, ½ cup almond flour, ½ cup coconut sugar, 1 tablespoon baking powder, ½ teaspoon baking soda, and ½ teaspoon salt. Whisk them well until they blend nicely. - Combine Wet Ingredients: In another bowl, mix ¾ cup unsweetened applesauce, ¼ cup almond milk, 2 large eggs, 1 teaspoon vanilla extract, and the zest of 1 lemon. Stir this until it is smooth. - Merge Mixtures: Pour the wet mix into the dry mix. Gently stir until just combined. Be careful not to overmix, or the muffins may turn out dense. - Fold in Blueberries: Gently fold in 1 ½ cups of blueberries, fresh or frozen. Make sure they are evenly spread in the batter. - Fill Muffin Tins: Spoon the batter into the muffin cups, filling each about ¾ full. You can sprinkle raw sugar on top for a sweet crust if you like. - Bake and Cool: Bake for 18-20 minutes. Check with a toothpick to see if they are done. Let the muffins cool in the pan for 5 minutes, then transfer them to a wire rack to cool completely. For the full recipe, check out the complete guide on making these delightful muffins. - Avoid Overmixing: When you mix the batter, do it gently. Overmixing makes muffins tough. Just mix until you see no dry flour. The batter should look a bit lumpy. This helps keep them soft and fluffy. - Use Room Temperature Ingredients: Before you start, let your eggs and almond milk sit out for a bit. Room temperature ingredients blend better and create a smoother batter. This small step can make a big difference in the final texture. - Test with Toothpick: To check if your muffins are done, insert a toothpick in the center. If it comes out clean, they are ready. If not, bake for a few more minutes. This helps you avoid undercooked or overcooked muffins. - Adjust Baking Time for Different Ovens: Every oven is different. If your muffins are browning too fast, lower the temperature a bit. If they need more time, keep an eye on them. Knowing your oven helps you bake perfect muffins every time. These tips will help you make the best gluten-free blueberry muffins. For the full recipe, check out the detailed instructions above. Happy baking! {{image_2}} You can play with flavors in your gluten-free blueberry muffins. Here are two fun ideas: - Chocolate Chip Gluten-Free Muffins: This twist adds rich chocolate flavor. Just mix in ½ cup of gluten-free chocolate chips with the blueberries. The chocolate pairs great with the sweet blueberries. - Lemon Poppy Seed Muffins: For a bright taste, add 2 tablespoons of poppy seeds and replace the vanilla with lemon juice. The lemon zest enhances the flavor too. This gives your muffins a refreshing kick. You might need to adapt the recipe for specific diets. Here are some easy swaps: - Vegan Gluten-Free Blueberry Muffins: To make these muffins vegan, replace the eggs with flax eggs. Mix 2 tablespoons of ground flaxseed with 6 tablespoons of water. Let it sit for 5 minutes until it thickens. Use this mix in place of eggs. - Nut-Free Options: If you have nut allergies, swap almond flour for oat flour or another nut-free flour. Just ensure all other ingredients are nut-free. This way, everyone can enjoy a tasty muffin. These variations keep your muffins exciting and cater to different diets. Enjoy the fun of baking! - Room Temperature Storage: Store cooled muffins in an airtight container. This keeps them fresh for up to three days. If you prefer, place a slice of bread in the container. This helps absorb moisture and keeps the muffins moist. - Refrigeration Tips: You can refrigerate muffins, but they may dry out. If you choose this option, wrap them in plastic wrap or foil. Store in the fridge for up to a week. Bring them to room temperature before eating for the best taste. - How to Freeze Muffins: To freeze your muffins, let them cool completely. Wrap each muffin tightly in plastic wrap, then place them in a freezer bag. This way, they can stay fresh for up to three months. - Thawing Options: When you're ready to eat, take the muffins out of the freezer. You can thaw them in the fridge overnight or leave them at room temperature for a few hours. If you're in a hurry, pop them in the microwave for about 20-30 seconds. Enjoy them warm for a delightful treat! Try this method to keep your gluten-free blueberry muffins fresh and tasty. For the full recipe, check out the Gluten-Free Blueberry Bliss Muffins. Can I use frozen blueberries? Yes, you can use frozen blueberries! They work great in this recipe. Just toss them into the batter while still frozen. This keeps them intact and prevents the batter from turning purple. Frozen blueberries add a nice burst of flavor to the muffins. What gluten-free flour is best for muffins? I recommend using a gluten-free all-purpose flour blend. These blends are made to mimic regular flour. They often include a mix of rice flour, tapioca flour, and potato starch. This mix will give your muffins a light and fluffy texture. Are gluten-free muffins healthy? Gluten-free muffins can be healthy! They often use whole, natural ingredients. This recipe includes almond flour and coconut sugar, which provide more nutrients than regular white flour and sugar. Always check the ingredients for added sugars or unhealthy fats. What are the health benefits of gluten-free baking? Gluten-free baking has several benefits. It can help those with gluten sensitivity feel better. You can also use healthier flours, like almond and coconut, which add protein and fiber. These muffins are a tasty way to enjoy a treat without gluten. For the full recipe, check out the Gluten-Free Blueberry Bliss Muffins. You now know how to make delicious gluten-free blueberry muffins. We covered key ingredients like gluten-free flour and blueberries, plus tips for perfecting your bake. From mixing to storage, these steps ensure tasty results every time. Feel free to experiment with flavors and substitutions. Enjoy your baking and savor every bite of your muffins! You’ll create treats that everyone can enjoy, regardless of dietary needs. Happy baking!

Gluten-Free Blueberry Muffins Delicious and Easy Recipe

Are you ready to bake scrumptious gluten-free blueberry muffins? This easy recipe combines juicy blueberries with wholesome ingredients like gluten-free

- 1 pint cherry tomatoes - 8 ounces fresh mozzarella balls (bocconcini) - Fresh basil leaves - 1/4 cup balsamic glaze - Salt and freshly cracked black pepper to taste - Skewers (wooden or metal) Rinse the cherry tomatoes and basil leaves under cold water. Make sure to dry them well with a paper towel. This step ensures that your ingredients stay fresh and tasty. Prepare your skewers by choosing between wooden or metal ones. If you use wooden skewers, soak them in water for 30 minutes to prevent burning. If you can't find fresh mozzarella, you can use mozzarella cubes or even feta cheese. For a twist, try using heirloom tomatoes instead of cherry tomatoes. If you want a lighter option, skip the balsamic glaze and use a sprinkle of olive oil and lemon juice. Fresh herbs like mint or parsley can also replace basil if you want a different flavor. To start, gather your ingredients for the Balsamic Caprese Skewers. You will need cherry tomatoes, fresh mozzarella balls, basil leaves, balsamic glaze, salt, and pepper. Rinse the cherry tomatoes and basil under cold water. Use a paper towel to pat them dry. This step keeps the flavors fresh. Now, grab your skewers. You can use either wooden or metal ones. Begin by threading a cherry tomato onto the skewer. Next, add a fresh basil leaf. Then, follow with a mozzarella ball. Repeat this pattern until your skewer has 2-3 sets, based on its length. This mix of colors and textures looks great. When you skewer, make sure to push each item firmly. This keeps them in place. Avoid leaving too much space between the items. They should be close to each other for the best flavor. If you want, let the skewers sit for about 10 minutes after making them. This helps the flavors blend well. Drizzle balsamic glaze over them for added taste. You can find the full recipe [here](#). Enjoy your delicious Balsamic Caprese Skewers! Serve Balsamic Caprese Skewers as a light appetizer or a snack. They shine at parties and picnics. You can also use them as a side dish with grilled meats. For a fun twist, serve them at brunch with eggs or quiche. Make your skewers pop on the table! Use a long platter or a wooden board to display them. Add a small bowl of balsamic glaze for dipping. You can also garnish with whole basil leaves for a fresh look. Arrange the skewers in a fan shape for added flair. Pair these skewers with light drinks. A crisp white wine like Pinot Grigio works well. You can also serve them with sparkling water mixed with lemon. For a non-alcoholic option, try homemade lemonade or iced tea. Each drink enhances the fresh flavors of the skewers. For the full recipe, please refer to the section above. {{image_2}} You can mix flavors to make your Balsamic Caprese Skewers unique. Try adding small pieces of prosciutto for a savory twist. A slice of avocado can add creaminess and richness. You might also consider using marinated mozzarella for added taste. If you like heat, add a slice of jalapeño for a spicy kick. You can use different herbs like mint or oregano instead of basil for a fresh note. Look for seasonal ingredients to keep your skewers fresh and exciting. In summer, try ripe heirloom tomatoes for a burst of flavor. In fall, swap the tomatoes for roasted butternut squash cubes. You can also use fresh figs in late summer for a sweet touch. Winter months can be perfect for citrus, so consider orange or grapefruit segments for brightness. Seasonal swaps keep your dish vibrant and tasty. To make these skewers vegan, simply replace mozzarella with dairy-free cheese. There are many tasty options made from nuts or soy. Gluten-free eaters can enjoy these skewers as they are naturally gluten-free. Just ensure your balsamic glaze doesn't contain gluten. You can find many brands that cater to dietary needs. Always check labels to be sure! To keep your Balsamic Caprese Skewers fresh, store them in an airtight container. Place a layer of paper towels in the container to absorb excess moisture. This helps prevent sogginess. You can keep them in the fridge for up to two days. When ready to eat, check for freshness. If they smell or look off, it’s best to toss them. These skewers are best served cold or at room temperature. If you want to refresh them, drizzle some extra balsamic glaze on top. You can also add a pinch of salt and pepper to enhance the flavor. If you prefer warm skewers, gently heat them in the microwave for 10-15 seconds, but this may alter the texture of the mozzarella. Freezing these skewers isn’t recommended. The fresh mozzarella and basil do not freeze well. They can become mushy when thawed. If you want to save ingredients, consider freezing the balsamic glaze separately. It keeps well and can enhance future dishes. For the best taste, enjoy your skewers fresh after making them using the Full Recipe. To make Balsamic Caprese Skewers vegan, simply swap the mozzarella with a vegan cheese. Many brands offer plant-based options that melt well and taste great. You can also use tofu for a protein boost. Ensure the balsamic glaze is vegan too; most brands are, but check the label. Yes, you can prepare Balsamic Caprese Skewers in advance! Assemble the skewers and store them in the fridge. Just make sure to wait to drizzle the balsamic glaze until you are ready to serve. This helps keep the ingredients fresh and prevents them from getting soggy. The best balsamic glaze for skewers is thick and sweet. Look for a high-quality, aged balsamic glaze. Some brands infuse flavors like fig or pomegranate. This adds a unique twist to your skewers. You want a glaze that sticks well to the tomatoes and cheese. It should bring out the flavors in each bite. For the full recipe, check the details provided earlier. In this article, we covered everything about making Balsamic Caprese Skewers. You learned about the ingredients you'll need, how to prep and measure them, and even some tasty substitutions. We walked through clear steps for cooking and assembling the skewers. I shared tips for serving and pairing drinks, plus fun variations to try. Lastly, we discussed storage methods and answered common questions. Enjoy making these skewers and sharing them with friends. They are sure to impress!

Balsamic Caprese Skewers Tasty and Simple Recipe

Looking for a fresh, tasty treat that’s easy to make? Balsamic Caprese Skewers are the answer! Packed with juicy tomatoes,

- 1 pound baby carrots (or sliced regular carrots) - 3 tablespoons honey - 2 tablespoons fresh lemon juice - 1 tablespoon olive oil - 1 teaspoon lemon zest - 1/2 teaspoon salt - 1/4 teaspoon black pepper - Fresh parsley for garnish (optional) - Honey alternatives: Use maple syrup or agave nectar for a vegan option. - Lemon juice substitutes: Lime juice works well if you want a different taste. - Carrot variations: Try using rainbow carrots for a colorful twist. When you make Honey Lemon Glazed Carrots, use fresh ingredients for the best flavor. Baby carrots are sweet and tender, perfect for roasting. If you can’t find baby carrots, sliced regular carrots work too. For the glaze, honey gives a rich sweetness. If you prefer, swap honey with maple syrup. Fresh lemon juice brightens the dish. It adds zest and balances the sweetness. The lemon zest enhances the flavor, so don’t skip it! Remember to adjust the salt and pepper to your taste. If you like more spice, add a pinch of cayenne. Feel free to garnish with parsley for a pop of color. You can find the Full Recipe for easy reference. First, wash the carrots under cold water. If you use regular carrots, peel them. Make sure to cut the carrots into even-sized pieces. This helps them cook at the same time. Aim for about two-inch pieces. Uniform cuts mean no mushy or hard bites. In a mixing bowl, combine the honey, lemon juice, olive oil, lemon zest, salt, and black pepper. Use a whisk to blend these together. You want a smooth mixture that coats the carrots well. The glaze adds sweet and tangy flavor, making the dish delightful. Preheat your oven to 400°F (200°C). Grab a baking sheet and line it with parchment paper. Place the carrots on the sheet, spreading them out evenly. Pour the honey-lemon glaze over the carrots. Toss them well to coat each piece. This step is key for great flavor. Bake the carrots in the oven for 20-25 minutes. Stir them halfway through to help even cooking. The carrots should be tender and caramelized when they are done. Once out of the oven, let them cool for a few minutes. Serve them up on a dish for everyone to enjoy. For a pop of color, sprinkle fresh parsley on top. For the full recipe, visit [Full Recipe]. To get that sweet, golden look on your carrots, start with even coating. After mixing your glaze, pour it over the carrots in a bowl. Toss them well so every piece gets the glaze. This helps the carrots roast evenly and caramelize better. Use parchment paper on your baking sheet. It prevents sticking and makes clean-up easy. You can change the glaze to fit your taste. If you like it sweeter, add more honey. For a tangy kick, squeeze in extra lemon juice. Taste the glaze before you pour it on the carrots. This way, you can make it just how you want. Remember, the right balance makes all the difference. Honey lemon glazed carrots pair well with many main dishes. Serve them alongside roasted chicken or grilled fish. They also work great with a hearty grain, like quinoa. For a pop of color, sprinkle fresh parsley on top. It adds a nice touch and extra flavor. Try these tips to make your meal shine! {{image_2}} You can give your honey lemon glazed carrots some extra flavor with herbs and spices. Fresh thyme or rosemary work great. Just sprinkle them over the carrots before roasting. If you want a sweet twist, try adding a bit of cinnamon to the glaze. This adds warmth and depth. Mixing flavors is a fun way to make the dish your own. If you want to switch things up, use other root veggies. Try parsnips, sweet potatoes, or turnips. They all have a natural sweetness that pairs well with honey and lemon. Cut them into even pieces, just like the carrots. This way, they cook evenly and soak up all the tasty glaze. Serving honey lemon glazed carrots cold is a great idea for summer dishes. You can add them to salads for a bright, sweet touch. They also work well in grain bowls or as a side for cold platters. Just let the carrots cool, then toss them in with your favorite greens or grains. This adds a refreshing crunch and a burst of flavor to any meal. For the full recipe, check out the Honey Lemon Glazed Carrots section above. To store leftover honey lemon glazed carrots, place them in an airtight container. Make sure they cool down first. Stored this way, they will last for about three to five days. Keeping them sealed helps prevent the carrots from drying out or absorbing other flavors in the fridge. The best way to reheat your carrots is in the oven. Preheat it to 350°F (175°C). Spread the carrots on a baking sheet and cover them with foil. Heat for about 10 to 15 minutes or until warm. You can also use a microwave. Place the carrots in a microwave-safe dish and heat for 1 to 2 minutes. Remember to stir halfway for even heating. Freezing cooked carrots is a great option if you have extra. First, let them cool completely. Then, place the carrots in a freezer-safe bag, removing as much air as possible. They can last for up to three months in the freezer. When ready to eat, let them thaw in the fridge overnight before reheating. This way, you can enjoy this tasty dish anytime! For the full recipe, check out the earlier section. Roasting honey lemon glazed carrots takes about 20 to 25 minutes. You should spend around 10 minutes to prep the carrots. This makes the total time about 35 minutes. Start by washing and cutting the carrots. Then, mix the glaze and coat the carrots. After preheating the oven, roast them until tender and caramelized. Yes, you can use frozen carrots. They cook faster than fresh carrots. However, they may not get as caramelized. Frozen carrots can also release extra water. This can make your glaze less thick. Make sure to adjust your cooking time. Check for tenderness often. These carrots pair well with many dishes. Try serving them with roasted chicken or grilled fish. They also go great with rice or quinoa. Add a fresh salad for balance. The sweet flavor of the carrots complements savory meals nicely. To make honey lemon glazed carrots vegan, swap honey for maple syrup or agave. This keeps the sweetness while making it plant-based. All other ingredients remain the same. You can enjoy this tasty side dish without any animal products. You learned how to make honey lemon glazed carrots. We covered ingredients, substitutions, and simple steps. You can personalize the flavor with tips for caramelization and herbs. These carrots serve well with many dishes and can be enjoyed warm or cold. If you store leftovers properly, you can savor them later. Now, get creative! Make this recipe your own and impress everyone at your table. Enjoy your cooking!

Honey Lemon Glazed Carrots Healthy and Simple Recipe

Looking for a quick side dish that bursts with flavor? You’ll love my Honey Lemon Glazed Carrots. This simple recipe

- Whole wheat pasta: This pasta choice packs more fiber than regular pasta. Fiber helps with digestion and keeps you full longer. Whole wheat pasta also adds a nutty flavor that pairs well with fresh veggies. - Fresh vegetables: I use cherry tomatoes, cucumbers, bell peppers, and red onions. Each of these adds crunch, color, and nutrients. Cherry tomatoes burst with sweetness, while cucumbers bring a refreshing crunch. Bell peppers add a sweet bite, and red onions give a nice kick. - Feta cheese and olives: Feta cheese adds creaminess and tang. I love using crumbled feta because it blends well with the pasta and veggies. Kalamata olives bring a briny flavor that enhances the salad's taste. They also add healthy fats to the dish. - Light dressing components: The dressing is simple. It has olive oil, lemon juice, and dried oregano. This mix creates a fresh and zesty flavor that ties everything together. - Olive oil vs. other dressings: I prefer olive oil for its health benefits. It contains healthy fats and antioxidants. Other dressings may add sugar or preservatives, which I try to avoid. - Seasoning options: Salt and pepper are essential for flavor. You can also add garlic powder or fresh herbs. These spices can elevate the taste. Feel free to adjust the seasoning to match your preferences. For the full recipe, check out the Mediterranean Bliss Pasta Salad. To start, you need to boil your pasta. Use a large pot and fill it with water. Add a good amount of salt to the water. This adds flavor to the pasta. Bring the water to a rolling boil. Then add your whole wheat pasta. Stir it well to prevent sticking. Cook the pasta until it is al dente, which means it should be firm but not hard. This usually takes about 8 to 10 minutes. After cooking, drain the pasta in a colander. Rinse it under cold water to stop the cooking process. This helps keep the pasta from getting mushy. As the pasta cooks, you can prepare the vegetables. First, wash your cherry tomatoes and slice them in half. For the cucumber, peel it if you like, then dice it into small pieces. The bell pepper should be diced into similar-sized pieces. For the red onion, use a sharp knife to finely chop it. Finally, slice the Kalamata olives. All these veggies add color and crunch to the salad. Once chopped, place them in a large mixing bowl. This makes it easy to combine later. Now, let’s make the dressing. In a small bowl, combine the olive oil, lemon juice, dried oregano, salt, and pepper. Use a whisk to mix everything well. The goal is to get a nice, smooth texture. Taste it to see if it needs more salt or lemon. Adjust the flavors until it feels just right. This dressing will add a zesty kick to your salad. Once the pasta is cool, it’s time to mix everything. Add the cooked pasta to the bowl with the vegetables. Pour the dressing over the top. Toss gently to coat the pasta and veggies evenly. When adding the feta cheese, fold it in carefully. This helps to keep the cheese from breaking too much. You want nice chunks of feta in your salad for a creamy texture. Chilling the salad is key. Cover the bowl with plastic wrap or a lid. Place it in the fridge for at least 30 minutes. This allows the flavors to blend and develop. When you’re ready to serve, stir the salad again. Serve it in a large bowl or individual cups. You can add extra parsley and olives on top for a nice look. Enjoy your Healthy Greek Pasta Salad! For the complete recipe, check out the Full Recipe. To make the best Greek pasta salad, avoid some common mistakes. First, don’t overcook the pasta. It should be firm but not hard. Rinse it well after cooking to stop the heat. This keeps it from getting mushy. Next, use fresh ingredients. High-quality tomatoes, cucumbers, and olives make a big difference. Fresh feta cheese adds creaminess and flavor. Always choose whole wheat pasta for health. It has more fiber than regular pasta. This salad pairs well with grilled chicken or fish. You can also serve it alongside pita bread and hummus for a full meal. For a fun twist, try serving it in mason jars. Layer the ingredients for a colorful look. You can also add a sprinkle of nuts for crunch. Toasted pine nuts or sliced almonds work great. They add texture and healthy fats. Want to boost the nutrition? Add superfoods like spinach or kale. These greens pack vitamins and minerals. You can also toss in chickpeas for more protein. If you want to cut calories, use less olive oil. You can replace some of it with Greek yogurt. This keeps the dressing creamy but lighter. You can also add more veggies to fill you up without extra calories. {{image_2}} You can easily boost your Greek pasta salad with protein. Chicken, chickpeas, or tuna work great. For chicken, use grilled or rotisserie chicken. Just shred it into bite-sized pieces. If you want a plant-based option, add chickpeas. They bring a nice nutty flavor and texture. For a seafood twist, try flaked tuna. It adds richness and pairs well with the salad. For vegetarians, consider adding hard-boiled eggs. They add protein and creaminess. You can also use edamame for a fun crunch. These options cater to various dietary needs while keeping the dish tasty. Seasonal vegetables can make your salad fresh and exciting. In summer, add ripe peaches or zucchini. These bring sweetness and color. In fall, consider roasted butternut squash or Brussels sprouts. This adds warmth and depth to the dish. Adjusting the dressing can also change the flavor. In spring, try adding fresh herbs like dill or basil. In winter, a splash of balsamic vinegar can enhance the taste. These small tweaks can keep your salad interesting all year long. For those needing gluten-free options, swap regular pasta for gluten-free pasta. Many brands offer great alternatives made from rice or quinoa. This way, everyone can enjoy the salad. If you want a vegan version, simply leave out the feta cheese. You can use a plant-based cheese or nutritional yeast for a cheesy taste. These modifications keep the salad delicious and inclusive for all dietary preferences. Enjoy the full recipe for more ideas! To keep your Healthy Greek Pasta Salad fresh, use airtight containers. Glass containers work well. They help keep the salad crisp and tasty. Make sure to store the salad in the main part of the fridge. The door can get too warm and spoil the food. Your salad lasts about 3 to 5 days in the fridge. Just check for any changes in smell or texture. If you want to store components, keep the pasta and veggies separate. This way, they stay fresh longer. You can freeze the salad, but it may change the texture. I suggest freezing cooked pasta or veggies separately. This helps maintain freshness when you want to eat them later. For the full recipe, check out the Mediterranean Bliss Pasta Salad. To make a gluten-free Greek pasta salad, choose gluten-free pasta. Options like rice, quinoa, or chickpea pasta work well. These alternatives offer good texture and flavor. You can prepare them just like regular pasta. Cook them according to package instructions, then cool before mixing. Yes, you can use different types of cheese in your salad. For a milder flavor, try mozzarella or goat cheese. If you want a stronger taste, use aged feta or blue cheese. Each cheese brings its own unique flavor. This lets you customize your salad to your liking. You can enhance the flavor of your Greek pasta salad with herbs and spices. Fresh herbs like basil or dill add brightness. A sprinkle of red pepper flakes adds heat. Consider using lemon zest for extra citrus flavor. These small tweaks make a big difference in taste. This blog post covered how to make a tasty Greek pasta salad. We explored key ingredients like whole wheat pasta, fresh veggies, and feta cheese. I shared tips on cooking, preparing, and combining the salad. You learned how to make a light dressing and the best storage methods. For a great meal, use fresh and high-quality ingredients. Experiment with different proteins and seasonal veggies to keep it exciting. Enjoy your healthy, homemade Greek pasta salad!

Healthy Greek Pasta Salad Flavorful and Nutritious Dish

Are you ready to create a dish that’s both flavorful and good for you? My Healthy Greek Pasta Salad packs

To make a Pineapple Banana Green Smoothie, gather these simple ingredients: - 1 ripe banana (frozen) - 1 cup fresh pineapple chunks - 1 cup fresh spinach leaves (packed) - 1/2 cup coconut water (or filtered water) - 1/2 cup Greek yogurt (or plant-based yogurt) - 1 tablespoon honey or agave syrup (optional) - 1 tablespoon chia seeds - Ice cubes (optional) Using frozen bananas adds creaminess. Fresh pineapple gives a bright, sweet taste. Spinach boosts nutrients without changing the flavor. Coconut water keeps it refreshing. Greek yogurt adds protein and creaminess, but you can use plant-based yogurt for a vegan option. Honey or agave syrup is there if you want extra sweetness. Chia seeds add texture and nutrients. If you want a thicker smoothie, throw in some ice cubes. These ingredients create a tasty drink that is packed with vitamins and minerals. Each sip feels like a tropical getaway! You can find the Full Recipe to guide you through the steps. How do you prepare the banana and other ingredients? Start by peeling the frozen banana. Break it into smaller chunks. This makes blending easier. Next, wash your spinach leaves well to remove any dirt. Then, measure out the fresh pineapple chunks. You can use canned pineapple, but fresh tastes better. What is the blending process for a smooth consistency? In your blender, add the banana chunks, pineapple, and spinach. Pour in the coconut water. This helps all the ingredients mix well. Next, add Greek yogurt for creaminess. Blend on low speed first. Gradually move to high speed until the mixture is completely smooth. How do you adjust sweetness and texture? After blending, taste your smoothie. If it's not sweet enough, add honey or agave syrup. Blend again to mix. If you want a thicker drink, add ice cubes. Blend until you reach your desired texture. Enjoy your Pineapple Banana Green Smoothie right away! For the full recipe, check out the link. Using frozen fruit is key. It adds a creamy texture and keeps your smoothie cold. If you use fresh fruit, your smoothie may be thin and warm. For best results, freeze your ripe bananas ahead of time. They blend easily and enhance the taste. Choose a good blender. A high-speed blender works best. It breaks down the ingredients well. If you have a regular blender, blend in small batches. This helps ensure a smooth mix. Adjust flavors to make it yours. If you want it sweeter, add more honey or agave. You can also try adding a pinch of salt to balance flavors. If it's too thick, pour in more coconut water. Taste as you go. Add superfoods for extra nutrition. Chia seeds are a great choice. They add fiber and protein to your drink. You can also try adding a scoop of protein powder. This makes your smoothie filling and boosts energy. Fresh ingredients offer more nutrients. They taste better and have more vitamins. Frozen fruit is good too, but fresh is best when possible. It keeps the nutrients intact and enhances flavor. Always choose what works for you, fresh or frozen. Try the Full Recipe for a tasty start. {{image_2}} You can switch up the greens in your smoothie. Instead of spinach, try kale or collard greens. They add a nice flavor and texture. Each green brings its own nutrients. If you want a fruit swap, consider mango or mixed berries. They add sweetness and a fun twist. You can also go vegan. Use plant-based yogurt and skip honey for a dairy-free option. To spice things up, try adding cinnamon or ginger. These spices give the smoothie a warm kick. They also add health benefits. If you want a creamier texture, mix in nut butters like almond or peanut butter. You can also add seeds, like flax or sunflower seeds. They pack in extra nutrition and crunch. These variations let you customize your smoothie to your taste. For the full recipe, check out the Tropical Oasis Pineapple Banana Green Smoothie. After you make your Pineapple Banana Green Smoothie, you might have some left. To keep it fresh, pour it into a clean, airtight container. Store it in the fridge for up to 24 hours. The smoothie may separate, but that's normal. Just shake or stir it before drinking. If you want to keep it longer, you can freeze it. Pour the smoothie into ice cube trays or freezer bags. This way, you can use it later in other drinks or recipes. Just remember to leave some space in the container. Smoothies expand when frozen. You can repurpose leftover smoothie in fun ways. Try pouring it over yogurt or oatmeal for a tasty breakfast. You can also blend it into a popsicle mixture. Just add some fruit chunks and freeze. When storing, make sure to check for any changes in smell or color. If anything seems off, it’s best to toss it. Safety is key when it comes to food! Enjoy experimenting with your leftovers, but always keep food safety in mind. Can I use different fruits? Yes, you can! Swap pineapple or banana for mango, berries, or any fruit you love. Each fruit gives a different taste and nutrition. Is this smoothie suitable for weight loss? Absolutely! This smoothie is low in calories and high in nutrients. It fills you up and helps curb cravings. How long can I store the smoothie? You can keep it in the fridge for up to 24 hours. Just remember to stir it well before drinking. What are the health benefits of this smoothie? This smoothie is rich in vitamins, minerals, and fiber. Pineapple offers vitamin C, while spinach adds iron and calcium. Bananas give you energy and potassium. Can I make this smoothie ahead of time? Yes, you can! Prepare it the night before for a quick breakfast. Just store it in an airtight container. How can I make this smoothie thicker? Add ice cubes or more frozen banana to create a thicker, creamier texture. You can also use frozen spinach for added thickness. Can I replace coconut water with another liquid? Sure! Use almond milk, regular water, or orange juice if you prefer. Each will change the taste slightly, so pick what you like. What’s the best time to consume this smoothie? Enjoy it any time! It’s perfect for breakfast or a snack. I love it after a workout to refuel. For the full recipe, check out the Tropical Oasis Pineapple Banana Green Smoothie section. This blog post explored how to make a tasty pineapple banana green smoothie. We covered the ingredients, step-by-step blending methods, and tips for the best results. You learned about variations to keep your smoothie exciting and how to store any leftovers safely. Incorporating these ideas can help you enjoy a healthier drink daily. Remember, adjusting flavors and textures makes this smoothie your own. Enjoy your blend and feel great!

Pineapple Banana Green Smoothie Refreshing and Healthy

Looking for a tasty and healthy drink? Try my Pineapple Banana Green Smoothie! This vibrant blend is packed with fresh

To make this easy chicken taco soup, you need a few key items: - 1 pound boneless, skinless chicken breasts, diced - 1 can (15 oz) black beans, drained and rinsed - 1 can (15 oz) corn, drained - 1 can (14.5 oz) diced tomatoes with green chilies - 1 medium onion, chopped - 2 cloves garlic, minced - 1 tablespoon olive oil - 1 packet taco seasoning (about 1 ounce) - 4 cups chicken broth - Salt and pepper to taste These ingredients come together to create a tasty and filling soup. You can add some optional ingredients for extra taste and texture: - Fresh cilantro, chopped (for garnish) - Avocado slices (for garnish) - Lime wedges (for serving) These toppings make your soup look great and add fresh flavors. You will need some basic kitchen tools to whip up this dish: - A large pot or Dutch oven - A cutting board and knife - A can opener - A stirring spoon Having the right equipment makes cooking easier and more fun. For the full recipe, check out the detailed instructions provided earlier. Start by gathering your ingredients. You will need boneless, skinless chicken, black beans, corn, diced tomatoes, onion, garlic, olive oil, taco seasoning, chicken broth, salt, and pepper. This mix gives the soup its bold flavor. In a large pot, heat the olive oil over medium heat. Add the chopped onion and minced garlic. Sauté until the onion turns translucent, about 3 to 4 minutes. This step fills your kitchen with a yummy aroma. Next, add the diced chicken to the pot. Stir it with the onions and garlic. Cook until the chicken is no longer pink, which should take about 5 to 7 minutes. This is key for a safe and tasty soup. Once the chicken is cooked, sprinkle the taco seasoning over it. Stir well to coat the chicken evenly. The spices will add a kick that makes this soup special. Now, it’s time to add the rest of the ingredients. Pour in the black beans, corn, diced tomatoes, and chicken broth. Stir gently to combine everything. Bring the mixture to a simmer. Let it cook for about 15 to 20 minutes. This allows the flavors to meld together, creating a rich and hearty soup. Taste your soup and adjust the seasoning with salt and pepper if needed. Serve it hot, and don’t forget to check the Full Recipe for details on garnishing with fresh cilantro and avocado slices. Enjoy! To boost flavor in your chicken taco soup, use fresh herbs. Fresh cilantro adds a burst of taste. Consider adding a dash of lime juice for tang. You can also toast the spices in the pot before adding other ingredients. This step helps release their oils and flavors. If you want creaminess, add a dollop of sour cream or Greek yogurt when serving. One common mistake is overcooking the chicken. It can become dry and tough. Make sure to cook the chicken until just done. Another mistake is not tasting the soup. Always taste and adjust seasonings. Adding salt and pepper at the end can enhance the final flavor. Lastly, avoid skipping the simmering time. This step is key for melding the flavors together. Garnishes can elevate your soup. I love using fresh cilantro for a bright finish. Sliced avocado adds creaminess and richness. Don’t forget lime wedges for a zesty kick. You can also sprinkle shredded cheese for extra flavor. Tortilla chips offer a nice crunch when crumbled on top. Enjoy experimenting with your favorite toppings! {{image_2}} You can easily make this soup vegetarian. Just skip the chicken. Use vegetable broth instead of chicken broth. Add extra beans or lentils for protein. You can also toss in more veggies like bell peppers or zucchini. This way, you keep the soup hearty and filling. If you want a different protein, you have options. Ground turkey or beef works well in this recipe. You can also use shredded rotisserie chicken for a quicker fix. For a fun twist, try tofu or tempeh. They soak up flavors nicely and add a great texture. To change the heat, add more or fewer spices. If you want it spicier, add jalapeños or a dash of hot sauce. For a milder soup, leave out the diced tomatoes with green chilies. You can also adjust the taco seasoning to fit your taste. Just remember, you can always add heat, but it's hard to take it out. You can find the full recipe to explore these variations in detail. To store leftover chicken taco soup, let it cool first. Use an airtight container for best results. This helps keep it fresh. You can store it in the fridge for up to three days. If you want to keep it longer, freezing is a great option. When you are ready to enjoy the soup again, you can reheat it easily. Pour the soup into a pot. Heat it on medium until it gets hot. Stir it often to prevent sticking. You can also use the microwave. Just heat in short bursts and stir in between. To freeze your chicken taco soup, use freezer-safe containers. Leave some space at the top for expansion. Label the containers with the date. It will last up to three months in the freezer. When you are ready to eat it, thaw it overnight in the fridge. Reheat it on the stove or microwave. Enjoy your delicious soup anytime! You can find the Full Recipe in the article for more details. To add heat, try these simple tips: - Add jalapeños: Fresh or pickled jalapeños boost spice. - Use hot taco seasoning: Find brands with extra heat. - Include hot sauce: A few drops can change the flavor. - Chili powder: Sprinkle in more chili powder to your taste. These options let you control the spice level. Experiment until it’s just right for you! Yes, frozen chicken works well! Just follow these steps: - Thaw the chicken: Leave it in the fridge overnight. - Cook longer: If using frozen pieces, add extra cooking time. - Ensure it’s cooked: Make sure the chicken reaches 165°F. Frozen chicken saves time and keeps the soup just as tasty! Here are some great side dishes: - Cornbread: Sweet and fluffy cornbread is a perfect match. - Tortilla chips: Crunchy chips add a fun texture. - Salad: A fresh green salad balances the dish. - Rice: Serve with white or brown rice for added heartiness. These sides complement the flavors of the soup and make for a satisfying meal. For the full recipe, check out the earlier sections! In this article, you learned how to make easy chicken taco soup. We covered the main and optional ingredients, cooking steps, and helpful tips. We also explored variations for dietary needs and shared storage info. Now, you can enjoy a tasty soup that warms your heart. Remember, cooking should be fun. Try new flavors and share with others!

Easy Chicken Taco Soup Delicious and Simple Recipe

If you’re craving a warm, filling meal, my Easy Chicken Taco Soup is just what you need! This delicious recipe

To make these peach cobbler bars, you need fresh, ripe peaches. Use about 2 cups of peeled and sliced peaches. Choose peaches that are sweet and juicy for the best flavor. You can add a splash of lemon juice for a nice zing. You will need some basic baking items to create these bars. Gather the following: - 1 cup all-purpose flour - 1 cup rolled oats - 1/2 cup brown sugar - 1/2 cup granulated sugar - 1/2 cup unsalted butter, melted - 1 tsp baking powder - 1/2 tsp cinnamon - 1/4 tsp salt These ingredients will help form a delicious base and topping for your bars. For extra taste, you might want to add some chopped pecans. About 1/4 cup should do. Pecans give a nice crunch and a nutty flavor. If you like, you can also add a teaspoon of vanilla extract. This ingredient will enhance the overall taste of the dessert. For the complete recipe, check out the Full Recipe. First, wash and peel your peaches. Use ripe peaches for the best flavor. Slice the peaches into thin pieces. This helps them cook evenly. In a large bowl, mix the sliced peaches with lemon juice and 1/4 cup of granulated sugar. The lemon juice keeps the peaches fresh and adds zest. Let this sit for about 10 minutes. This lets the juices blend together, enhancing the flavor. In a separate bowl, gather your dry ingredients. Combine the flour, rolled oats, brown sugar, baking powder, cinnamon, and salt. Mix these well to avoid clumps. Next, pour in the melted butter and vanilla extract. Stir until it looks like coarse crumbs. If you like nuts, fold in the chopped pecans. This adds a nice crunch to your bars. Now it’s time to build your bars. Take about two-thirds of the oat mixture and press it into the bottom of your prepared baking pan. This forms a sturdy crust. Spread the peach mixture evenly on top of the crust. Finally, crumble the rest of the oat mixture over the peaches. Bake in your preheated oven for 30-35 minutes. Watch for a golden brown topping and bubbling peach filling. When done, let it cool for at least 15 minutes before lifting it out using the parchment paper. Cut into bars and enjoy. For the full recipe, refer back to the ingredients section. When picking peaches, look for ones that feel heavy for their size. The skin should be smooth and slightly fuzzy. Choose peaches that give a little when you press them. If they are hard, they may not be ripe. The color should be bright and vibrant. Yellow and pink tones indicate ripeness. Avoid peaches with dark spots or wrinkles. These signs mean the fruit is overripe. To get a great crust, mix the dry ingredients well. Use cold butter for a flaky texture. When you mix it in, make sure it looks like coarse crumbs. Press the crust firmly into the pan but not too hard. This keeps it light and airy. Bake it just until golden brown. If it bakes too long, it may become tough. Peach cobbler bars are best served warm. You can top them with vanilla ice cream for a treat. Whipped cream also adds a nice touch. For extra flavor, sprinkle some extra cinnamon on top. You can serve them with a drizzle of honey. Try pairing them with a cup of tea or coffee. Each bite should feel like a warm hug. Check out the Full Recipe for more details. {{image_2}} You can make these bars even more delicious by adding different fruits. Try using blueberries or cherries along with the peaches. Their sweet and tart flavors will mix well. Just keep the same amounts and mix them in with the peaches. You can even create a fruit blend for a fun twist. This keeps your dessert fresh and exciting. If you need gluten-free options, you can still enjoy these bars. Substitute all-purpose flour with a gluten-free flour blend. You can also use gluten-free oats. They will still hold together and taste great. This way, everyone can enjoy your peach cobbler bars without worry. If you want a healthier option, try using alternative sweeteners. You can use honey or maple syrup instead of brown sugar and granulated sugar. Adjust the amount to suit your taste. These sweeteners add a unique flavor and can cut down on refined sugars. You can enjoy your dessert while feeling good about your choices. For the full recipe, check out the Peachy Delight Cobbler Bars above! To keep your peach cobbler bars fresh, place them in an airtight container. Make sure they cool completely first. If you stack them, put parchment paper between layers. This will help prevent sticking. Store them in the fridge for up to five days. The bars stay tasty and moist this way. When you want to enjoy your peach cobbler bars again, preheat your oven to 350°F (175°C). Place the bars in an oven-safe dish and cover them with foil. Heat for about 10-15 minutes. This warms them nicely without drying them out. You can also use a microwave. Heat one bar for about 20-30 seconds. Enjoy the warm, gooey goodness! If you want to save some for later, freezing is a great option. First, let the bars cool fully. Cut them into individual pieces. Wrap each piece tightly in plastic wrap. Then, put them in a freezer-safe bag or container. They can stay frozen for up to three months. When you’re ready to eat, just thaw in the fridge overnight and reheat. You’ll have a delicious treat waiting for you! For the complete recipe, refer to the Full Recipe. Yes, you can use canned peaches. Just make sure to drain them well. Canned peaches are softer and sweeter than fresh. They can save time if fresh peaches are not in season. I recommend using peaches in light syrup for the best flavor. If the peaches are too sweet, cut back on the sugar in the recipe. Check the topping for a golden brown color. The peach filling should also bubble. Bake for about 30 to 35 minutes at 375°F (190°C). If you see golden edges and smell a sweet aroma, it's time to take them out. Let them cool for a bit before cutting. This helps the bars hold their shape. Peach cobbler bars are great on their own, but you can add extras. Serve them warm with vanilla ice cream or whipped cream. A drizzle of caramel sauce also works well. Pair them with a scoop of yogurt for a lighter option. Enjoy the mix of flavors and textures! For more details, check the Full Recipe. In this post, I covered the key steps to make peach cobbler bars. We talked about fresh ingredients, baking essentials, and extra flavors. I shared step-by-step instructions to prep peaches, make crust, and assemble the bars. Tips on choosing peaches and serving ideas help ensure success. You can even try fruit variations or gluten-free options. Now, you’re ready to bake delicious peach cobbler bars that impress. Enjoy creating a delightful treat for yourself and others!

Peach Cobbler Bars Delicious and Easy Dessert Recipe

If you love dessert, you’re in for a treat! My Peach Cobbler Bars are both simple and delicious. This recipe

- 1 ½ cups all-purpose flour - 1 teaspoon baking powder - ½ teaspoon baking soda - ¼ teaspoon salt - ½ cup unsalted butter, softened - 1 cup granulated sugar - 2 large eggs - 1 tablespoon lemon zest (about 1 lemon) - ¼ cup fresh lemon juice - 1 teaspoon vanilla extract - 2 tablespoons poppy seeds - ½ cup plain Greek yogurt - Optional: Powdered sugar for dusting When I bake lemon poppy seed bread, I focus on fresh, quality ingredients. Each one plays a key role in flavor and texture. The flour gives structure. Baking powder and baking soda help the bread rise. Salt enhances the flavors and balances sweetness. I like using unsalted butter for a rich taste. It adds moisture and creaminess. Granulated sugar sweetens the bread and helps it brown nicely. Eggs act as a binder, so I choose large ones for best results. Lemon zest adds bright flavor, while fresh lemon juice brings a tangy twist. Vanilla extract rounds out the flavor profile. Poppy seeds provide a nutty crunch and a lovely look. Lastly, Greek yogurt adds moisture and a slight tang. These ingredients blend perfectly for a moist, flavorful loaf. For the full recipe, check out the instructions. - Preheat oven to 350°F (175°C). - Grease and flour the loaf pan. - In a bowl, mix the dry ingredients: flour, baking powder, baking soda, and salt. - In a large bowl, cream the softened butter with sugar until fluffy. - Add eggs one at a time, mixing well after each. Stir in lemon zest, juice, and vanilla. - Alternate adding the dry mix with Greek yogurt. Start and end with flour. Stir until just combined. - Gently fold in the poppy seeds until evenly mixed. - Pour the batter into the prepared loaf pan and smooth the top. - Bake for 50-60 minutes. Test doneness with a toothpick; it should come out clean. Follow these steps closely for a perfect Lemon Poppy Seed Bread every time! For the detailed recipe, check out the Full Recipe link. - Use room temperature ingredients. This helps the batter mix well. - Do not over-mix the batter. This keeps the bread light and fluffy. - Fresh lemon juice gives the best flavor. Always choose fresh over bottled. - Try different citrus zests for a twist. Orange zest can add a nice touch. - Swap yogurt for sour cream if you want a creamier texture. - Serve the bread warm with a pat of butter. This makes it even more tasty. - Enjoy a slice with a cup of tea or coffee. It’s a perfect match. You can find the Full Recipe for Lemon Poppy Seed Bread in the previous sections. {{image_2}} Lemon poppy seed bread is great on its own, but you can change it up! One fun option is to make almond lemon poppy seed bread. Just add a little almond extract for a nutty twist. The flavor pairs well with lemon's bright notes. Another tasty variation is blueberry lemon poppy seed bread. Mix in fresh blueberries for added sweetness. You can fold them in gently to keep them whole. This adds a pop of color and flavor to each bite. If you need a gluten-free option, you can use a gluten-free flour blend. Make sure it has xanthan gum to help with texture. This way, everyone can enjoy this lovely bread. For a vegan version, swap the eggs with flaxseed meal mixed with water. Use coconut oil or vegan butter in place of regular butter. These changes keep the bread moist and delicious without animal products. You can add spices to your lemon poppy seed bread for the holidays. Try cinnamon, nutmeg, or ginger for a warm, cozy flavor. These spices give it a festive touch that's perfect for gatherings. In the summer, consider adding berries like strawberries or raspberries. They add a fresh, fruity taste that brightens the bread. This makes it a perfect treat for warm days. For the full recipe, check out the Lemon Poppy Seed Bread Delight. To keep your lemon poppy seed bread fresh, store it in a cool, dry place. Wrap it in plastic wrap or place it in an airtight container. This keeps moisture in and prevents it from drying out. At room temperature, it can last for about 2 to 3 days. If you want to store it longer, consider refrigerating it. In the fridge, it stays fresh for about a week. Just remember, the cold can change the texture slightly. If you want to freeze the bread, let it cool completely first. Wrap it tightly in plastic wrap or aluminum foil. Then, place it in a freezer-safe bag or container. This helps avoid freezer burn. It can last up to 3 months in the freezer. When you're ready to eat it, thaw the bread in the fridge overnight. To reheat, preheat your oven to 350°F (175°C) and warm the bread for about 10-15 minutes. This brings back its fresh-baked taste. At room temperature, expect your lemon poppy seed bread to stay fresh for 2 to 3 days. If refrigerated, it can last up to a week. Keep an eye out for signs of spoilage. Look for any mold or an off smell. If the bread feels dry or hard, it may not taste good anymore. Enjoy your lemon poppy seed bread while it's fresh for the best flavor! Lemon poppy seed bread can last about 3 to 5 days at room temperature. Store it in an airtight container to keep it fresh. If you want it to last longer, refrigerate it for up to a week. You can also freeze it for about 3 months. Just wrap it well in plastic wrap and then in foil. You can use milk, but it will change the bread's texture. Greek yogurt adds moisture and richness. Milk may make the bread a bit less dense and softer. If you use milk, try to add a little more lemon juice to keep the flavor strong. If you want to skip eggs, there are great options. You can use a flaxseed meal. Mix 1 tablespoon of flaxseed with 2.5 tablespoons of water. Let it sit until it thickens. You can also use applesauce or mashed banana. Just use 1/4 cup of either for each egg. Several things can cause this. First, check your baking powder and baking soda; they need to be fresh. Also, make sure you mix the batter well but don’t overdo it. Too much mixing can make the bread dense. Lastly, the oven must be preheated. If it’s not hot enough, the bread won't rise. Yes, you can make mini loaves! Use smaller loaf pans to bake. Adjust the baking time to about 30 to 40 minutes. Keep an eye on them. Check for doneness by inserting a toothpick. When it comes out clean, your mini loaves are ready. Enjoy the fun sizes! You learned how to make Lemon Poppy Seed Bread from start to finish. We covered essential ingredients, recommended tools, and step-by-step baking instructions. Plus, tips for perfecting your bread and fun variations. Remember, using fresh ingredients and avoiding over-mixing will help your bread rise well. This simple recipe is perfect for any occasion. Enjoy your baking and share this delightful treat with loved ones!

Lemon Poppy Seed Bread Flavorful and Simple Recipe

Looking for a delicious and easy recipe? You’ve come to the right place! This Lemon Poppy Seed Bread is bursting

For these Thai peanut chicken lettuce wraps, gather the following items: - 1 lb ground chicken - 2 tablespoons peanut butter - 2 tablespoons soy sauce - 1 tablespoon lime juice - 1 tablespoon honey - 2 cloves garlic, minced - 1 teaspoon ginger, grated - 1 cup shredded carrots - 1 red bell pepper, diced - 1/4 cup scallions, chopped - 1/4 cup fresh cilantro, chopped - 1 head of butter lettuce or romaine, separated into leaves - Salt and pepper to taste - Crushed peanuts (for garnish) You can switch out the ground chicken for ground turkey or tofu for a vegetarian option. If you need a nut-free meal, use sunflower seed butter instead of peanut butter. Soy sauce can be swapped for coconut aminos to make it gluten-free. The lime juice adds a bright flavor, but lemon juice works too. Each ingredient in these wraps brings something healthy: - Ground chicken is a lean protein that helps build muscle. - Peanut butter gives healthy fats and protein, which keeps you full. - Carrots are rich in vitamin A, good for your eyes. - Bell peppers add vitamin C, boosting your immune system. - Cilantro has antioxidants that help fight inflammation. These wraps are not only tasty but also packed with nutrients! For the full recipe, check the details above. First, gather all your ingredients. You want everything ready before you start. Measure out the ground chicken, peanut butter, soy sauce, lime juice, honey, and garlic. Don't forget the ginger, carrots, bell pepper, scallions, cilantro, and lettuce. Next, wash and dry the lettuce leaves. You can use butter lettuce or romaine. This will be your wrap. Chop the scallions and cilantro. Dice the red bell pepper and shred the carrots. Keep everything close, so you can move fast. Heat a large skillet over medium heat. Add the ground chicken to the pan. Cook it for about 5-7 minutes. Break it apart with a spoon. When it's browned, drain any extra fat. Now, add the minced garlic and grated ginger. Cook for 1-2 minutes. This step adds great flavor. Next, stir in the peanut butter, soy sauce, lime juice, and honey. Mix until everything is coated and the peanut butter melts. Add the shredded carrots and diced bell pepper next. Cook for another 3-4 minutes. You want the veggies to stay crisp. Season with salt and pepper to taste. Finally, remove the skillet from the heat. Stir in the chopped scallions and cilantro for freshness. Now comes the fun part! Take a lettuce leaf and spoon the chicken mixture onto it. Make sure not to overfill. You want it easy to hold. Top with crushed peanuts for a crunchy bite. You can also add more scallions or cilantro if you like. Enjoy your wraps right away, or serve them fresh to friends. For the full recipe, check out the details above. One big mistake is overcooking the chicken. Cook it just until it's brown. If you cook it too long, it can become dry. Also, don’t skip the garlic and ginger. They add a lot of flavor. Make sure to chop them small for best taste. Lastly, avoid using thick lettuce. Thin leaves make great wraps. To boost the flavor, add lime zest along with the juice. This adds a fresh twist. You can also mix in a bit of sesame oil for depth. A sprinkle of red pepper flakes gives a nice kick. If you love heat, add sliced jalapeños or chili sauce. It’s fun to play with flavors, so don’t be afraid to experiment! You can prepare these wraps ahead of time. Cook the chicken mixture and store it in the fridge. You can keep it for up to three days. When you’re ready to eat, just warm it up. Wash and dry the lettuce leaves, and they’ll be ready to use. You can even prep the veggies, like carrots and bell peppers, in advance. This makes your meal quick and easy! For the full recipe, check out the complete instructions. {{image_2}} You can easily make these wraps vegetarian. Instead of chicken, use firm tofu. Press the tofu to remove extra water. Dice it into small cubes. Sauté the tofu in a skillet until golden brown. This gives you a nice texture. You can also use chickpeas. Mash them lightly and mix with the sauce. Both options are tasty and filling. Besides chicken, you can try ground turkey or beef. Both work well with the peanut sauce. Cook them just like you would chicken. For a seafood twist, shrimp is great too. Just sauté shrimp until they turn pink. Each protein brings a new flavor to your wraps. Get creative with your flavors! Add diced mango or pineapple for sweetness. You can also mix in some chopped jalapeños for heat. Fresh herbs like mint or basil can brighten the dish. Want a crunch? Toss in sliced cucumbers or radishes. These simple changes make your wraps exciting every time. For the full recipe, check the complete details above. To keep your Thai peanut chicken lettuce wraps fresh, store them properly. First, let the chicken mixture cool down. Use an airtight container for the chicken. Place the lettuce leaves in a separate bag or container. This way, they stay crisp. Avoid stacking the lettuce leaves to prevent bruising. When stored right, the chicken filling lasts about 3 days in the fridge. The lettuce leaves stay fresh for about 2 days. If you mix them, the wraps will get soggy quickly. So, keep them apart until you're ready to eat. To reheat the chicken mixture, place it in a skillet. Heat it on medium until warm. Stir often to avoid burning. You can also use a microwave. Place the chicken in a microwave-safe bowl. Cover it loosely with a lid or a paper towel. Heat for 1-2 minutes, checking halfway. Once hot, serve it in the fresh lettuce leaves. For the full recipe, check the earlier section! Yes, you can prepare the chicken filling in advance. Store it in the fridge for up to three days. When ready to serve, simply spoon it into the lettuce leaves. This saves time and keeps your meal fresh. If you need a substitute, try almond butter or sunflower seed butter. Both options give a tasty flavor. They also keep the dish nut-free if you have allergies. To add heat, mix in some chopped fresh chili peppers or a splash of hot sauce. You can also use spicy peanut butter for an extra kick. Adjust the spice level to suit your taste. These wraps pair well with jasmine rice or a fresh salad. You can also add a side of spring rolls for extra crunch. Enjoy these options for a full meal! For the full recipe, check out the sections above. This blog post covered the essential ingredients for Thai Peanut Chicken Lettuce Wraps. We talked about their health benefits, preparation steps, and cooking techniques. You learned tips to avoid common mistakes and how to enhance flavor. Variations make this dish fun, whether you choose vegetarian options or add new flavors. Lastly, we explored storing and reheating tips to keep your wraps fresh. Cooking these wraps is easy and rewarding. Enjoy a delicious and healthy meal that you can customize to your taste!

Thai Peanut Chicken Lettuce Wraps Savory Fresh Meal

Are you ready to enjoy a burst of flavor? My Thai Peanut Chicken Lettuce Wraps are a fresh and tasty

Older posts
Page1 Page2 … Page131 Next →
© 2025 My Dish Spin • Built with GeneratePress

Our Policies

  • Privacy Policy
  • GDPR Policy
  • Terms Of Use
  • Copyright Policy
  • Cookie Policy
  • Disclaimer

More Information​

  • Home
  • Contact
  • About
  • Dinner
  • Appetizers
  • Dessert
©2025, My Dish Spin About Privacy Policy Back To Top