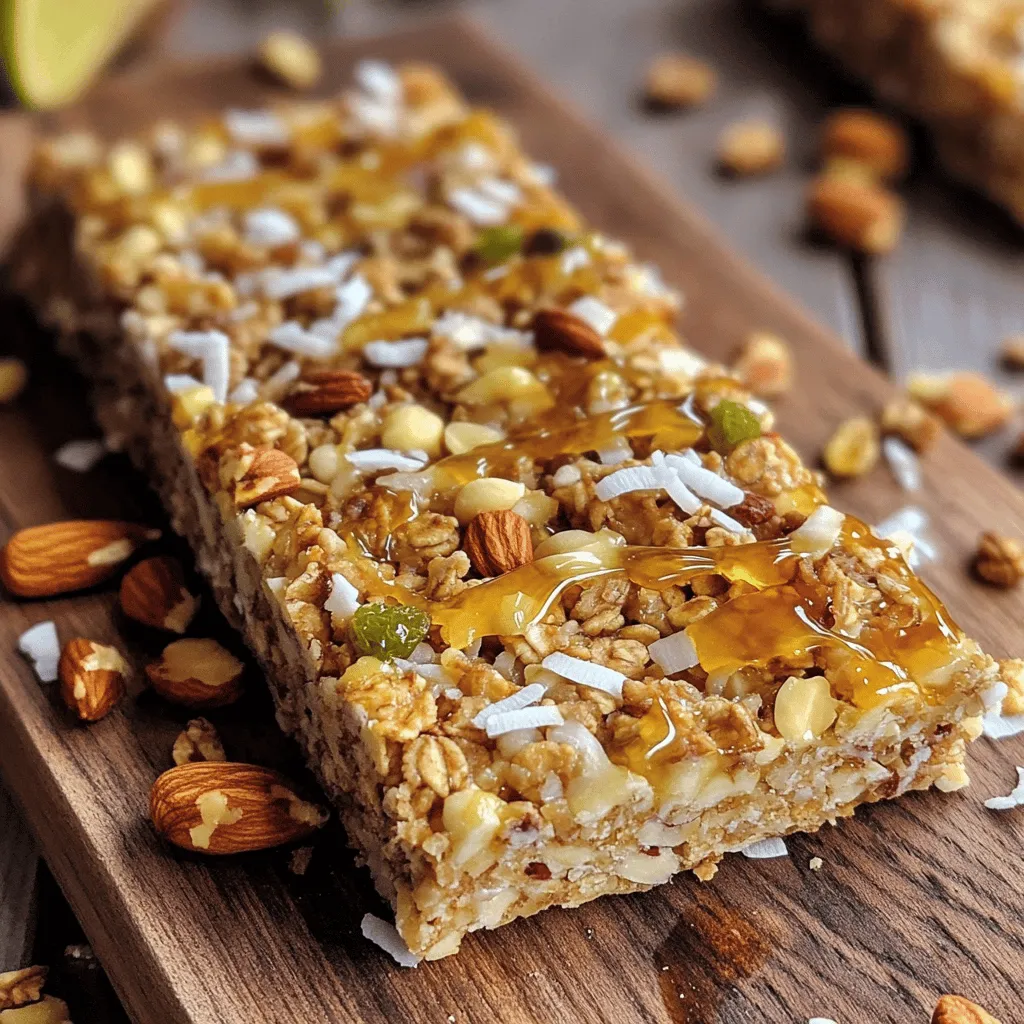
Looking for a quick, tasty snack that’s easy to make? Homemade granola bars are the answer! Packed with wholesome ingredients, they give you energy without added junk. I’ll guide you step-by-step to create a delicious snack your whole family will love. Whether you’re at home, work, or on the go, these bars are perfect for any time. Let’s dive into the simple recipe and make your own!
Ingredients
Detailed Ingredient List
– 2 cups rolled oats
– 1 cup mixed nuts (almonds, walnuts, pecans), roughly chopped
– 1/2 cup unsweetened shredded coconut
– 1/2 cup honey or maple syrup
– 1/2 cup nut butter (peanut, almond, or cashew)
– 1/4 cup brown sugar (optional)
– 1/2 teaspoon vanilla extract
– 1/2 teaspoon cinnamon
– 1/4 teaspoon salt
– 1/2 cup dried fruit (cranberries, raisins, or apricots), chopped
When I make these bars, I focus on fresh, simple ingredients. The rolled oats form the base. They give a chewy texture and great taste. I like to use a mix of nuts for crunch. Almonds, walnuts, and pecans work well together.
Shredded coconut adds a nice sweetness. Honey or maple syrup acts as a natural sweetener. Nut butter binds everything together. I often use peanut butter, but almond or cashew butter is great too.
If you want more sweetness, add brown sugar. The vanilla extract and cinnamon give a wonderful flavor boost. Salt balances the sweetness and brings out the flavors. Dried fruit adds chewiness and natural sweetness. You can choose cranberries, raisins, or apricots based on your taste.
This recipe is easy to customize. You can mix and match ingredients based on what you enjoy.
Step-by-Step Instructions
Preparation Steps
– Step 1: Preheat oven and prepare baking dish
First, set your oven to 350°F (175°C). Get an 8×8 inch baking dish. Line it with parchment paper. Leave some paper hanging over the sides. This will help you lift the bars out later.
– Step 2: Combine dry ingredients in a bowl
In a big bowl, mix together 2 cups of rolled oats, 1 cup of chopped nuts, and 1/2 cup of shredded coconut. Stir well so the ingredients blend.
– Step 3: Mix wet ingredients in a saucepan
Take a small saucepan. Over low heat, combine 1/2 cup of honey (or maple syrup), 1/2 cup of nut butter, and 1/4 cup of brown sugar (if you want it sweeter). Add 1/2 teaspoon of vanilla extract, 1/2 teaspoon of cinnamon, and 1/4 teaspoon of salt. Stir until it gets smooth.
Mixing and Baking Process
– Step 4: Combine wet and dry ingredients
Pour the warm mixture into the bowl with the dry ingredients. Mix until every piece is coated. Make sure it looks sticky and tasty.
– Step 5: Press the mixture into the baking dish
Transfer the mixture into the baking dish. Use a spatula to press it down firmly. Make sure it’s even all over the dish.
– Step 6: Bake and cool
Place the dish in the oven. Bake for 20-25 minutes. Look for the edges to turn golden brown. Once done, take it out and let it cool for 10-15 minutes in the pan. Then carefully lift it out using the parchment paper.
Finalizing the Bars
– Step 7: Cut into serving sizes
Once the granola has cooled, place it on a cutting board. Cut it into bars or squares. This makes it easy to share.
– Step 8: Serve or store
You can eat them right away or store them. Place the bars in an airtight container. They will stay fresh for about a week. Enjoy your homemade granola bars!
Tips & Tricks
Common Mistakes to Avoid
When making homemade granola bars, avoid these common mistakes:
– Not measuring ingredients: Use measuring cups and spoons. This ensures proper texture.
– Skipping the press: Press the mixture firmly into the pan. This helps the bars hold together.
– Overbaking: Keep an eye on the time. Overbaking can dry out your bars.
How to Achieve the Best Texture
To get that perfect chewy yet crunchy texture, follow these tips:
– Use rolled oats: They provide a hearty base. Instant oats can make bars mushy.
– Add enough nut butter: This helps bind the ingredients. Too little can cause crumbling.
– Cool before cutting: Let the bars cool completely. This allows them to firm up nicely.
Flavor Enhancements
You can easily boost the flavor of your granola bars:
– Experiment with spices: Add nutmeg or ginger for extra warmth.
– Mix in seeds: Flaxseeds or chia seeds give a nutty flavor and crunch.
– Use flavored nut butters: Try using chocolate or cinnamon nut butter for a twist.

Variations
Nut-Free Option
If you want a nut-free granola bar, you can easily swap out the nuts. Use seeds instead, like pumpkin or sunflower seeds. These seeds give a nice crunch and protein. You can also add more dried fruit for sweetness. Try cranberries, raisins, or apricots for extra flavor. This way, anyone with nut allergies can enjoy your bars.
Different Sweetener Choices
Not all sweeteners are the same. You can use honey, maple syrup, or agave nectar. Each sweetener brings a different taste. Honey gives a rich flavor, while maple syrup adds a warm sweetness. If you like, you can reduce the sugar too. If you want less sweetness, use just a bit of honey or syrup. Adjust it to fit your taste!
Add-Ins for Extra Flavor
To make your bars even more tasty, think about extra add-ins. You can mix in chocolate chips or yogurt-covered raisins for a sweet treat. Dried coconut adds a tropical twist, and spices like nutmeg or ginger can warm the flavor. You can also try adding chia seeds or flaxseeds for some crunch and health benefits. Explore your options and make these bars yours!
Storage Information
Best Storage Practices
To keep your homemade granola bars fresh, store them in an airtight container. This will protect them from air and moisture. Place parchment paper between layers to prevent sticking. If you live in a warm area, keep them in the fridge. This can help them last longer and stay crunchy.
How Long They Last
When stored properly, these granola bars can last for about a week. However, if you want them to last longer, consider freezing them. The flavors will stay fresh and tasty even after freezing. Just make sure to check for any signs of spoilage before eating.
Freezing Instructions
To freeze your granola bars, cut them into squares or bars first. Wrap each piece in plastic wrap to keep them safe from freezer burn. Place the wrapped bars in a freezer bag. They can last for up to three months in the freezer. When you’re ready to enjoy them, just take out what you need and let them thaw at room temperature. For a quick snack, you can also eat them straight from the freezer!
FAQs
Can I customize these homemade granola bars?
Yes, you can customize these granola bars! You can change the nuts, seeds, or dried fruits. You might try adding chocolate chips or seeds like pumpkin or sunflower. The flavors are yours to explore. Just keep the main ingredients the same, like oats and a binding agent like honey or nut butter.
What are the best substitutes for nut butter?
If you need a nut-free option, try sunflower seed butter or soy nut butter. Both work well in the recipe. You can also use tahini, which is made from sesame seeds. These options will still give you a creamy texture and help bind the bars together.
How do I know when the granola bars are done baking?
Look for the edges to turn golden brown. This color means they are likely done. You can also press on the center lightly; it should feel firm, not soft. If it feels too soft, give it a few more minutes in the oven.
Is it possible to make these bars vegan?
Absolutely! To make these bars vegan, switch honey for maple syrup. Use a plant-based nut butter, and ensure your ingredients are all vegan. This way, you get a tasty snack that fits a vegan diet.
In this post, we explored how to make tasty granola bars. We covered the ingredients, step-by-step instructions, tips, variations, and storage. You can mix and match ingredients to suit your taste. These bars not only taste great but also offer health benefits. With a few easy steps, you can enjoy a healthy snack that you made yourself. Remember, the options are endless. Have fun creating your own unique granola bars!


