Go Back
To make Biscoff cheesecake bars, you’ll need: - 1 ½ cups Biscoff cookie crumbs - ½ cup unsalted butter, melted - 1 cup cream cheese, softened - ¾ cup powdered sugar - ½ cup Biscoff cookie spread - 1 teaspoon vanilla extract - 1 cup whipped cream (store-bought or homemade) - 1 tablespoon Biscoff crumbs for topping These ingredients work together to create a rich and creamy dessert. If you have dietary needs, you can swap some ingredients: - Dairy-free: Use a dairy-free cream cheese and whipped cream. - Gluten-free: Ensure you use gluten-free Biscoff cookies. - Lower sugar: Replace powdered sugar with a sugar substitute like erythritol. These swaps keep the bars tasty while fitting your diet. When selecting ingredients, here are my go-to brands: - Biscoff Spread: Look for the original Biscoff cookie spread. It’s rich and smooth. - Cream Cheese: Philadelphia cream cheese is a reliable choice for texture and taste. - Whipped Cream: Use either Cool Whip for ease or make your own fresh whipped cream. Using these brands can enhance the flavor and quality of your cheesecake bars. {{ingredient_image_1}} Start by preheating your oven to 350°F (175°C). Line an 8x8-inch baking dish with parchment paper. This will help you lift out the bars later. In a bowl, mix 1 ½ cups of Biscoff cookie crumbs with ½ cup of melted unsalted butter. Combine these well until they look like wet sand. Press this mix into the bottom of your baking dish. Make sure it is even and packed down. Bake for 10 minutes, then let it cool for a bit. While the crust cools, grab another bowl. Beat 1 cup of softened cream cheese with an electric mixer until it is smooth. Slowly add in ¾ cup of powdered sugar while mixing. This will sweeten the filling. Next, add ½ cup of Biscoff cookie spread and 1 teaspoon of vanilla extract. Beat until it is smooth and well combined. Now fold in 1 cup of whipped cream gently. This adds lightness to your filling. Spread the cheesecake filling over your cooled crust. Use a spatula to smooth the top. Now, cover the dish with plastic wrap. Place it in the fridge for at least 4 hours, or overnight for best results. This helps the bars set and develop a great texture. When they are set, lift the cheesecake out with the parchment paper. Cut it into bars. Top with 1 tablespoon of Biscoff crumbs for a lovely finish. Enjoy your sweet creation! To get the best texture in your cheesecake bars, start with softened cream cheese. This makes it easier to mix and helps avoid lumps. Make sure to fold in the whipped cream gently. If you mix too hard, your bars may turn out dense instead of light. Refrigerate for at least four hours. This chilling time helps the bars set properly. One common mistake is not pressing the crust firmly enough. If the crust is loose, it will crumble when you cut the bars. Another mistake is overmixing the batter. This adds too much air, leading to cracks. Always use room temperature ingredients. Cold ingredients can create a lumpy batter. For a stunning presentation, serve the bars on a decorative platter. Garnish with a dollop of whipped cream beside each bar. Add a drizzle of Biscoff cookie spread for extra flair. Finally, sprinkle additional Biscoff crumbs on top. This adds texture and makes the bars look more inviting. Pro Tips Chill Thoroughly: Make sure to refrigerate the cheesecake bars for at least 4 hours or overnight. This allows the filling to set properly and enhances the flavors. Quality Ingredients: Use high-quality cream cheese and Biscoff cookie spread for the best flavor. The quality of your ingredients directly affects the final taste of your cheesecake bars. Customize the Topping: Feel free to get creative with the toppings! Add chocolate shavings, caramel drizzle, or fresh fruit to complement the Biscoff flavor. Make Ahead: These cheesecake bars can be made ahead of time and stored in the refrigerator for up to a week. Perfect for gatherings or meal prep! {{image_2}} You can easily add a chocolate swirl to your Biscoff cheesecake bars. To do this, melt about ½ cup of chocolate chips. After mixing the cheesecake filling, pour half of it over the crust. Drizzle melted chocolate on top, then add the rest of the filling. Use a knife to swirl the chocolate through the cheesecake. This adds a tasty twist and looks great! For a gluten-free version, use gluten-free Biscoff cookies or another gluten-free cookie. The crust will still be delicious! Make sure to check the labels on all your ingredients to avoid any hidden gluten. The filling remains the same, so you still get that rich and creamy taste. If you want a vegan version, swap the cream cheese for vegan cream cheese. Use coconut cream or whipped aquafaba instead of whipped cream. Replace the butter with coconut oil for the crust. The Biscoff cookie spread is usually vegan, but check the label to be sure. This way, you can enjoy creamy Biscoff bars without dairy! To keep your Biscoff Cheesecake Bars fresh, store them in an airtight container. This helps prevent them from drying out or absorbing other smells in the fridge. If you don't have a container, wrap the bars tightly in plastic wrap. Make sure to layer parchment paper between the bars if you stack them. This keeps them from sticking together. When stored properly, Biscoff Cheesecake Bars can last about 5 to 7 days in the refrigerator. They taste best when enjoyed fresh, but chilling them helps the flavors meld. Check for any signs of spoilage, like an off smell or changes in texture, before eating. Freezing is a great way to extend the shelf life of these bars. To freeze, cut the cheesecake into individual bars first. Wrap each bar tightly in plastic wrap and then place them in a freezer-safe bag. Make sure to remove all air from the bag to avoid freezer burn. They can last for up to 3 months in the freezer. When you're ready to eat, thaw them in the fridge overnight for the best texture. Yes, you can use other cookies. Graham crackers work great for the crust. Oreo cookies also add a nice chocolate flavor. Just crush them and mix with melted butter. Adjust the amount based on cookie size. The taste will change, but it can still be yummy! To cut cheesecake bars evenly, chill them well first. Use a sharp knife for clean cuts. Wipe the knife with a damp cloth after each cut. This keeps the edges neat. You can also use a ruler to mark where to cut. This way, each piece looks perfect! Yes, you can make these bars ahead of time. They stay fresh in the fridge for up to five days. Just cover them well to prevent drying. You can also freeze them for longer storage. Thaw in the fridge before serving for the best texture. You learned how to make amazing Biscoff Cheesecake Bars. We covered ingredients, cooking steps, and helpful tips. I shared variations for different diets and smart storage ideas. Keeping these bars fresh is key to their taste. Remember to avoid common mistakes for a great result. Enjoy creating these tasty treats! You’ll impress friends and family with your skills. Happy baking!

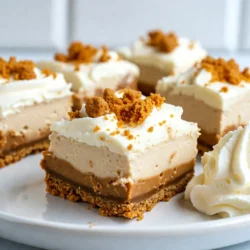
Biscoff Bliss Cheesecake Bars

Delicious cheesecake bars with a Biscoff cookie crust and creamy filling.
Prep Time 20 minutes
Cook Time 10 minutes
Total Time 4 hours 30 minutes
Course Dessert
Cuisine American
Servings 12
Calories 250 kcal

Ingredients
  

  • 1.5 cups Biscoff cookie crumbs
  • 0.5 cup unsalted butter, melted
  • 1 cup cream cheese, softened
  • 0.75 cup powdered sugar
  • 0.5 cup Biscoff cookie spread
  • 1 teaspoon vanilla extract
  • 1 cup whipped cream
  • 1 tablespoon Biscoff crumbs for topping

Instructions
 

  • Preheat your oven to 350°F (175°C) and line an 8x8-inch baking dish with parchment paper for easy removal of the bars.
  • In a mixing bowl, combine the Biscoff cookie crumbs and melted butter until well mixed. Press this mixture evenly into the bottom of the prepared baking dish to form the crust. Bake for 10 minutes, then remove from the oven and let it cool slightly.
  • In a separate bowl, beat the softened cream cheese with an electric mixer until smooth. Gradually add the powdered sugar, continuing to mix until well combined.
  • Add the Biscoff cookie spread and vanilla extract to the cream cheese mixture, beating until everything is well incorporated and smooth.
  • Fold the whipped cream into the cream cheese mixture gently until there are no streaks.
  • Spread the cheesecake filling evenly over the cooled Biscoff crust, smoothing the top with a spatula.
  • Refrigerate for at least 4 hours, or overnight, until the cheesecake is set.
  • Once chilled, lift the cheesecake out of the baking dish using the parchment paper and cut it into bars.
  • Sprinkle the top with additional Biscoff crumbs for garnish before serving.

Notes

Serve the bars on a decorative platter with whipped cream and extra Biscoff cookie spread.
Keyword Biscoff, cheesecake, dessert