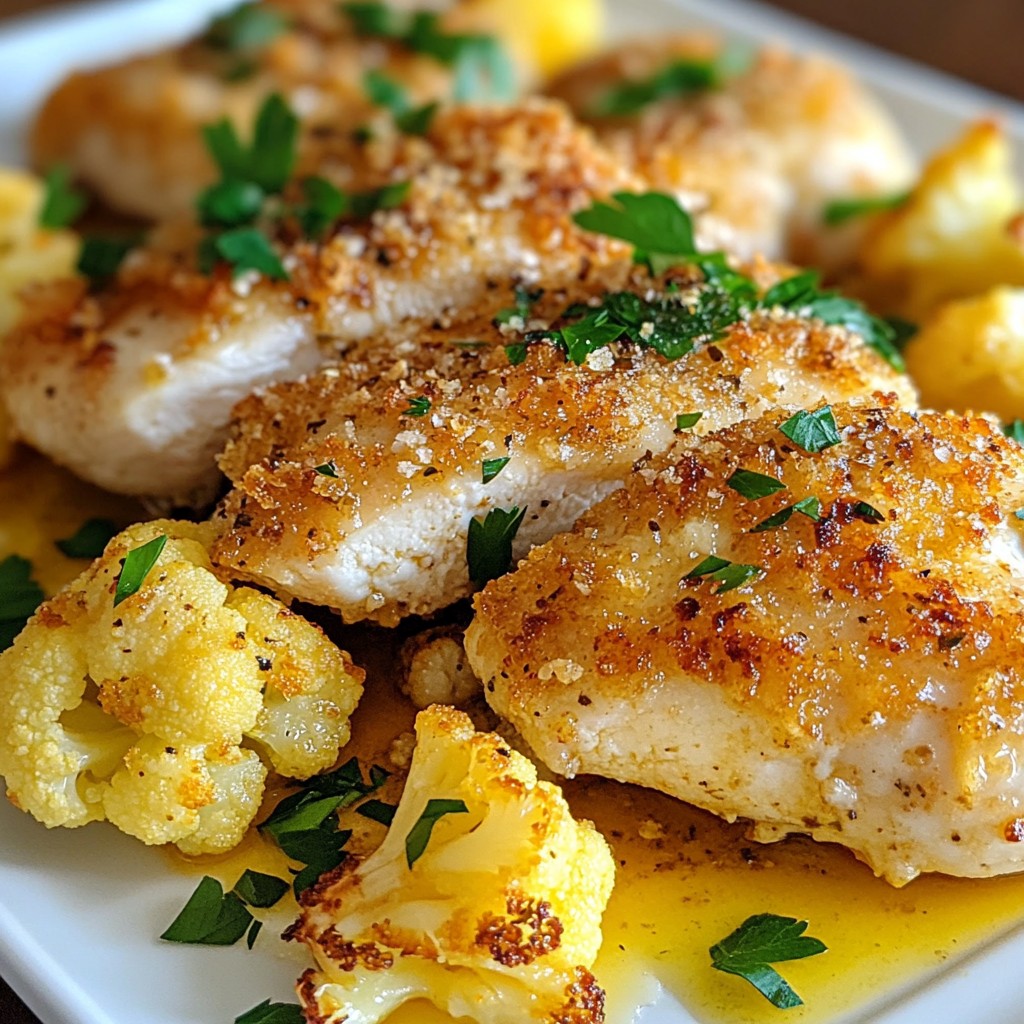
Welcome to my kitchen! Today, I’m excited to share my Baked Chicken with Parmesan Crust and Cauliflower Delight. This dish is easy, tasty, and perfect for any night. With juicy chicken breasts coated in crunchy parmesan and a side of roasted cauliflower, dinner just got a delicious upgrade. Let’s dive into the simple steps and tips that will make this meal a favorite at your table!
Why I Love This Recipe
- Deliciously Crunchy: The Parmesan crust creates a delightful crunch that pairs perfectly with tender chicken.
- Easy to Prepare: This recipe requires minimal prep time and uses simple ingredients, making it accessible for any home cook.
- Healthy and Wholesome: With lean chicken and nutritious cauliflower, this dish is a healthy choice for family dinners.
- Flavorful Seasoning: The combination of garlic, onion powder, and paprika enhances the taste, making each bite a savory delight.
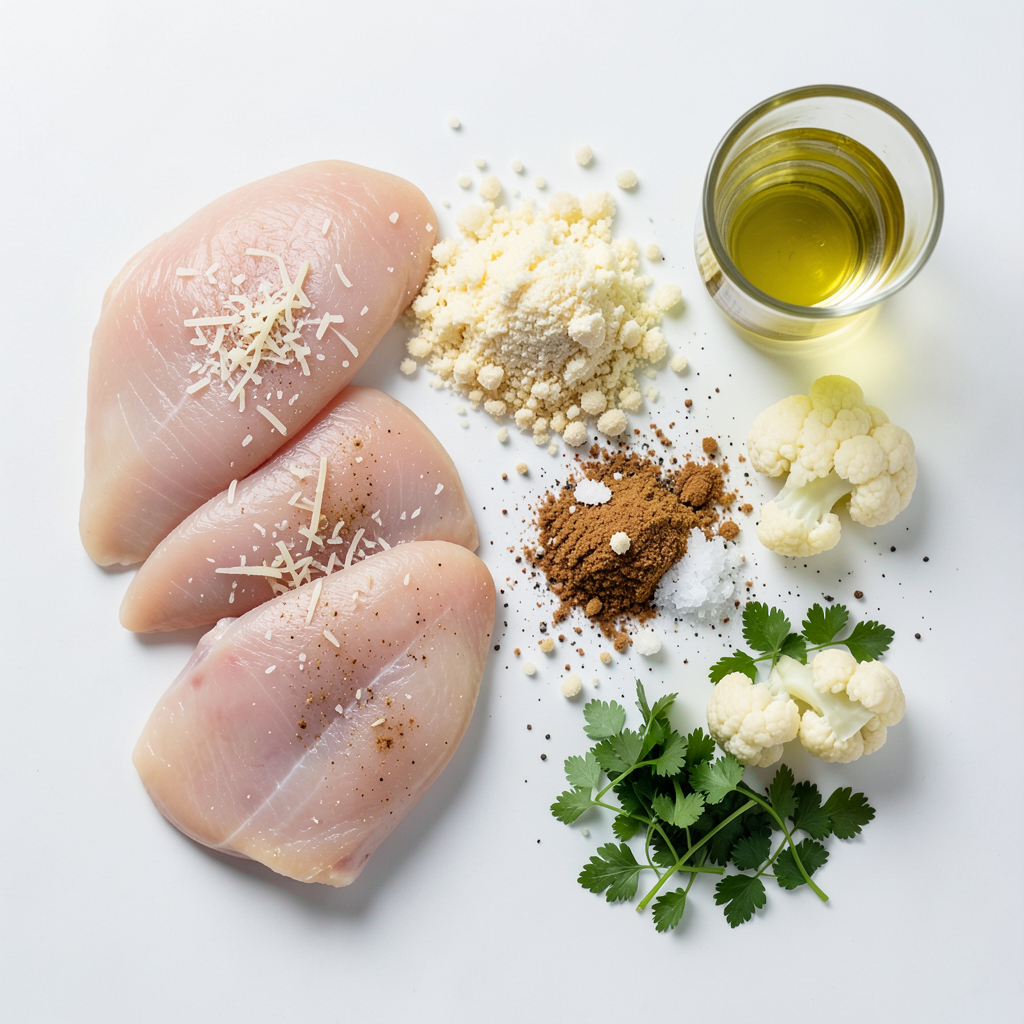
Ingredients
Main Ingredients
- 4 boneless, skinless chicken breasts
- 1 cup grated Parmesan cheese
- 1 cup breadcrumbs (panko preferred for crunch)
Seasonings and Oil
- 1 teaspoon garlic powder
- 1 teaspoon onion powder
- 2 tablespoons olive oil
Vegetables
- 2 cups cauliflower florets
- Fresh parsley, chopped (for garnish)
When making Baked Chicken with Parmesan Crust and Cauliflower, you want to gather fresh ingredients. Start with the chicken. I prefer boneless, skinless chicken breasts. They cook evenly and stay moist. The Parmesan cheese provides a rich, savory flavor. Grating it fresh gives the best taste. Breadcrumbs add that perfect crunch. Panko breadcrumbs work best here for an extra crispy texture.
Now, let's talk about seasonings. Garlic powder and onion powder bring depth to the dish. They make every bite flavorful. I also add olive oil to help the coating stick to the chicken. It keeps the chicken juicy too.
Don't forget the vegetables! Cauliflower florets are the perfect side. They roast nicely and soak up flavors. You can also add fresh parsley for a pop of color. It brightens up the dish and adds freshness. With these ingredients, you are ready to create a delightful meal.
Step-by-Step Instructions
Preparation Steps
1. Preheat your oven to 400°F (200°C). This step is key for a perfect bake.
2. Line a baking sheet with parchment paper. This makes cleanup easy and helps the chicken not stick.
Coating the Chicken
1. In a large mixing bowl, combine the grated Parmesan, breadcrumbs, garlic powder, onion powder, paprika, black pepper, and salt. Stir well to mix all the flavors.
2. Place the chicken breasts on the baking sheet. Brush each breast with olive oil. This helps the crust stick to the chicken.
Baking the Dish
1. Generously coat each chicken breast with the Parmesan mixture. Press down slightly to make sure it sticks well.
2. In another bowl, toss the cauliflower florets with the remaining olive oil and a pinch of salt and pepper. Spread them evenly around the chicken on the baking sheet.
3. Bake in the oven for 25-30 minutes. The chicken is done when it reaches 165°F (75°C). Look for a golden brown crust. The cauliflower should be tender with crisp edges.
Tips & Tricks
Cooking Techniques
- Best practices for a crispy crust: Make sure to use panko breadcrumbs for extra crunch. They create a light and airy texture. Mix the breadcrumbs well with Parmesan and spices. Press the mixture firmly onto the chicken. This helps it stick well during baking.
- Avoiding overcooking the chicken: Cook the chicken until it reaches 165°F (75°C) inside. Use a meat thermometer for accuracy. If you bake it too long, the chicken can become dry. Set a timer for 25 minutes and check for doneness.
Serving Suggestions
- Presentation ideas: Place the baked chicken on a nice platter. Arrange the roasted cauliflower around the chicken. Sprinkle chopped parsley on top for a vibrant touch. This makes your dish look professional and inviting.
- Side dishes to pair: This dish goes well with a simple salad. A green salad with a light vinaigrette adds freshness. You could also serve it with rice or quinoa to soak up the flavors. These sides enhance the meal and make it more filling.
Pro Tips
- Tip for Choosing Chicken: Opt for chicken breasts that are uniform in size to ensure even cooking.
- Tip for Perfect Crust: For an extra crunchy texture, broil the chicken for the last 2-3 minutes of baking.
- Tip for Flavor: Add some dried herbs like oregano or thyme to the breadcrumb mixture for an extra flavor boost.
- Tip for Cauliflower: Make sure to spread the cauliflower in a single layer for even roasting and crispiness.
Variations
Ingredient Substitutions
You can switch things up if you want. For the Parmesan cheese, try using Pecorino Romano. It has a strong flavor that works well. If you don’t have breadcrumbs, crushed crackers or cornflakes can give a nice crunch.
Feel free to mix the seasonings too. Try adding Italian herbs like oregano or thyme for a fresh twist. If you like heat, include some red pepper flakes. These changes can bring new life to the dish.
Dietary Adjustments
If you need a gluten-free meal, use gluten-free breadcrumbs. You can even skip the breadcrumbs altogether and just use more cheese for the crust. This still gives you that tasty bite.
For a low-carb option, swap the cauliflower with other veggies like broccoli or zucchini. These veggies roast well and keep the dish light. You can enjoy the same great taste while sticking to your diet.
Storage Info
Storing Leftovers
To keep your baked chicken with Parmesan crust fresh, store leftovers in an airtight container. This helps lock in moisture and flavor. Place the chicken and cauliflower in the fridge within two hours of cooking. The best way to store is to separate the chicken from the cauliflower. This keeps both tasty.
You can keep leftovers for up to three days. If you want to enjoy the dish later, consider freezing it. Wrap the chicken tightly in foil and place it in a freezer-safe bag. It should last for about three months in the freezer.
Reheating Tips
When you’re ready to enjoy leftovers, reheating is key. The best method is to use the oven. Preheat it to 350°F (175°C). Place the chicken and cauliflower on a baking sheet. Cover with foil to prevent drying out. Heat for about 15-20 minutes or until warm.
If you want to use a microwave, do so with care. Place the chicken on a microwave-safe plate. Cover it with a damp paper towel. Heat in short bursts, checking every 30 seconds. This helps avoid sogginess. Enjoy your meal as if it were just made!
FAQs
Common Questions
Can I use chicken thighs instead of breasts? Yes, you can use chicken thighs. Thighs have more fat, giving them a juicier taste. They will also cook similarly. Just make sure the internal temperature reaches 165°F (75°C) to ensure safety.
How can I make this dish spicier? To add spice, try these options:
- Add cayenne pepper or chili powder to the coating.
- Mix in some crushed red pepper flakes.
- Serve with a spicy dipping sauce.
Nutritional Information
Caloric content per serving Each serving of baked chicken with Parmesan crust and cauliflower has about 400 calories. This may vary based on exact ingredient use.
Dietary considerations This dish is high in protein from chicken and cheese. It contains carbs from breadcrumbs. It can fit into a balanced meal plan. Adjust the recipe for gluten-free or low-carb diets as needed.
Cooking Tools and Equipment
Suggested kitchen tools for preparation
- Baking sheet: Use for cooking the chicken and cauliflower evenly.
- Parchment paper: Helps prevent sticking and makes cleanup easy.
- Mixing bowls: Necessary for combining your coating and tossing cauliflower.
Alternatives if you don’t have specific equipment
- If you lack a baking sheet, use a large cast-iron skillet.
- No parchment paper? Grease the baking sheet lightly with oil.
- A fork works well for mixing instead of a whisk.
This blog post covered all you need to know about making a delicious chicken dish. We explored the main ingredients and the importance of seasonings and oil. I provided step-by-step instructions for preparation, coating, and baking. I also shared tips for perfect results and several variations for different diets. Finally, you learned the best ways to store and reheat leftovers. With this knowledge, you can make tasty meals with ease and confidence. Keep experimenting, and enjoy your cooking journey!