Craving a sweet treat but short on time? The Chocolate Peanut Butter Mug Cake is your answer! In just minutes, you can indulge in a rich, fluffy dessert that combines the classic flavors of chocolate and peanut butter. Whether you're a beginner or a pro in the kitchen, this easy recipe offers quick steps and tasty tips to ensure success. Let’s dive into making this delightful dessert right in your microwave!
Why I Love This Recipe
- Quick and Easy: This mug cake can be prepared in just 5 minutes, making it perfect for a last-minute dessert craving.
- Chocolate and Peanut Butter Combo: The rich chocolate flavor combined with creamy peanut butter creates a deliciously indulgent treat.
- Single Serving: This recipe is designed for one, so you won’t be tempted to overindulge with leftovers.
- Customizable: You can easily add chocolate chips or nuts to the batter, allowing you to personalize it to your taste.
Ingredients
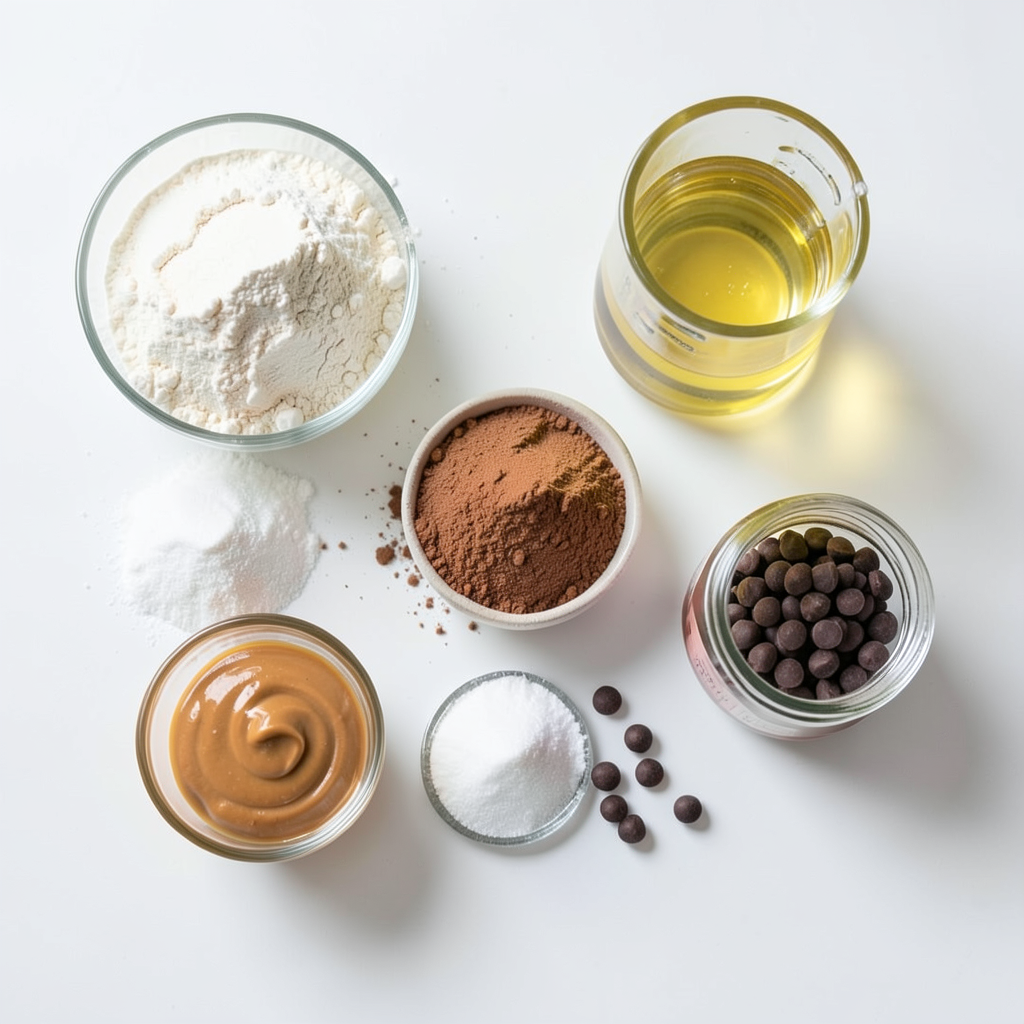
List of Ingredients
- 4 tablespoons all-purpose flour
- 2 tablespoons cocoa powder
- 2 tablespoons granulated sugar
- 1/8 teaspoon baking powder
- 1/8 teaspoon salt
- 3 tablespoons milk (any type)
- 1 tablespoon peanut butter
- 1 tablespoon vegetable oil
- 1/4 teaspoon vanilla extract
- Optional: chocolate chips for extra indulgence
I love using simple ingredients for this mug cake. You can find them in your pantry.
Optional Ingredients for Extra Flavor
- Chocolate chips: They add a rich, melty texture.
- Nuts: Chopped peanuts give a nice crunch.
- Sea salt: A pinch can enhance the chocolate flavor.
Adding these extras makes the cake even more fun and tasty.
Suggested Substitutions for Common Allergens
- Gluten-free flour: You can use a blend for the all-purpose flour.
- Dairy-free milk: Almond, coconut, or oat milk works well.
- Nut butter: Sunflower seed butter is a great swap for peanut butter.
These swaps keep the cake friendly for many diets. You can enjoy it no matter your needs!
Step-by-Step Instructions
Preparation of Dry Ingredients
First, grab a microwave-safe mug. This is key for cooking your cake. In the mug, add:
- 4 tablespoons all-purpose flour
- 2 tablespoons cocoa powder
- 2 tablespoons granulated sugar
- 1/8 teaspoon baking powder
- 1/8 teaspoon salt
Mix these dry ingredients well. Stir until they blend evenly. This step ensures a smooth cake.
Mixing Wet Ingredients with Dry Ingredients
Now, it’s time to add the wet ingredients. Pour in:
- 3 tablespoons milk (any type)
- 1 tablespoon peanut butter
- 1 tablespoon vegetable oil
- 1/4 teaspoon vanilla extract
Use a fork or spoon to mix. Stir until the batter is smooth and lump-free. If you want more chocolate flavor, fold in a few chocolate chips.
Cooking in the Microwave
Place your mug in the microwave. Cook on high for about 1 minute and 30 seconds. Watch closely. Cooking times can change based on your microwave’s power. The cake should rise and be set but still moist in the center.
Once done, let it cool for a minute. The mug will be hot! Enjoy your warm cake right from the mug.
Tips & Tricks
How to Achieve the Perfect Mug Cake Texture
To get the best texture, be careful with the mixing. Stir the dry ingredients well. This helps prevent lumps. When you add the wet ingredients, mix until smooth. Over-mixing can make it tough. The cake should look creamy and thick but not runny. Microwave it on high for about 1 minute and 30 seconds. Check if it rises and feels set but still soft in the middle.
Avoiding Common Mistakes
One common mistake is not watching the mug cake while it cooks. Microwaves can vary, so times may differ. If you cook it too long, it may dry out. Another issue is adding too much liquid. Stick to the amounts provided for the best results. Also, ensure your mug is microwave-safe and large enough. A small mug can overflow.
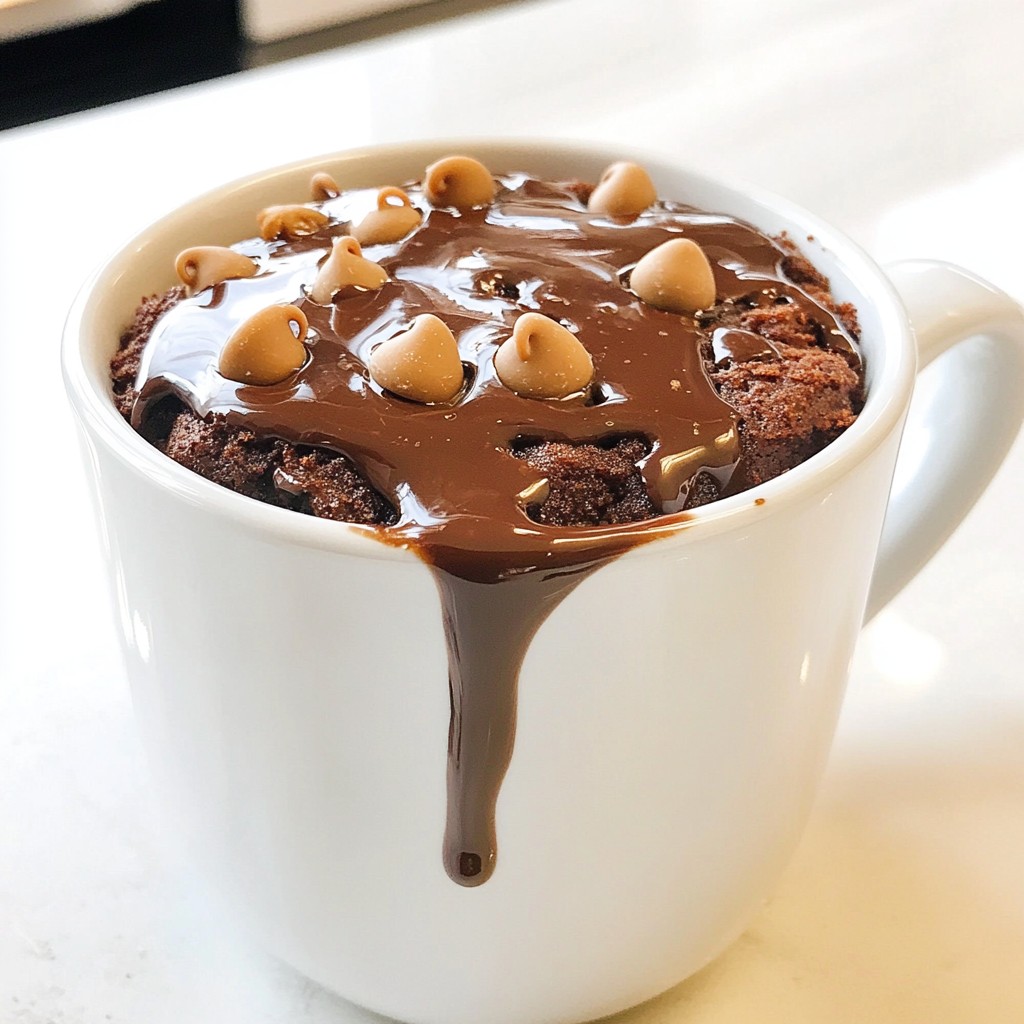
Enhancing Flavor with Toppings
You can boost the flavor with fun toppings. A scoop of ice cream on top makes it special. Drizzle some chocolate sauce for extra sweetness. You can also add sliced bananas or crushed nuts. If you want extra chocolate, sprinkle some chocolate chips on top before microwaving. These simple ideas elevate your mug cake from good to great!
Pro Tips
- Use a Larger Mug: Make sure to use a mug that can hold at least 12 ounces to give the cake enough room to rise without overflowing.
- Check Microwave Power: Different microwaves have varying power levels. Start with 1 minute and 30 seconds, then add 10-second intervals until it’s done.
- Let it Cool: Allow the mug cake to cool for at least a minute before eating to avoid burns and to let the flavors meld together.
- Experiment with Add-ins: Feel free to add nuts, berries, or spices like cinnamon to customize your mug cake to your taste!
Variations
Different Flavor Combinations
You can change up your chocolate peanut butter mug cake in fun ways. Want a minty twist? Add a drop of peppermint extract. For a fruity kick, mix in some mashed banana or a spoon of jam. You can also swap peanut butter for almond or cashew butter. Each nut butter gives a new taste. Try mixing in nuts or seeds for crunch. The possibilities are endless!
Healthier/Substitutable Ingredients
You can make this mug cake healthier too. Use whole wheat flour instead of all-purpose flour. This adds fiber and keeps you full longer. Swap granulated sugar with honey or maple syrup. You can also try unsweetened applesauce for sweetness. For a dairy-free option, use almond or oat milk. This keeps the cake delicious without extra calories.
Dietary Adaptations (Vegan, Gluten-Free)
If you want a vegan version, replace milk with plant-based milk. Use a vegan butter or coconut oil instead of regular oil. For gluten-free, choose almond flour or gluten-free all-purpose flour. These choices make your mug cake fit your needs. You can enjoy a tasty treat that fits your diet!
Storage Info
Best Practices for Storing Leftovers
Store your leftover mug cake in an airtight container. This keeps it fresh and moist. Place it in the fridge. It will last for about two days. Before you store, let the cake cool down. This prevents extra moisture from forming.
How to Reheat Successfully
To reheat, use the microwave. Place the mug cake in the microwave for 10 to 20 seconds. This warms it without drying it out. Check if it's warm enough to eat. If not, heat in short bursts. Be careful not to overheat, or it may become tough.
Freezing Options for Mug Cakes
You can freeze your mug cake if you want to save it for later. Wrap the cooled cake tightly in plastic wrap. Then, place it in a freezer bag. It can stay in the freezer for up to one month. When ready to eat, thaw it in the fridge overnight. Then, reheat it as mentioned earlier.
FAQs
How long does it take to make a Chocolate Peanut Butter Mug Cake?
It takes just about 5 minutes to make this cake. You spend 3 minutes on prep and 1 minute and 30 seconds cooking it in the microwave. It is quick and easy, perfect for a late-night snack or a sweet treat.
Can I use a different type of nut butter?
Yes, you can use other nut butters. Almond butter or cashew butter work well too. Each nut butter gives a unique taste. If you want a different flavor, try sunbutter for a nut-free option.
What is the best microwave time for mug cakes?
The best time is usually around 1 minute and 30 seconds. Keep an eye on it while it cooks. Each microwave is different, so adjust the time if needed. The cake should rise and look set but still be soft inside. If you overcook it, it may turn dry.
This blog post covered every step to create a great mug cake. You learned about essential and optional ingredients, plus smart substitutions. We detailed preparation and cooking in the microwave. Tips helped ensure your cake has the right texture and flavor.
In the end, your mug cake can be as unique as you. Experiment with different flavors and tweaks to suit your taste. Enjoy your delicious creation and share it with others!