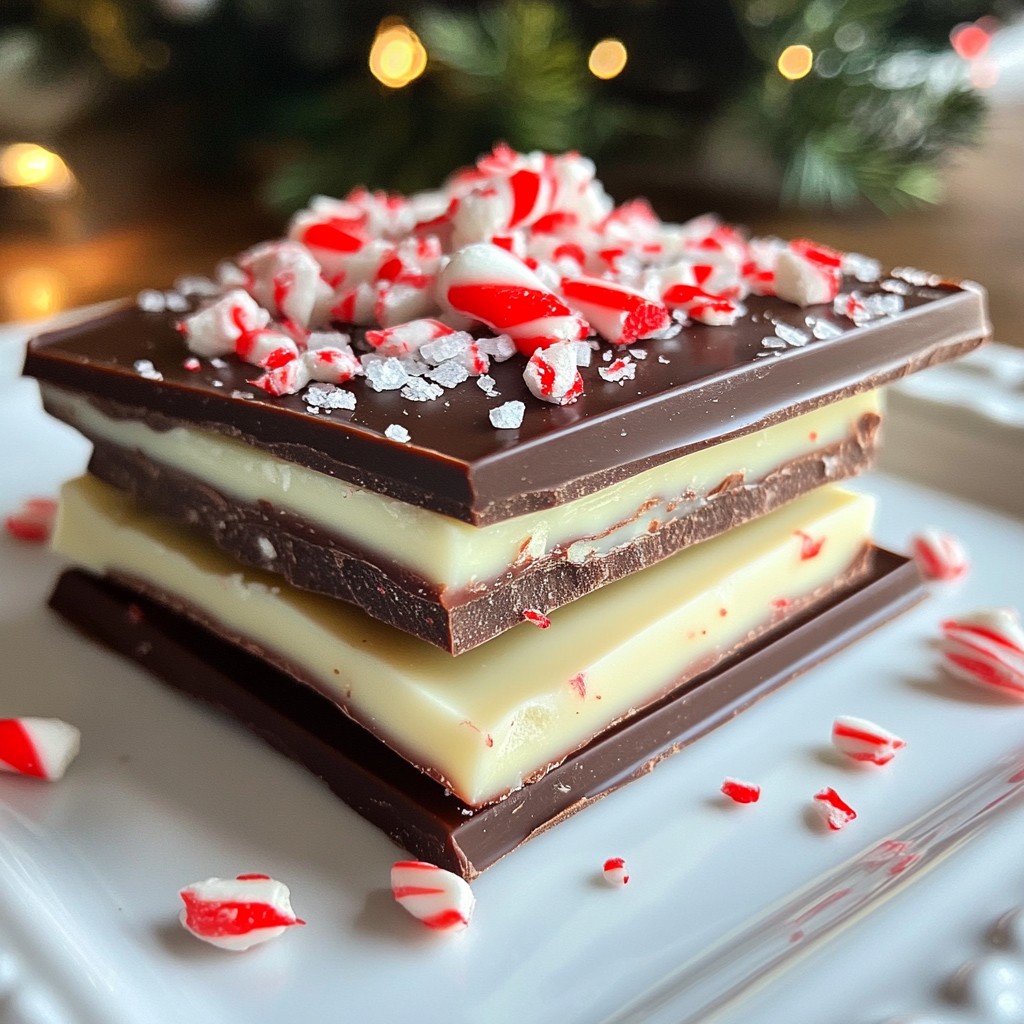
Are you looking for a festive treat that’s easy to make? Chocolate Peppermint Bark is the answer! This delight combines rich chocolate and refreshing peppermint for a flavor that screams holiday cheer. In this post, I’ll share simple steps, ingredient tips, and fun variations. Whether you're a seasoned baker or a newbie, you can create this irresistible treat. Let’s dive in and make your holiday season sweeter!
Why I Love This Recipe
- Decadent Flavor Combo: The rich dark chocolate perfectly balances with the sweet white chocolate and refreshing peppermint, creating an irresistible treat.
- Easy to Make: This recipe requires minimal ingredients and just a few simple steps, making it perfect for both novice and experienced bakers.
- Festive Presentation: The vibrant red and white colors from the candy canes make this bark a beautiful addition to any holiday dessert table.
- Customizable Treat: You can easily swap the candy canes for other toppings or flavors, allowing for endless variations to suit your taste.
Ingredients
List of Ingredients
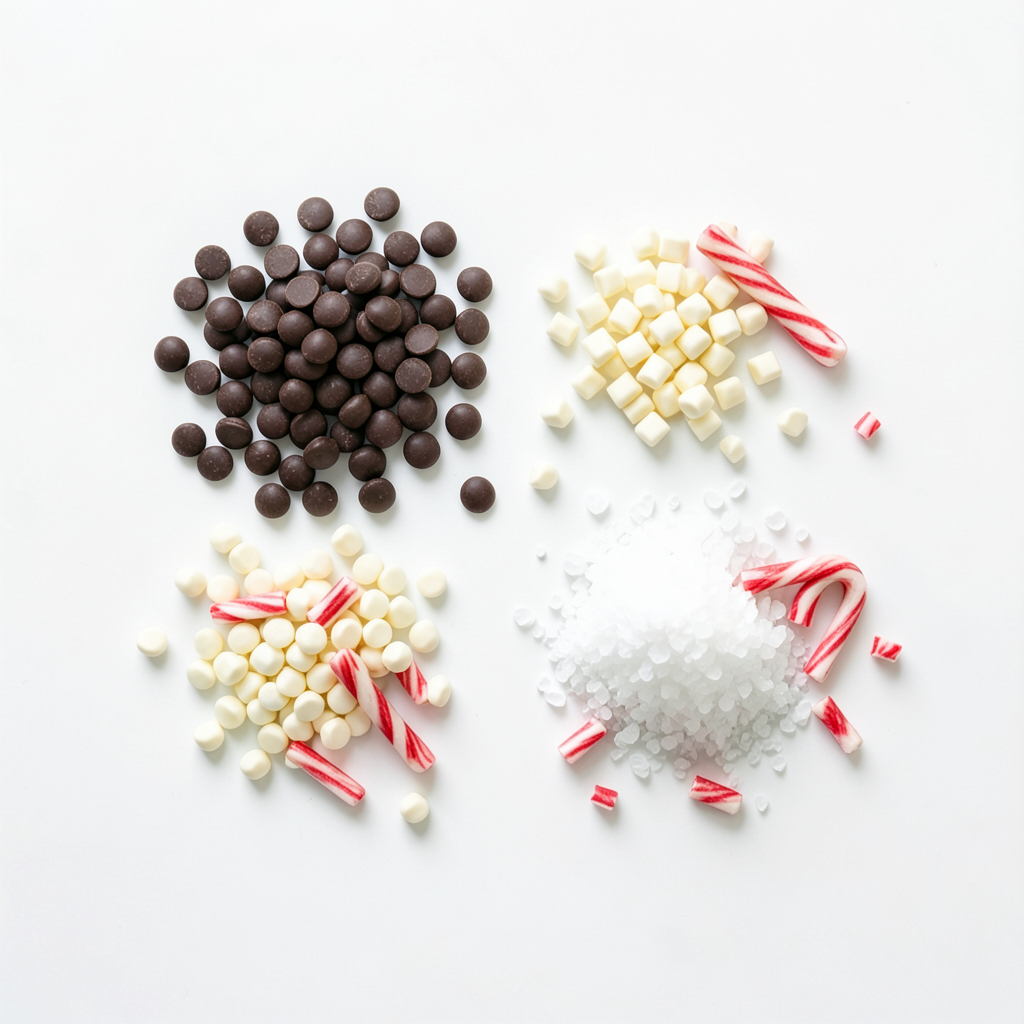
- 12 oz dark chocolate chips
- 12 oz white chocolate chips
- 1 teaspoon peppermint extract
- ½ cup crushed candy canes
- A pinch of sea salt
Ingredient Substitutions
You can switch dark chocolate chips for milk chocolate if you prefer a sweeter taste. White chocolate can also be replaced with vanilla-flavored chips. For peppermint extract, use peppermint oil for a stronger flavor. If you can't find candy canes, try crushed peppermint candies or chocolate-covered mints. These swaps can change the bark's taste while keeping it festive.
Step-by-Step Instructions
Preparation Steps
- Preparing the baking sheet: Start by lining a baking sheet with parchment paper. This helps the bark release easily later. Make sure the paper is smooth and even.
- Melting the dark chocolate: Next, place 12 oz of dark chocolate chips in a microwave-safe bowl. Heat them in the microwave in 30-second intervals. Stir after each interval until the chocolate is smooth and fully melted.
- Spreading dark chocolate on the baking sheet: Pour the melted dark chocolate onto the lined baking sheet. Use a spatula to spread it into a flat layer about ¼ inch thick. Then, put it in the fridge for 10-15 minutes to set.
Completing the Bark
- Melting the white chocolate: In another microwave-safe bowl, add 12 oz of white chocolate chips. Repeat the microwave method, melting in 30-second intervals. Stir until the white chocolate is smooth.
- Adding peppermint extract: When the white chocolate is melted, stir in 1 teaspoon of peppermint extract. This gives the bark its festive flavor.
- Combining layers of dark and white chocolate: Once the dark chocolate has set, take the baking sheet out of the fridge. Pour the melted white chocolate on top of the dark layer. Spread it evenly with your spatula.
Final Touches
- Adding crushed candy canes: Sprinkle ½ cup of crushed candy canes on top of the white chocolate. Press the candy canes down gently so they stick well.
- Sprinkling sea salt: For extra flavor, add a pinch of sea salt on top. This balances the sweetness of the chocolate and candy canes.
- Refrigerating to set: Finally, place the baking sheet back in the fridge. Chill for about 30 minutes or until the bark is fully set. Once set, you can break it into pieces of your desired size.
Tips & Tricks
Expert Tips for Perfect Bark
- How to melt chocolate without burning: Use a microwave-safe bowl. Heat the chocolate in 30-second bursts. Stir each time until smooth. This keeps the chocolate from burning and ensures a nice melt.
- Best practices for layering chocolate: Pour the dark chocolate first. Spread it on the baking sheet to a ¼ inch thick layer. After it sets, pour the white chocolate on top. This makes sure the layers stay distinct and pretty.
- Ensuring candy canes stick properly: After pouring white chocolate, sprinkle crushed candy canes while it is still warm. Gently press them into the chocolate. This helps them stick well and gives a nice crunch.
Presentation Suggestions
- Ideas for packaging as gifts: Cut the bark into pieces. Place them in a clear bag or box. Tie with a festive ribbon for a sweet gift. It looks lovely and shows you care.
- Serving suggestions for parties or gatherings: Serve the bark on a decorative plate. You can also break it into fun shapes. This adds a personal touch and makes it more exciting to eat.
Troubleshooting Common Issues
- What to do if the chocolate isn't melting: If the chocolate is not melting, it might be too cold. Try warming it a bit more. Stirring helps too. If it still doesn’t melt, check for moisture in the bowl.
- Fixing a cloudy appearance in the bark: Cloudy bark can happen from overcooking the chocolate. To fix this, melt a bit more chocolate and mix it in. This can help bring back the shine.
Pro Tips
- Use High-Quality Chocolate: The better the chocolate, the better the bark. Choose high-quality dark and white chocolate for a richer flavor.
- Customize Your Toppings: Feel free to experiment with different toppings like nuts, dried fruits, or sprinkles for a personalized touch.
- Ensure Even Melting: Stir the chocolate well after each 30-second interval in the microwave to avoid any burning or uneven melting.
- Store Properly: Keep the bark in an airtight container at room temperature or in the fridge for longer freshness.
Variations
White Chocolate Peppermint Bark
To switch to white chocolate, you need to adjust the recipe slightly. Start with 12 oz of white chocolate chips. Melt them just like the dark chocolate. Stir in 1 teaspoon of peppermint extract for that minty kick. You can add fun flavors by mixing in nuts or dried fruit. Chopped almonds or dried cherries fit perfectly. They add texture and taste to the sweet bark.
Dark Chocolate Peppermint Bark
For a rich twist, use only dark chocolate. Simply melt 24 oz of dark chocolate chips and follow the same steps. You can also enhance the flavor with other extracts. Try adding a splash of vanilla or almond extract to the melted chocolate. This will give your bark a unique flavor that stands out.
Holiday-Themed Variations
Get festive with your bark! Add colors by using green and red sprinkles. Just sprinkle them on right after you add the crushed candy canes. You can also use other fun toppings. Think about crushed nuts, mini marshmallows, or festive sugar shapes. These toppings make the bark look cheerful and ready for the holidays.
Storage Info
Optimal Storage Conditions
To keep your Chocolate Peppermint Bark fresh, store it in a cool, dry place. Use an airtight container to prevent moisture. If you have a lot, stack pieces between sheets of parchment paper. This keeps them from sticking together. You can use glass or plastic containers, but glass works best for keeping the bark fresh.
Shelf Life
Chocolate Peppermint Bark lasts about two weeks at room temperature. Ensure it stays away from heat or direct sunlight. If you refrigerate it, it can last up to a month. Just remember to seal it well to keep out moisture and odors.
Freezing Instructions
Yes, you can freeze Chocolate Peppermint Bark! Wrap it tightly in plastic wrap. Then, place it in an airtight container. This helps keep the texture nice. When you're ready to eat it, take it out and let it thaw in the fridge. This way, you avoid any changes in texture. Enjoy your treat!
FAQs
How do I know if my chocolate is melted properly?
To check if your chocolate has melted right, look for these signs:
- The chocolate should be smooth and shiny.
- There should be no lumps or bits left.
- It should easily flow when you stir it.
If you see any lumps, keep melting in short bursts. Stir well in between. This helps avoid burning your chocolate.
Can I add more flavorings?
Yes, you can add more flavorings! Here are some options:
- Almond extract for a nutty twist.
- Vanilla extract for a classic touch.
- Orange zest for a refreshing flavor.
Add these in small amounts. Start with a ¼ teaspoon and taste. Adjust as you like to make it unique.
Is Chocolate Peppermint Bark gluten-free?
Chocolate Peppermint Bark can be gluten-free. Here’s what to check:
- Use gluten-free chocolate chips. Many brands offer this.
- Ensure your candy canes are also gluten-free. Some brands may add gluten.
Read labels carefully to avoid any gluten. This way, you can enjoy the treat worry-free!
In this article, we explored how to make delicious Chocolate Peppermint Bark. You learned about key ingredients like dark and white chocolate, peppermint extract, and candy canes. We provided tips for preparing and layering the chocolate, as well as storage advice to keep your bark fresh. Remember, you can easily swap ingredients to suit your taste. With these steps, you can create tasty treats for yourself or share with others. Enjoy your baking adventure, and don’t hesitate to get creative with flavors and toppings!