Are you ready for a dessert that impresses with ease? The Cookies and Cream Icebox Cake is a no-bake treat that’s simple and satisfying. With just a few ingredients, you can create a layered delight that will wow your friends and family. I’ll guide you through each step, from the creamy mix to fun variations. Let's dive in and make this delightful cake together!
Why I Love This Recipe
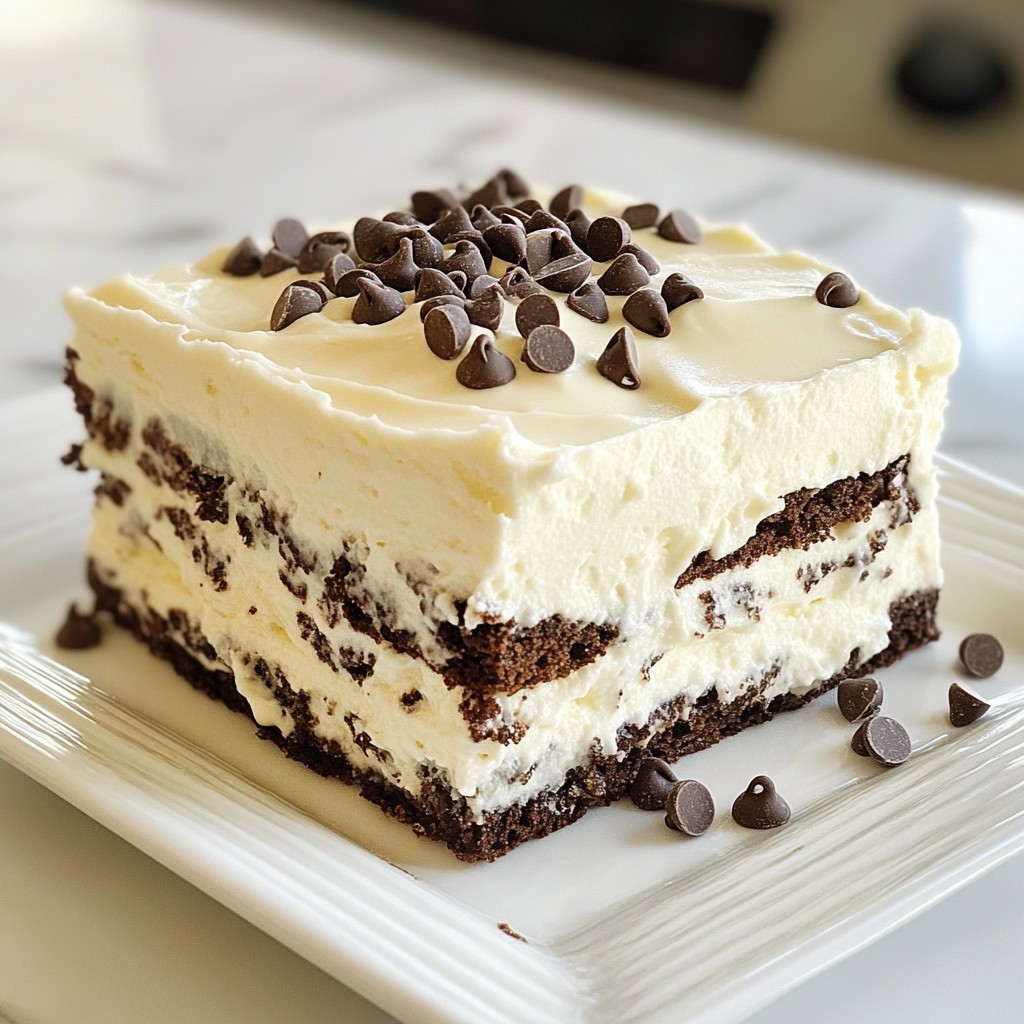
- Delicious Layers: This icebox cake features smooth cream cheese and whipped cream layered with chocolate cookies, creating a delightful contrast in textures and flavors.
- No Baking Required: With no oven involved, this recipe is perfect for warm days when you want a cool dessert without the hassle of baking.
- Make-Ahead Friendly: This cake needs to chill for several hours, making it an ideal dessert for gatherings where you want to prepare in advance.
- Customizable: You can easily add your favorite toppings or variations, like different cookie flavors or toppings, to make it your own.
Ingredients
List of Ingredients
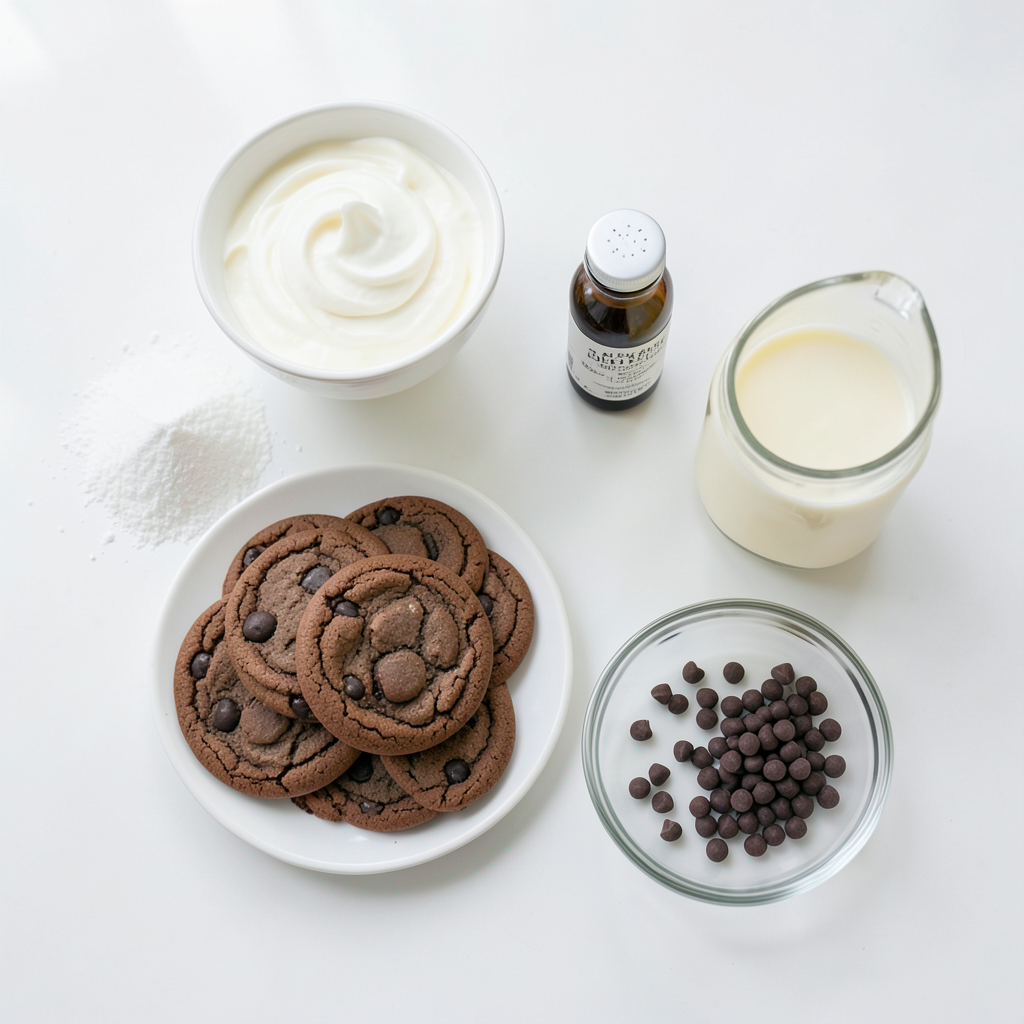
For this Cookies and Cream Icebox Cake, gather these key ingredients:
- 2 cups heavy whipping cream
- 1 cup powdered sugar
- 2 teaspoons vanilla extract
- 1 package (14.3 oz) chocolate sandwich cookies (like Oreos)
- 1 cup cream cheese, softened
- 1 cup milk
- 1/2 cup mini chocolate chips (optional)
Optional Ingredients for Variation
You can add some fun twists to your icebox cake. Here are a few ideas:
- Use gluten-free chocolate cookies for a gluten-free treat.
- Swap chocolate cookies for vanilla cookies for a different taste.
- Add crushed peppermint candies for a holiday flair.
Equipment Needed
To make this delightful dessert, you will need:
- A large mixing bowl
- A whisk or electric mixer
- A second mixing bowl for the cream cheese
- An 8x8-inch or 9x9-inch baking dish
- Plastic wrap
- A spatula for spreading
- A knife or cake cutter for slicing
This list makes it easy to gather what you need before you start. You’ll be ready to create a treat that’s both simple and scrumptious!
Step-by-Step Instructions
Preparation of Cream Mixture
Start by gathering your heavy whipping cream, powdered sugar, and vanilla extract. In a large bowl, beat the heavy whipping cream, powdered sugar, and vanilla extract together. Keep mixing until soft peaks form. This will take about 3-5 minutes. Once done, set this bowl aside.
Now, take another bowl. Mix the softened cream cheese with milk. Stir until it is smooth and creamy. This step is key for a rich flavor. Next, gently fold the whipped cream into the cream cheese mixture. Be careful not to deflate the whipped cream. You want a light and fluffy texture.
Layering the Cake
Grab your chocolate sandwich cookies. Dunk each cookie in milk for just 1-2 seconds. This softens them without making them mushy. It’s important to get this right. In an 8x8-inch or 9x9-inch baking dish, place a single layer of milk-soaked cookies at the bottom.
Spread a layer of the cream mixture over the cookies. Make sure it’s even and smooth. Now, repeat the process. Add another layer of cookies, then more cream mixture. Keep layering until you run out of ingredients. Make sure to finish with a nice layer of cream on top. For fun, sprinkle mini chocolate chips on the top layer if you like.
Refrigeration Process
Cover the dish with plastic wrap. This keeps everything fresh. Now, place it in the fridge for at least 4 hours. If you can, let it chill overnight. This helps the flavors blend and lets the cake set properly. Once ready, slice the cake into squares. Serve it chilled for a refreshing treat.
Tips & Tricks
How to Achieve the Perfect Whipped Cream
To make your whipped cream just right, start with cold cream. Cold cream whips better. Use a large bowl to give it room to expand. I like to beat it on medium speed. Add powdered sugar and vanilla extract for sweetness. Whip until soft peaks form. This means the cream holds a shape but is still soft. Don’t overwhip, or it will turn into butter!
Avoiding Cookie Sogginess
To keep your cookies firm, dunk each one in milk for only 1-2 seconds. This softens them but stops them from getting mushy. Lay them in a single layer, and don’t stack them too high. The cream mixture will add moisture, but you want some crunch in each bite.
Presentation Ideas for Serving
To make your Cookies and Cream Icebox Cake look great, use a chilled plate. This keeps the cake cool. Top it with extra mini chocolate chips for fun. A sprig of fresh mint adds a nice touch too! Slice the cake into squares for easy serving. Your guests will love the look as much as the taste!
Pro Tips
- Chill Your Tools: For an even better whipped cream, chill your mixing bowl and beaters in the freezer for 10-15 minutes before starting. This helps the cream whip up quickly and achieve maximum volume.
- Layering Secrets: When layering the cookies and cream mixture, try to alternate the types of cookies used, if you have more than one variety. This adds visual interest and enhances flavor.
- Make Ahead: This dessert tastes even better the next day! If planning for a party, assemble the cake a day prior to serving to allow the flavors to meld beautifully.
- Serving Suggestions: For a gourmet touch, serve with a drizzle of chocolate sauce or a dollop of whipped cream alongside each slice for an indulgent experience.
Variations
Gluten-Free Cookies and Cream Icebox Cake
You can make a gluten-free version of this dessert. Start by using gluten-free chocolate sandwich cookies. Brands like Glutino or Kinnikinnick offer tasty options. This way, you keep all the flavors without the gluten. Just follow the same steps in the recipe. The taste will still be rich and creamy.
Vegan Version of the Dessert
For a vegan twist, swap out the cream and cheese. Use coconut cream instead of heavy whipping cream. You can whip it just like regular cream. Also, use dairy-free cream cheese or silken tofu blended until smooth. Almond or soy milk works well too. This version is just as delightful and perfect for a vegan diet.
Flavor Swaps and Add-Ins
You can change up the flavors to fit your taste. Try using different cookies, like mint chocolate or peanut butter. These will give your cake a new spin. You can also add crushed candy bars or nuts for extra crunch. Want a fruity touch? Mix in some crushed berries or banana slices between the layers. Each change can create a new dessert experience.
Storage Information
How to Store Leftovers
To store leftovers, cover the cake with plastic wrap. This keeps it fresh. Place it in the fridge. The cake stays cold and tasty for up to three days. Always slice it before serving to make it easy to grab.
Freezing Instructions
You can freeze this icebox cake for longer storage. First, let it cool completely in the fridge. Then, cut it into squares. Wrap each square in plastic wrap tightly. Place the wrapped pieces in a freezer-safe bag. This way, they stay fresh for up to two months. When you want a treat, just thaw a square in the fridge overnight.
Shelf Life and Best Practices
This cake tastes best within three days in the fridge. After that, the cookies may get too soft. If you freeze it, use it within two months for the best flavor. Always check for any signs of freezer burn before eating. Enjoy your delicious treat!
FAQs
Can I use different types of cookies?
Yes, you can. Feel free to swap chocolate sandwich cookies with others. Try vanilla cookies or even peanut butter ones. Each cookie type brings a unique flavor. The key is to ensure they can soak in milk without falling apart. This gives the cake its creamy texture. Experiment with your favorite cookies for fun twists.
How long does the icebox cake need to set?
The icebox cake needs at least 4 hours to set. For best results, let it chill overnight. This allows the flavors to blend well. A longer chill time makes the cake firmer and easier to slice. Patience is key to great taste in this dessert.
Can I make it a day ahead of time?
Absolutely! Making the cake a day ahead is a great idea. It saves time and enhances flavors. Just store it covered in the fridge. This way, you can serve a cool, tasty treat at your next gathering. You’ll impress your friends with minimal effort.
You now have all the tools to create a fantastic Cookies and Cream Icebox Cake. We covered the key ingredients, step-by-step instructions, and tips to help you succeed. You can even explore variations like gluten-free or vegan options. Don't forget about proper storage to keep your dessert fresh. Whatever your dietary needs, this cake is sure to impress. Enjoy making and sharing this treat with family and friends!