
If you crave a sweet treat that’s bright, tangy, and oh-so-creamy, then this Lemon Cream Cheese Danish is for you! This easy recipe combines flaky puff pastry with a smooth, zesty cream cheese filling that will leave your taste buds dancing. Whether you're a baking novice or a seasoned pro, I’ll guide you through each step. Get ready to impress your friends and family with this delightful pastry!
Why I Love This Recipe
- Easy to Make: This recipe uses store-bought puff pastry, making it a quick and simple treat to whip up.
- Deliciously Creamy: The cream cheese filling combined with fresh lemon gives a delightful creamy and tangy flavor.
- Perfect for Any Occasion: These Danishes make a great breakfast, dessert, or snack for gatherings and celebrations.
- Beautiful Presentation: The golden brown pastries, garnished with lemon slices and mint, are visually stunning.
Ingredients
Main Ingredients
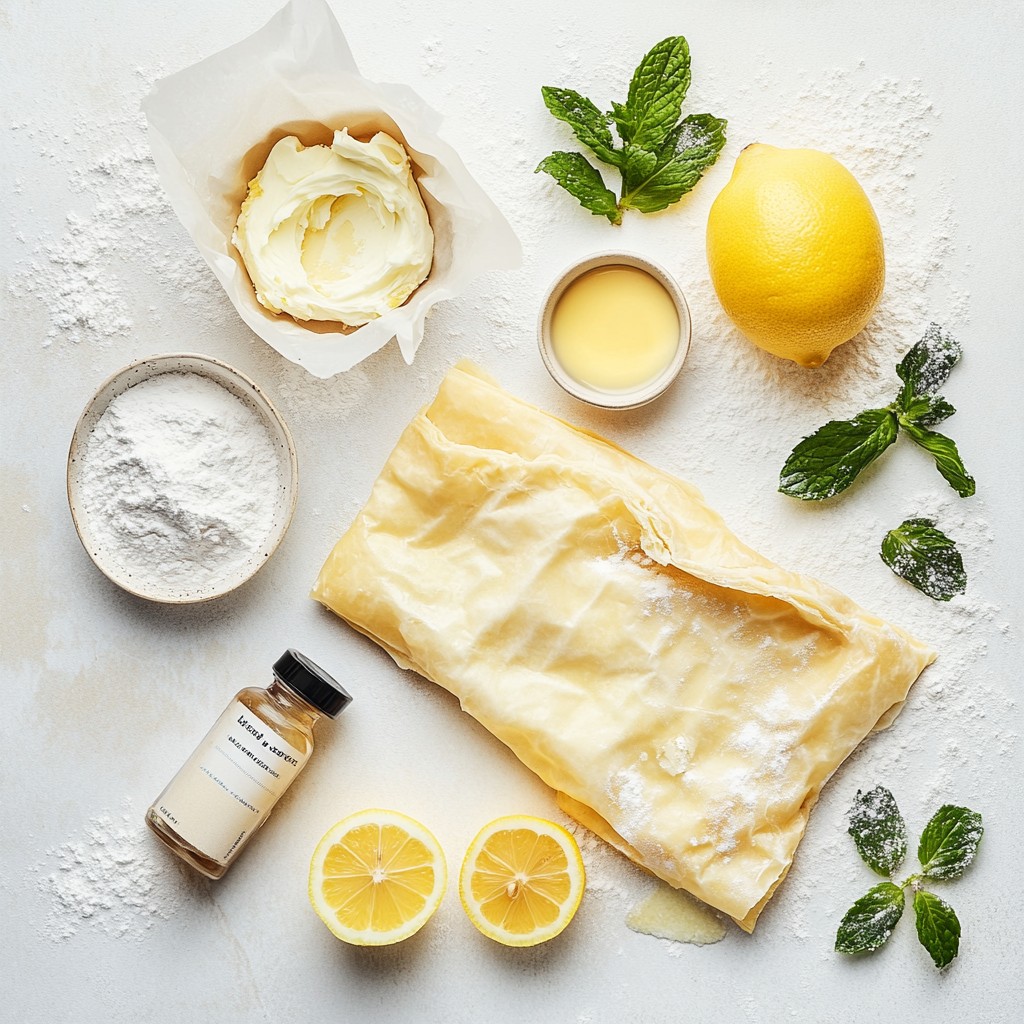
To make a Lemon Cream Cheese Danish, you will need some key items. Here’s a simple list:
- 1 sheet of puff pastry, thawed
- 8 oz cream cheese, softened
- 1/2 cup powdered sugar
- 1 lemon, zested and juiced
- 1 teaspoon vanilla extract
- 1 egg, beaten (for egg wash)
- 1 tablespoon all-purpose flour (for dusting)
- Fresh lemon slices and mint leaves (for garnish)
Let’s break these down.
Puff Pastry: This flaky dough is the base of your Danish. It puffs up nicely when baked. Buy it frozen and thaw it before use.
Cream Cheese Filling: This creamy mix brings the flavor. You need softened cream cheese, powdered sugar, and lemon zest and juice. The zest adds a bright taste, while the juice gives it a fresh kick.
Flavorings and Garnishes: Use vanilla extract for depth. Garnish with lemon slices and mint leaves for a pretty finish. They add color and a hint of freshness.
With these ingredients, you set the stage for a delightful treat. Each item plays a part in making your Danish delicious and beautiful.
Step-by-Step Instructions
Prepping the Oven and Pastry
1. Preheat your oven to 400°F (200°C). This step is key for nice and crispy pastries.
2. Roll out the puff pastry on a lightly floured surface. Aim for a rectangle about 1/8 inch thick. This will help the pastry puff up nicely.
3. Cut the pastry into squares. You will need four equal squares for your Danishes.
Making the Cream Cheese Filling
1. Combine the cream cheese and sugar in a mixing bowl. This mix will be the base of your filling.
2. Add the lemon zest and juice. These will bring a fresh and tangy flavor.
3. Mix until smooth. You want a creamy texture that is easy to spread.
Assembling the Danish
1. Place a spoonful of the cream cheese mixture in the center of each pastry square. Don’t overfill, or they will spill out.
2. Use a folding technique. Fold each corner of the square towards the center. Pinch to seal, leaving a small opening at the top.
3. Apply egg wash. Brush the tops of each Danish with the beaten egg. This will give them a golden finish.
Baking the Danish
1. Bake in the preheated oven for 15-20 minutes. Keep an eye on them as they bake.
2. Look for indicators of doneness. They should be golden brown and puffed up. A nice fragrance will fill your kitchen!
Tips & Tricks
Perfecting the Puff Pastry
To get the best puff pastry, start by thawing it in the fridge overnight. This keeps it cool and easy to handle. If you need it fast, you can let it sit at room temperature for about 30 minutes. When rolling it out, use a lightly floured surface. Roll it to about 1/8 inch thick. This thickness helps it puff nicely when baking. Cut the rolled pastry into four equal squares. This ensures even cooking and a nice shape.
Enhancing Flavor
The filling is key to a great Lemon Cream Cheese Danish. You can adjust the sweetness to your liking. If you prefer it sweeter, add a bit more powdered sugar. Tasting as you mix helps find the right balance. To make it even more lemony, increase the lemon zest and juice. This adds brightness and zing to each bite.
Presentation Tips
A beautiful Danish is a treat for the eyes. After baking, dust it with powdered sugar for a sweet touch. For an extra pop of color, add fresh lemon slices and mint leaves on top. Arrange them nicely to create a stunning plate. Serve the Danish warm for a cozy feel. Pair it with coffee or tea for a delightful snack.
Pro Tips
- Chill the Dough: For best results, keep the puff pastry chilled until you're ready to use it. This ensures a flakier texture after baking.
- Adjust Sweetness: Taste the cream cheese mixture before filling; adjust the powdered sugar based on your desired sweetness level.
- Seal Properly: Make sure to pinch the corners tightly to prevent the filling from leaking out during baking.
- Creative Garnishes: Experiment with different garnishes, like berries or edible flowers, to elevate the presentation of your Danish.
Variations
Different Cream Cheese Flavorings
You can mix things up with your cream cheese. Try adding fruit purees like strawberry or raspberry. This gives your Danish a fresh twist. Use about 1/4 cup of puree for a nice flavor boost. You can also use different extracts. Almond or coconut extract can add a unique taste. Just use 1/2 teaspoon for the right balance.
Alternative Pastries
If you want to change the base, consider using croissant dough. It gives a flaky and buttery texture. Simply roll it out and cut it the same way as puff pastry. You could also try biscuit dough for a different taste. The dough will be thicker, but it can be a fun option. Just make sure to adjust the baking time.
Diet-Friendly Variants
For gluten-free options, you can use a gluten-free puff pastry. Many brands make frozen options that work well. You can also make vegan adaptations. Replace cream cheese with a vegan cream cheese or cashew cream. Use a plant-based milk for the wash, too. This way, everyone can enjoy your delightful Lemon Cream Cheese Danish!
Storage Info
Storing Leftovers
To keep your Lemon Cream Cheese Danish fresh, store them in the fridge. Place the Danishes in an airtight container. This helps prevent them from drying out. You can also wrap them in plastic wrap for extra protection. Try to eat them within three days for the best flavor.
Reheating Instructions
To reheat, use the oven. Preheat it to 350°F (175°C). Place the Danishes on a baking sheet. Heat for about 10 minutes. This method keeps the pastry nice and crisp. Avoid using the microwave, as it can make the pastry soggy.
Freezing Tips
You can freeze the Danishes before or after baking. If freezing before baking, wrap them in plastic wrap tightly. Place them in a freezer-safe bag or container. You can bake them straight from the freezer, adding a few extra minutes to the baking time. If freezing after baking, let them cool first. Then, wrap and store them in the same way. Enjoy them within three months for the best taste.
FAQs
Can I make the Lemon Cream Cheese Danish ahead of time?
Yes, you can prepare some parts ahead of time. You can make the cream cheese filling a day before. Just keep it in the fridge. You can also cut the puff pastry squares in advance. Just store them in the fridge until you are ready to bake. However, I suggest baking them fresh for the best taste.
What can I substitute for cream cheese?
If you want a different filling, you can try mascarpone or ricotta cheese. Both give a nice creamy texture. You could also use Greek yogurt for a tangy flavor. If you want a lighter option, try whipped coconut cream. It adds a fun twist, and it's dairy-free.
How long can I store the Danish?
You can store the Danish in the fridge for up to three days. Make sure to place them in an airtight container to keep them fresh. If you want to keep them longer, you can freeze them. Frozen Danish can last up to two months. Just remember to let them cool completely before storing.
Can I use homemade puff pastry?
Yes, you can use homemade puff pastry. It can taste even better than store-bought. However, it requires more time and skill. Store-bought pastry is quick and easy for busy cooks. If you have time, give homemade a try for a special touch.
We covered how to make a delicious Lemon Cream Cheese Danish. You learned about the key ingredients, like puff pastry and cream cheese filling. I shared step-by-step instructions, tips for perfecting your pastry, and fun variations.
In the end, baking this treat is easy and fun. With these tips, you can impress anyone. Don’t be afraid to experiment and find what you love best. Enjoy your baking journey!