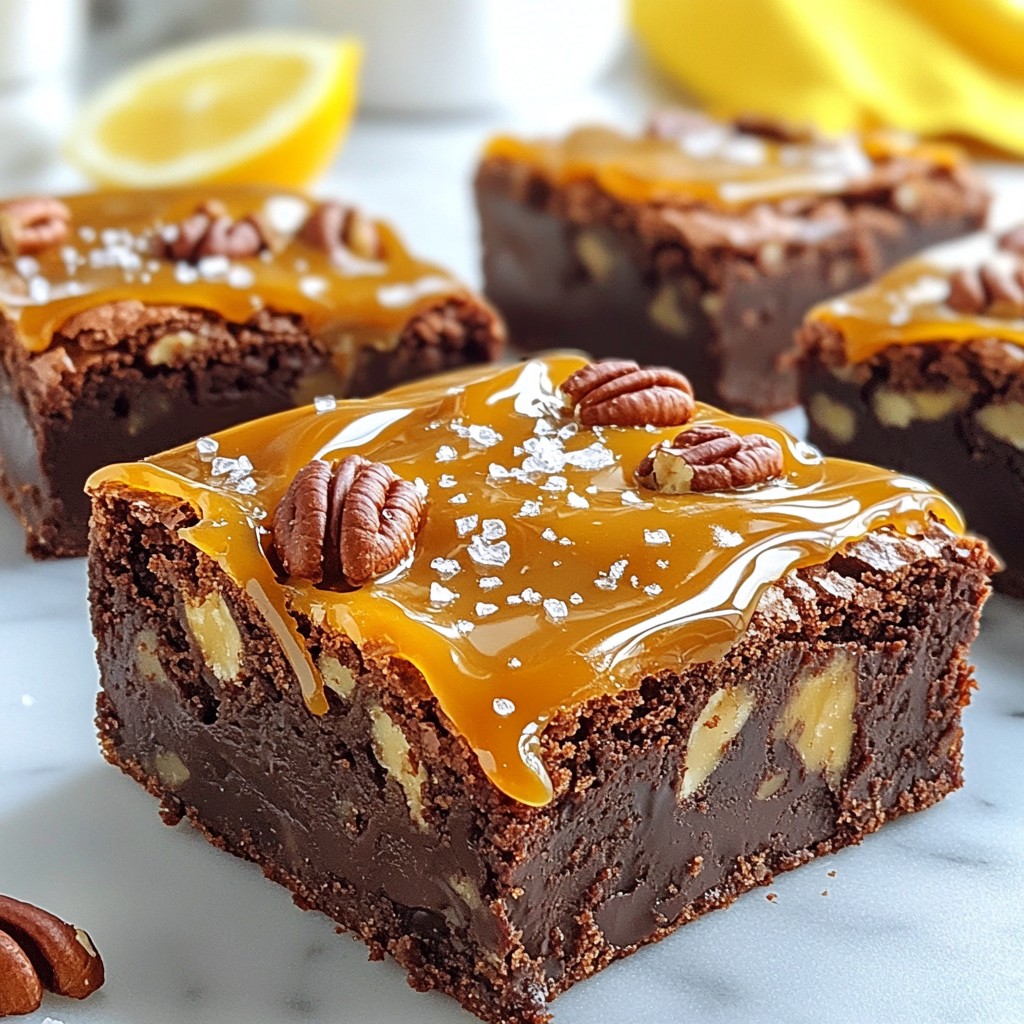
Get ready to dive into a sweet treat that’s hard to resist! Salted caramel turtle brownies blend rich chocolate, creamy caramel, and a hint of sea salt. Whether you want to impress friends or treat yourself, these brownies are the perfect choice. I’ll guide you through each step, from gathering the right ingredients to mastering the caramel swirl. Let’s get baking and make a delight you won’t forget!
Why I Love This Recipe
- Decadent Flavors: The combination of rich chocolate, crunchy pecans, and luscious caramel creates a delightful explosion of flavors in every bite.
- Simple to Make: This recipe is straightforward, using common ingredients and easy-to-follow steps, perfect for bakers of any skill level.
- Perfect for Sharing: With 20 brownies in a batch, these treats are ideal for parties, gatherings, or simply sharing with friends and family.
- Customizable: Feel free to add your favorite nuts or swap the chocolate chips for white chocolate or butterscotch for a fun twist!
Ingredients
List of Ingredients for Salted Caramel Turtle Brownies
To make these tasty brownies, gather the following items:
- 1 cup unsalted butter
- 2 cups granulated sugar
- 4 large eggs
- 1 teaspoon vanilla extract
- 1 cup all-purpose flour
- 1 cup cocoa powder
- 1/2 teaspoon baking powder
- 1/2 teaspoon salt
- 1 cup chocolate chips
- 1 cup pecans, chopped
- 1 cup caramel sauce
- Sea salt, for topping
These ingredients blend to create a rich, chocolatey base with a sweet caramel twist.
Optional Ingredients for Customization
You can add your twist to these brownies with optional ingredients:
- Different nuts, like walnuts or almonds
- Dark chocolate chips for a richer flavor
- Sea salt caramel for extra saltiness
- A splash of espresso for a coffee kick
- Different flavors of caramel sauce
Feel free to mix and match to suit your taste!
Tips for Selecting Quality Ingredients
Choosing quality ingredients can elevate your brownies. Here are some tips:
- Butter: Use unsalted butter for better control over the salt level.
- Sugar: Real granulated sugar gives the best texture and sweetness.
- Eggs: Fresh eggs yield better results. Look for large eggs for this recipe.
- Chocolate Chips: Use high-quality chocolate chips for a richer taste.
- Caramel Sauce: Opt for homemade or premium store-bought caramel for the best flavor.
Good ingredients make a big difference in taste and texture. Enjoy the process!
Step-by-Step Instructions
Prepping Your Baking Pan
Start by preheating your oven to 350°F (175°C). Grab a 9x13-inch baking pan. Grease it well with butter or cooking spray. Next, line the bottom with parchment paper. This makes it easy to lift the brownies out later. Use a pair of scissors to cut the paper to size.
Mixing Wet Ingredients
In a medium saucepan, melt 1 cup of unsalted butter over low heat. Stir it often. Once the butter is fully melted, remove it from the heat. Now, add in 2 cups of granulated sugar. Mix well until it's smooth.
Next, crack 4 large eggs into a bowl. Add them to the butter and sugar mix one at a time. Stir well after each egg. This helps blend everything perfectly. Finally, pour in 1 teaspoon of vanilla extract for flavor. Mix until it’s all combined and smooth.
Combining Dry Ingredients and Creating the Batter
In another bowl, whisk together 1 cup of all-purpose flour, 1 cup of cocoa powder, 1/2 teaspoon of baking powder, and 1/2 teaspoon of salt. Mix these dry ingredients well. Gradually add this dry mix to the wet mixture. Stir until the batter is fully combined.
Now, it’s time to make it even better! Fold in 1 cup of chocolate chips and 1 cup of chopped pecans. Make sure they are evenly spread throughout the batter.
Layering the Brownies with Caramel
Pour half of the brownie batter into the prepared baking pan. Spread it evenly across the bottom. Now, take 1 cup of caramel sauce and drizzle half of it over the brownie layer.
Next, pour the rest of the brownie batter on top. Smooth it out carefully. Drizzle the remaining caramel sauce over the top layer. Use a knife to swirl the caramel gently into the batter. This creates a beautiful marbled effect.
Now, it's time to bake! Place the pan in the oven and bake for 25-30 minutes. Check your brownies by inserting a toothpick in the center. It should come out with a few moist crumbs. Once done, sprinkle sea salt on top while they’re still hot. Allow them to cool in the pan for at least 20 minutes before lifting them out. Enjoy those rich flavors!
Tips & Tricks
Baking Tips for the Perfect Brownie Texture
To make the best brownies, follow these tips. First, measure your ingredients carefully. Use a kitchen scale for accuracy. Next, do not overmix the batter. Mix just until combined for a fudgy texture. Always bake at the right temperature. An oven thermometer can help ensure accuracy. Lastly, let your brownies cool before cutting. This helps them set and makes them easier to slice.
How to Achieve the Best Caramel Swirl
The caramel swirl makes these brownies special. To get a great swirl, use warm caramel sauce. Warm it slightly in the microwave for easy drizzling. Pour the caramel in a zigzag pattern over the brownie batter. Use a knife to gently swirl it in. Be careful not to mix too much. You want a pretty marbled look, not a fully blended batter.
Salt Considerations for Flavor Enhancement
Salt boosts flavor in sweets. Use high-quality sea salt for topping. A light sprinkle right after baking enhances the caramel taste. If you love a saltier bite, add more salt. Just remember, a little goes a long way. You can also mix a pinch of salt into the caramel sauce for extra flavor depth. This adds a nice contrast to the sweet brownies.
Pro Tips
- Use Quality Ingredients: The flavor of your brownies will greatly depend on the quality of the cocoa powder and chocolate chips you use. Opt for high-quality brands for the best taste.
- Don’t Overmix: Once you add the dry ingredients to the wet mixture, mix just until combined. Overmixing can lead to dense brownies instead of the desired fudgy texture.
- Cool Before Cutting: Allow the brownies to cool in the pan for at least 20 minutes before cutting. This helps them set and makes it easier to get clean squares.
- Experiment with Toppings: Feel free to add extra toppings like crushed pretzels, sea salt flakes, or even a drizzle of melted chocolate for added flavor and texture.
Variations
Gluten-Free Salted Caramel Turtle Brownies Recipe
To make gluten-free salted caramel turtle brownies, swap the all-purpose flour for a gluten-free blend. These blends often mix rice flour, potato starch, and tapioca flour. Use a 1:1 ratio for this swap. Ensure the blend you choose contains xanthan gum. This helps with texture. Follow the same steps in the original recipe. You will still get rich, gooey brownies that everyone loves.
Vegan Options for Turtle Brownies
If you want vegan salted caramel turtle brownies, you have a few easy swaps. Replace the eggs with flaxseed meal. Mix one tablespoon of flaxseed meal with three tablespoons of water for each egg. Let it sit for a few minutes until it thickens. Use a plant-based butter or coconut oil instead of unsalted butter. Lastly, choose dairy-free chocolate chips and caramel sauce. This way, you get a tasty dessert that fits vegan diets.
Flavor Variations: Adding Nuts or Different Chocolates
Feel free to get creative with your salted caramel turtle brownies. You can add more nuts or use different types of chocolate. Try walnuts or almonds for a new twist. For the chocolate, use dark chocolate for a richer taste, or white chocolate for a sweeter flavor. You can mix in some espresso powder to deepen the chocolate flavor. Each change brings a new experience to the same great base recipe.
Storage Info
How to Properly Store Brownies
To keep your salted caramel turtle brownies fresh, store them in an airtight container. Line the bottom with parchment paper for extra protection. Make sure they cool completely before sealing. This method helps prevent sogginess and keeps them soft. You can keep them at room temperature for up to three days.
Alternatives for Freezing Brownies
If you want to save some brownies for later, freezing is a great option. First, cut them into squares. Wrap each square tightly in plastic wrap, then place them in a freezer-safe bag. Make sure to remove as much air as possible. You can freeze them for up to three months. When you’re ready to enjoy, thaw them in the fridge overnight.
Best Preservation Methods for Freshness
For the best taste, eat your brownies within a week. If you have leftover brownies, try these tips:
- Use parchment paper: This helps keep moisture levels balanced.
- Add a slice of bread: Place a slice in the container. The bread keeps brownies soft by adding moisture.
- Avoid direct sunlight: Store them in a cool, dark place. This helps keep flavors intact.
By following these simple steps, you will enjoy your salted caramel turtle brownies at their best!
FAQs
What are Salted Caramel Turtle Brownies?
Salted caramel turtle brownies are rich and gooey. They combine chocolate brownies, caramel, and pecans. The sea salt adds a nice touch. You get sweet, salty, and crunchy all in one bite. It’s a dessert that feels special and comforting.
How long do these brownies last?
These brownies can last about a week. Store them in an airtight container. Keep them at room temperature for best taste. If you want to keep them longer, you can freeze them. They can stay good for up to three months in the freezer.
Can I make these brownies ahead of time?
Yes, you can make these brownies ahead. Bake them one or two days before serving. Allow them to cool completely before covering. This way, the flavors can blend well. They will still taste fresh when you serve them.
What can I substitute for pecans?
If you don’t have pecans, you can use walnuts or almonds. Both give a nice crunch. You could also skip nuts if you prefer. The brownies will still taste amazing without them.
In this article, I covered how to make salted caramel turtle brownies. We went through the ingredients, steps, tips, and fun variations. I shared ideas for gluten-free and vegan options. Proper storage was also discussed to keep your brownies fresh.
These brownies are a fun treat for any occasion. Try different flavors and enjoy your baking journey. Remember, the best brownies start with quality ingredients and care. Happy baking!