Looking for a tasty snack that packs a punch? Lemon Garlic Roasted Chickpeas are your answer! These crunchy bites are easy to make and perfect for munching anytime. In this blog post, I’ll guide you through every step, from selecting fresh ingredients to achieving that perfect crunch. Plus, I’ll share useful tips and fun variations to keep your snacks exciting. Let’s dive into this flavorful treat together!
Why I Love This Recipe
- Nutritious Snack: These roasted chickpeas are packed with protein and fiber, making them a healthy alternative to traditional snacks.
- Flavor Explosion: The combination of lemon, garlic, and spices creates a zesty and flavorful crunch that’s hard to resist.
- Quick and Easy: This recipe requires minimal prep time and only a few ingredients, perfect for a last-minute snack.
- Versatile Topping: They can be used as a crunchy topping for salads or soups, adding texture and flavor to your meals.
Ingredients
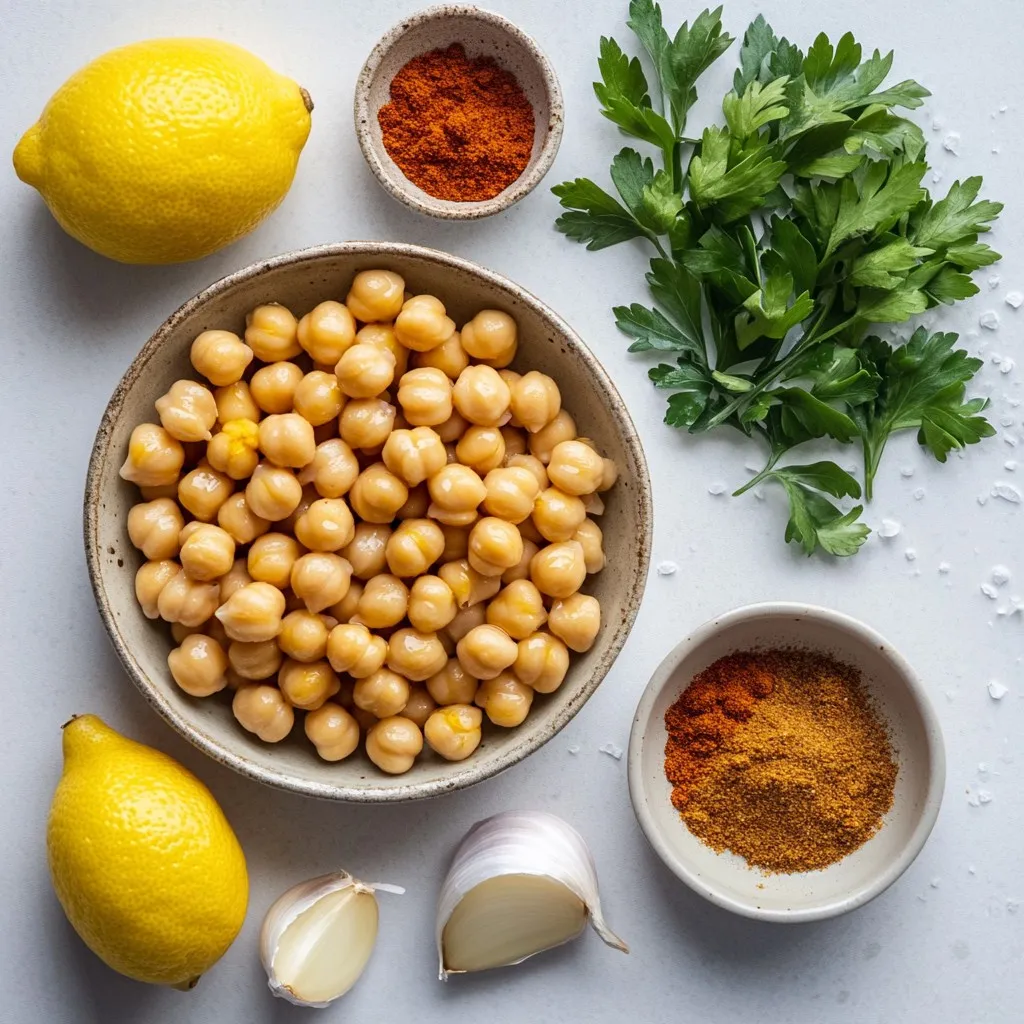
List of Ingredients
– 1 can (15 oz) chickpeas, drained and rinsed
– 2 tablespoons olive oil
– 1 tablespoon lemon juice
– 2 cloves garlic, minced
– 1 teaspoon lemon zest
– 1 teaspoon smoked paprika
– ½ teaspoon cumin
– ½ teaspoon sea salt
– ¼ teaspoon black pepper
– Fresh parsley, chopped (for garnish)
Nutritional Highlights
Lemon garlic roasted chickpeas are a great snack. They provide protein and fiber. Each serving has about 120 calories. They are low in fat and high in taste. Chickpeas help keep you full longer. The garlic adds flavor and health benefits.
Substitute Options
You can swap chickpeas for white beans if you want a change. Olive oil can be replaced with avocado oil. Lemon juice is also good with lime juice. Smoked paprika can be switched for regular paprika. If you like spicy, add cayenne pepper instead. Fresh parsley can be replaced with cilantro for a different touch.
Step-by-Step Instructions
Prepping the Chickpeas
First, I preheat my oven to 400°F (200°C). This step makes sure the chickpeas roast nicely. Next, I take one can of chickpeas. I drain and rinse them under cold water. This removes any extra salt or canning liquid. After rinsing, I pat them dry with a clean kitchen towel. It’s important to get them dry to help them crisp up.
Mixing Seasonings
I grab a mixing bowl and add the dry chickpeas. Then, I pour in 2 tablespoons of olive oil and 1 tablespoon of lemon juice. The olive oil helps the seasonings stick. I also add 2 cloves of minced garlic and 1 teaspoon of lemon zest. The zest gives a bright flavor. Next, I sprinkle in 1 teaspoon of smoked paprika, ½ teaspoon of cumin, ½ teaspoon of sea salt, and ¼ teaspoon of black pepper. I mix everything well to coat the chickpeas evenly with the seasonings.
Roasting in the Oven
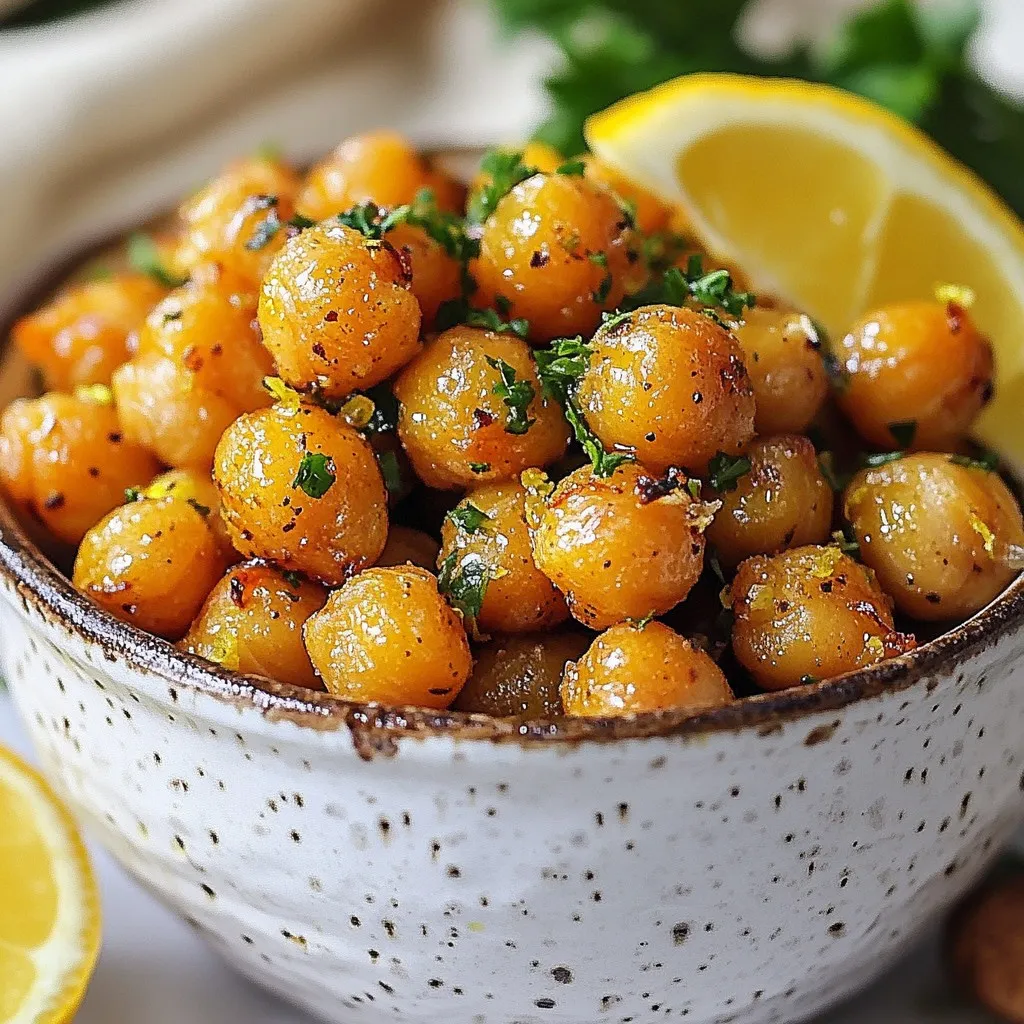
Now, I spread the seasoned chickpeas on a baking sheet lined with parchment paper. I make sure they are in a single layer for even roasting. I pop the baking sheet into the preheated oven and set a timer for 25-30 minutes. Halfway through, I shake the baking sheet to help them roast evenly. When they turn golden brown and crunchy, I take them out. After letting them cool for a few minutes, I taste them. If needed, I adjust the seasoning. Before serving, I garnish with fresh chopped parsley for a nice touch.
Tips & Tricks
Achieving the Perfect Crunch
To get that perfect crunch, start with dry chickpeas. Rinse them well, then pat them dry. Remove as much moisture as you can. This step is key. When you roast, spread them in a single layer. This helps them cook evenly. Shake the pan halfway through roasting to avoid sogginess. Roast until they are golden brown.
Flavor Enhancements
Lemon garlic roasted chickpeas are tasty on their own. But you can enhance the flavor. Try adding some heat with cayenne pepper. A sprinkle of nutritional yeast gives a cheesy taste. You can also mix in different herbs. Consider using rosemary or thyme for a fresh twist. Experiment and find your favorite flavor combo!
Common Mistakes to Avoid
One common mistake is not drying the chickpeas enough. Wet chickpeas won’t get crispy. Another mistake is overcrowding the baking sheet. This leads to uneven cooking. Make sure to shake your baking sheet while roasting. Lastly, remember to adjust seasoning after roasting. Tastes can change as they cool!
Pro Tips
- Dry Chickpeas Thoroughly: Make sure to pat the chickpeas dry before roasting. Removing excess moisture helps them achieve that perfect crunch.
- Adjust Seasoning to Taste: After roasting, taste the chickpeas and feel free to adjust the seasoning. A little extra salt or a sprinkle of cayenne can elevate the flavor!
- Experiment with Spices: Don’t hesitate to get creative with spices! Try adding curry powder, chili powder, or even nutritional yeast for a unique twist.
- Store for Freshness: If you have leftovers, store them in an airtight container at room temperature. They can lose crunchiness in the fridge.
Variations
Spice Mix Changes
You can change the spice mix to suit your taste. Try adding cayenne pepper for heat. You can also use garlic powder instead of fresh garlic. Italian herbs like oregano or basil work well too. For a sweeter option, try cinnamon or coconut sugar. Experimenting with spices can make each batch unique and tasty.
Dietary Adaptations
This recipe is easy to adapt for different diets. For a gluten-free option, this dish is naturally gluten-free. You can also make it vegan by ensuring all ingredients are plant-based. If you want a low-sodium version, reduce the sea salt or use salt-free seasoning. These changes let everyone enjoy this tasty snack.
Serving Suggestions
Lemon garlic roasted chickpeas can be served in many ways. Enjoy them as a snack on their own. You can sprinkle them on salads for extra crunch and protein. They also make a great topping for soups. For a fun party treat, serve them in small bowls with dips. Pair them with hummus or yogurt for added flavor.
Storage Info
Proper Storage Methods
To keep your lemon garlic roasted chickpeas fresh, store them in an airtight container. Make sure the container is sealed tightly to prevent moisture. You can use a glass jar or a plastic container. Avoid placing them in the fridge, as this can make them soggy. Instead, keep them at room temperature in a cool, dry place.
Reheating Instructions
If you want to enjoy your chickpeas warm again, preheat your oven to 350°F (175°C). Spread the chickpeas on a baking sheet. Heat them for about 10 minutes, or until they are warm. This will help restore their crunch. You can also use an air fryer for a quick reheating option.
Shelf Life
Lemon garlic roasted chickpeas can last up to five days when stored properly. After that, they might lose their crunch and flavor. If you see any signs of spoilage, like an off smell or mold, it’s best to throw them away. Enjoy them while they are fresh for the best taste!
FAQs
What Are the Health Benefits of Roasted Chickpeas?
Roasted chickpeas are packed with protein and fiber. They help keep you full longer. This makes them great for snacks. The spices add flavor without extra calories. Chickpeas are also rich in vitamins and minerals. They support heart health and aid digestion. Plus, they are low in fat, which is a bonus for healthy eating.
Can I use dried chickpeas instead of canned?
Yes, you can use dried chickpeas! Just soak them overnight before cooking. After soaking, boil them until soft. This will take about 1-2 hours. Make sure to drain and rinse them. Dried chickpeas may taste fresher, but they need more time to prep. Canned chickpeas are quicker and easier for busy days.
How do I adjust the recipe for more servings?
To make more servings, simply double or triple the ingredients. Keep the same cooking time. Just spread the chickpeas out on more baking sheets. This way, they roast evenly. Remember to adjust the spices too. Taste as you go to keep the flavor balanced. Enjoy sharing this tasty snack with friends or family!
We explored the key ingredients for roasted chickpeas, including their nutrition and possible substitutes. I shared step-by-step instructions for prepping, mixing, and roasting to get that perfect crunch. We discussed tips to enhance flavor and avoid common mistakes.
Finally, I suggested variations to suit different diets and serving ideas. With proper storage methods, you can keep them fresh longer. Enjoy this healthy snack, and feel free to experiment with flavors that excite you. Happy roastin