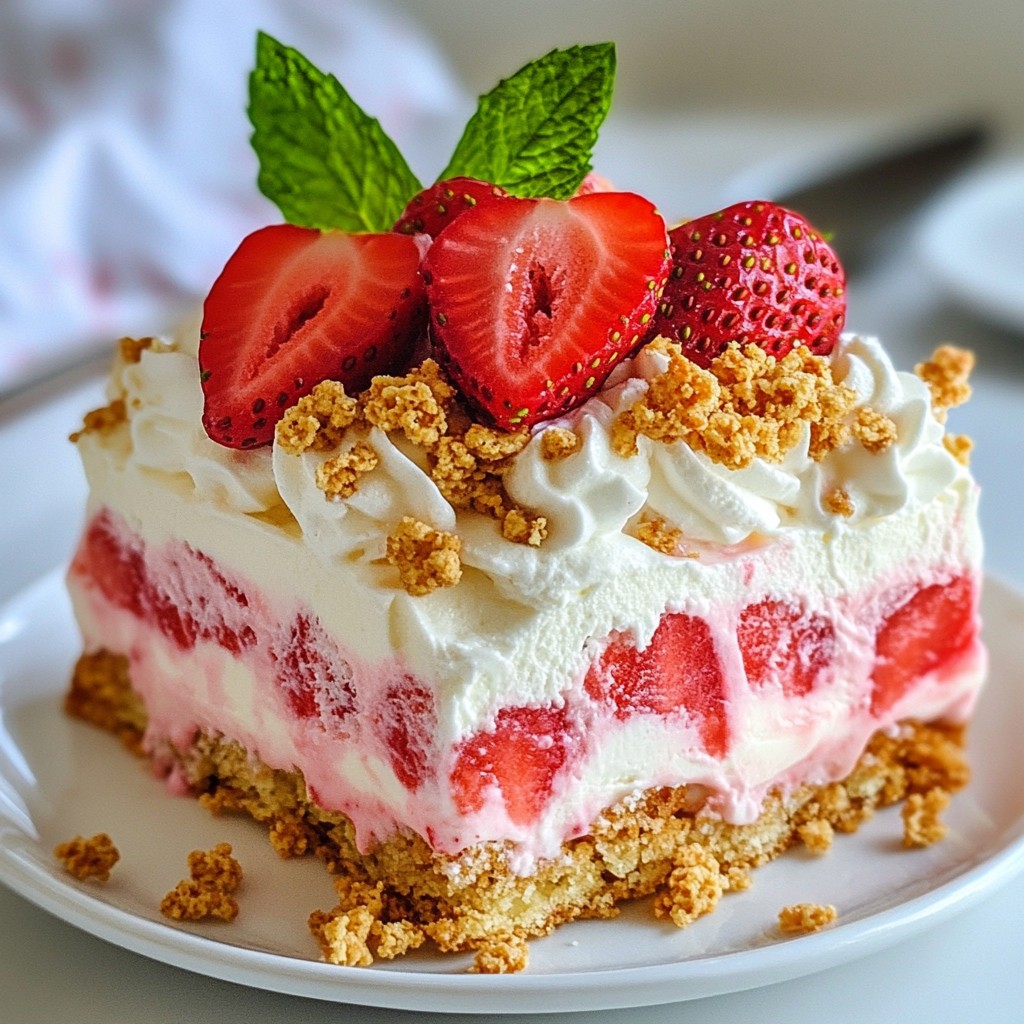
Are you ready to impress your friends and family with a stunning dessert? The Strawberry Crunch Ice Cream Cake is your go-to treat for any occasion. It's simple to make and deliciously refreshing. With layers of creamy goodness and a crunchy Oreo crust, this cake is a crowd-pleaser. Let’s explore how you can whip up this delightful dessert that everyone will love!
Why I Love This Recipe
- Deliciously Refreshing: This Strawberry Crunch Ice Cream Cake is the perfect blend of creamy vanilla ice cream and fresh strawberries, making it a refreshing treat for any occasion.
- Easy to Make: With simple ingredients and straightforward instructions, this recipe is easy to follow, even for novice bakers.
- Perfect for Gatherings: This cake serves up to 10 people, making it a great dessert option for parties, barbecues, or family gatherings.
- Customizable: Feel free to experiment with different fruits or toppings to make this ice cream cake your own!
Ingredients
Main Ingredients
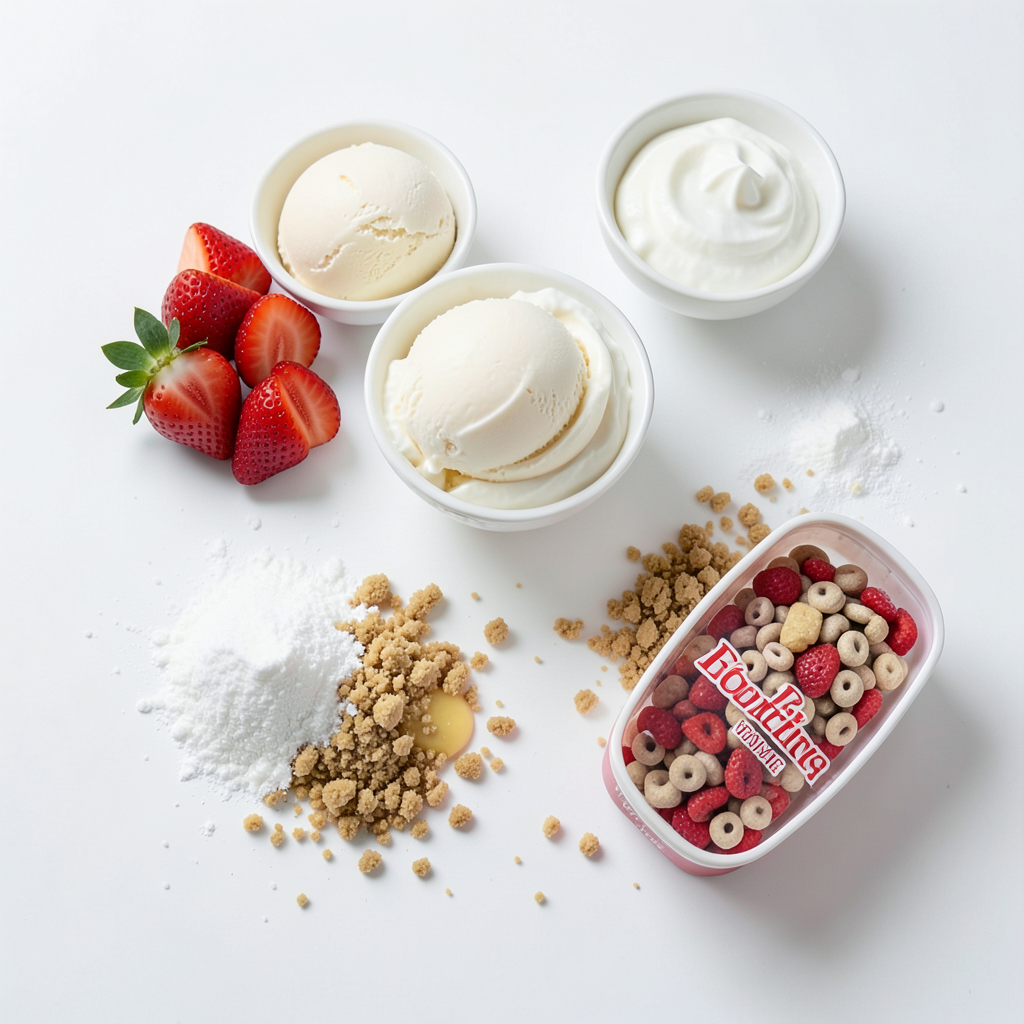
To make a delicious Strawberry Crunch Ice Cream Cake, you'll need:
- 1 box of vanilla ice cream (1.5 quart), softened
- 1 pint of fresh strawberries, hulled and sliced
- 1 cup of heavy whipping cream
- 1/2 cup powdered sugar
- 1 teaspoon vanilla extract
- 2 cups strawberry-flavored cereal (like Strawberry Treasures)
- 1 cup graham cracker crumbs
- 1/4 cup unsalted butter, melted
These ingredients create a sweet and creamy cake that everyone loves.
Optional Ingredients
You can add a few extra touches to enhance your cake:
- Fresh mint leaves for garnish
- Extra strawberries for serving
These optional ingredients can make your cake look even more inviting.
Recommended Tools
To successfully make this cake, gather these tools:
- A 9-inch springform pan
- Mixing bowls
- A hand mixer or stand mixer
- A spatula
- Plastic wrap or aluminum foil
Having these tools ready will help make your baking easier.
Step-by-Step Instructions
Preparing the Oreo Crust
To start, gather your ingredients for the crust. You need strawberry-flavored cereal and graham cracker crumbs. In a bowl, mix 2 cups of cereal with 1 cup of crumbs. Pour in 1/4 cup of melted unsalted butter. Stir until all crumbs are coated. Press this mixture firmly into the bottom of a 9-inch springform pan. Make sure it is even and compact. Freeze the crust for about 15-20 minutes until it sets.
Whipping the Cream
Next, we whip the cream. In a mixing bowl, add 1 cup of heavy whipping cream. Beat it until soft peaks form. This means the cream will hold its shape but still droop a bit. Gradually add 1/2 cup of powdered sugar and 1 teaspoon of vanilla extract. Keep whipping until stiff peaks form. The cream should be thick and fluffy. Set it aside for later.
Layering the Cake
Now, we layer the cake. Remove the crust from the freezer. Take your softened 1.5-quart box of vanilla ice cream. Spread half of the ice cream evenly over the crust. Next, add a layer of sliced strawberries on top. Then, take your whipped cream and spread half over the strawberries. Smooth it out gently. Repeat these layers. Add the remaining ice cream and another layer of strawberries. Finally, top with the rest of the whipped cream. Make sure it is smooth. Cover the cake with plastic wrap or foil, and freeze for at least 4-6 hours. This step makes it firm and ready to serve.
Tips & Tricks
Achieving the Best Texture
To get a great texture, focus on your layers. The ice cream should be soft but not melted. When you spread it, make sure to use a spatula for even layers. The whipped cream must be whipped to stiff peaks. This keeps it fluffy and light. If you want more crunch, add extra cereal to the crust. Mixing in a bit more graham cracker crumbs helps too.
Serving Suggestions
This cake is a hit at parties. Serve it with fresh strawberries on the side. It pairs well with whipped cream or chocolate sauce. For a fun twist, try drizzling some strawberry syrup on top. You can also serve it with ice cream scoops for extra delight. This cake is perfect for summer gatherings or birthdays.
Presentation Ideas
Make your cake look special! Use a springform pan for clean edges. Garnish the top with mint leaves for color. Add fresh strawberry slices around the base for a pop of color. For a family-style serve, slice it into wedges on a colorful plate. You can even add a sprinkle of extra cereal on top for a final touch.
Pro Tips
- Use Fresh Strawberries: For the best flavor and texture, opt for ripe, fresh strawberries. They add a burst of sweetness and color to your cake.
- Soften Ice Cream Properly: Allow the vanilla ice cream to soften at room temperature for about 15-20 minutes before spreading. This makes it easier to layer without melting the crust.
- Freeze Between Layers: If you're short on time, freeze the cake for about 30 minutes between layers to ensure each layer sets well before adding the next.
- Garnish for Presentation: A few fresh mint leaves and extra strawberry slices on top before serving not only looks appealing but also enhances the flavor profile.
Variations
Using Different Ice Cream Flavors
You can switch up the ice cream to make this cake your own. Instead of vanilla, try strawberry or even chocolate ice cream. Each choice adds a new twist to the flavor. For a fruity touch, mango or raspberry ice cream works well too. Just make sure to match the ice cream with your chosen toppings!
Alternative Toppings
Toppings bring fun and crunch! Instead of strawberry-flavored cereal, use crushed Oreos or chocolate cookies. You can also sprinkle chopped nuts for a nutty crunch. Fresh fruits like blueberries or bananas can add color and taste. Drizzle chocolate or caramel sauce on top for extra sweetness.
Gluten-Free Options
To make a gluten-free version, choose gluten-free graham crackers. You can also use gluten-free cookie crumbs for the crust. Always check labels on other ingredients too. This way, everyone can enjoy a slice of your delicious cake!
Storage Info
Freezing Instructions
You can freeze this cake easily. After you finish layering it, cover the cake. Use plastic wrap or aluminum foil to keep it airtight. This step helps keep the cake fresh. Freeze it for at least 4-6 hours. If you want to store it longer, it can stay in the freezer for up to 3 months.
Best Practices for Storing Leftovers
If you have leftovers, slice the cake first. Wrap each slice in plastic wrap. Place the slices in a resealable bag. This keeps them safe from freezer burn. For best taste, eat the leftover cake within a week.
Shelf Life of the Cake
The cake stays fresh in the freezer for about three months. If left in the fridge, it’s best eaten within 2-3 days. Keep in mind, the longer it sits, the softer it may get. Enjoy it while it’s still firm and tasty!
FAQs
How long does the Strawberry Crunch Ice Cream Cake last in the freezer?
The Strawberry Crunch Ice Cream Cake lasts about 2 to 3 weeks in the freezer. After that, it may lose its taste and texture. To keep it fresh, wrap it well in plastic wrap or foil. This helps protect it from freezer burn.
Can I make this cake ahead of time?
Yes, you can make this cake up to 2 days ahead of your event. Just store it in the freezer until you need it. This makes it a great option for parties or family gatherings. Preparing it early saves you time and stress on the day of the event.
What can I use instead of strawberry-flavored cereal?
If you can't find strawberry-flavored cereal, try using regular cereal and adding some freeze-dried strawberries. You can also use crushed cookies, like vanilla wafers or graham crackers, for a different flavor. These options will still give you a tasty crunch in your cake.
In this post, we covered how to make a Strawberry Crunch Ice Cream Cake. We explored the main and optional ingredients, along with the tools you need. The step-by-step instructions guide you from preparing the crust to layering the cake. We shared tips for the best texture and serving ideas. You can even try different ice cream flavors and toppings. Finally, we discussed storage methods and answered common questions. Creating this cake is fun and easy. Now, it's time for you to enjoy making it and tasting the sweet results!